Welcome to Handmade Hero! This is a series where we program an entire game, from scratch, explaining each and every little piece that goes into creating games along the way.
Additionally, if you preorder Handmade Hero, you will receive access to the GitHub repository, containing complete source code (tagged day-by-day) as well as community ports to other platforms. If you get stuck somewhere during this course, be sure to check it out!
Keep in mind that everything we're going to show you in this course is only one way of programming a game. In this course, we will present you how Casey makes games, so that you can see one complete way of doing it. You are encouraged however to develop your own styles and techniques, and experiment with trying different things and see what works the best for you.
No prior knowledge of programming is required to start following along. The only thing that will help you along the way is the basic knowledge of Windows, the insides of a computer on a basic level (what's a CPU, Graphics card, Memory, Motherboard). Knowledge about that binary number system, that a byte is 8 bits and that a kilobyte is 1024 bytes, as well as the basics of color theory (RGB) would definitely help as well.
(Top)
1 Start the Project
1.1 Set Up the Compiler
1.2 Command Line in Windows
1.3 Set Up the Text Editor
1.3.1 4coder Setup
1.3.2 VSCode Setup
2 Create the First Code File
2.1 Minimum Code You Will Need
3 Configure Everything for Development
3.1 Set Up Environment Variables
3.2 Build.bat
4 Debugging in RemedyBG or Visual Studio
4.1 Set Up RemedyBG
4.2 Set Up Visual Studio Debugger
4.3 Debugging Your Program
4.4 Call Stack
5 Add Something to Do for the Program
5.1 Import a Library
6 Recap
7 Exercises
7.1 A Different Message Box
7.2 Respawning Message Boxes
8 Basics of Programming
8.1 Entry Point on Windows
8.2 Bitwise Operators
9 Side Considerations
9.1 Create a Virtual Drive
10 Navigation
Start the Project
The first thing we're going to do is to get a simple project started. We do it by setting up all our tools and by building something to ensure that our tools are working properly. While it may be a bit of drudgework, it's a vital step to ensure that, when moving forward, the project can be continued successfully without any interruptions.
To program our game, for the starters we will only need the following tools:
- A tool allowing to edit our code.
- Another tool that allows us to compile our code and produce executable (.exe) files.
These tools, as well as few more advanced tools will be the focus of this Day.
Set Up the Compiler
A compiler is something that takes the source code that you type, and it translates it into what's called “an object file”.
The role of the linker then is then to gather all of the (usually) independently compiled object files and compose (link) them together it into an executable file.
Compiling and linking are two different stages of producing executable file from the source code. We will learn about compilers and linkers in the following sections and chapters.
This course assumes you follow along on a machine with x86 (preferably one with 64-bit support) processor running Windows 7, 8 or Windows 10.
We will use the Microsoft Visual C++ compiler, or MSVC. MSVC is part of Visual Studio IDE (Integrated Development Environment). You can download the free Community Edition at visualstudio.microsoft.com and follow the installation instructions:
- Run
vs_community.exefile that will be downloaded after the prompt. - Accept the terms and conditions.
- Wait for the installer setup to complete.
- In the
Workloadssection, select onlyDesktop development with C++ - You can further reduce total space required by leaving only the following tools (
###stands for current version number of the tools):- MSVC v
###- VS 2019 C++ x64/x86 build tools - C++/CLI support for v
### - Windows 10 SDK (highest version available)
- IntelliCode (If you are planning on using Visual Studio as your text editor)
- MSVC v
- After that, the development tools will be installed
Although in practice this does not reduce space by too much. In total that still weighs a few gigabytes.
Once you are done, you can quickly test if everything was installed correctly by searching for “Visual Studio 2019" in your Start menu. You will be greeted with the Visual Studio IDE:

This tool may be used to write, compile and debug the code. Feel free to use Visual Studio editor tools to develop your code, though this course will use a different route and show how to use the compiler, text editor and debugger separately.
Other than that, depending on your choice of debugger (see Subsection 4), you might only access this IDE for debugging purposes.
We will compile our code using Command Line Interface (CLI) for MSVC.
Command Line in Windows
In 2020 world, the command line is getting somewhat of a comeback on Windows. Still, while on Linux the command line is omnipresent, it's still possible that you have used Windows without ever accessing it.
To open a command line, simply search in your Windows Start Menu for Command Prompt. Alternatively you can hit Win+R and type cmd, or hit Win+X and then type C key.
When you open it, you will be presented with a simple text window:
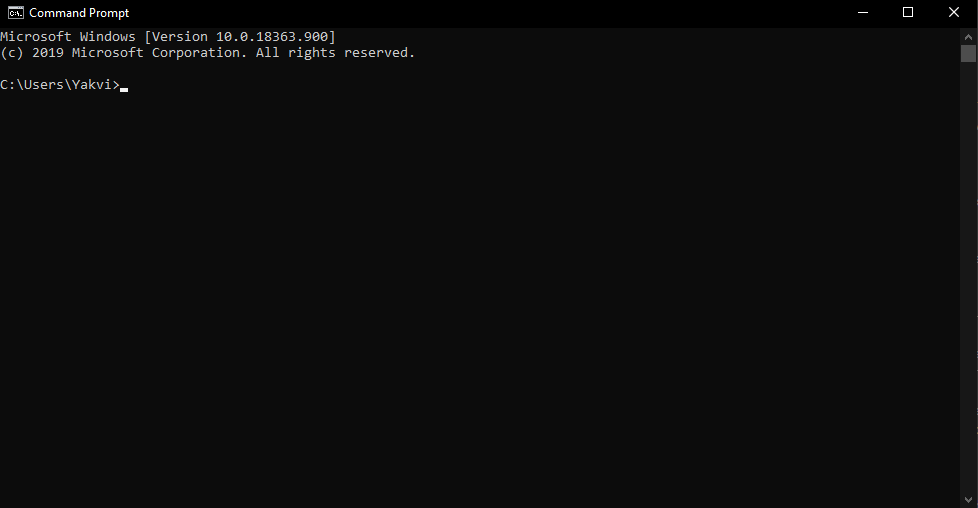
This text window allows you to have dialogue with your computer the old-fashioned way: with the text commands. For instance, typing dir command lists the contents of the current directory (shown as the path in the prompt), del [filename] deletes the specified file (be careful, it won't be put into the trash bin!), cd [path] changes the current directory to the one specified by path.
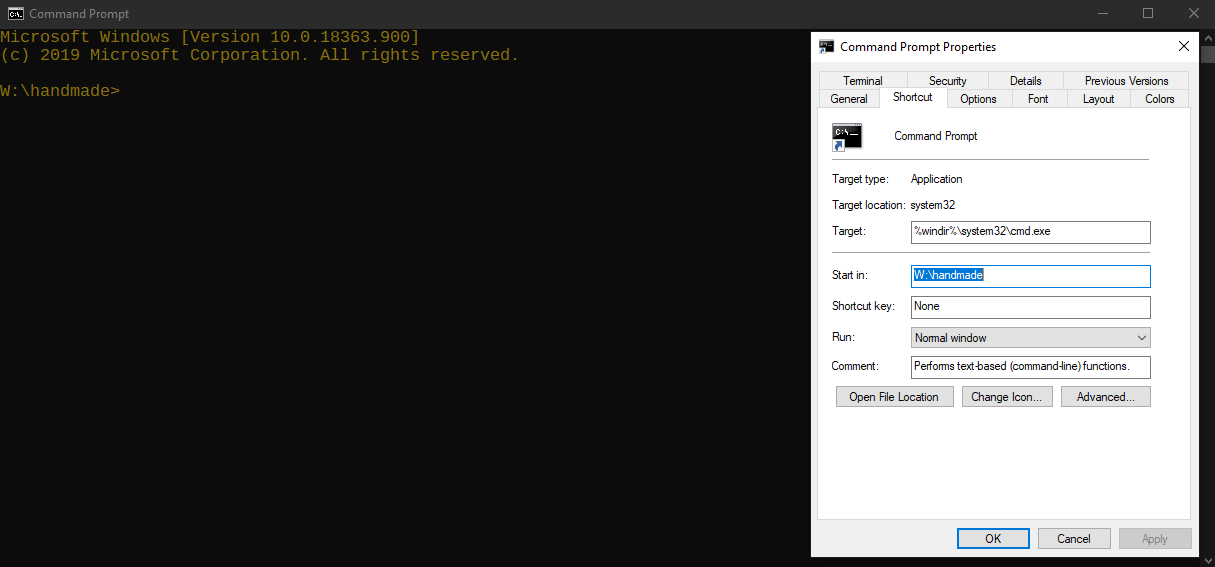
You might want to customize your Command Prompt font, colors, layout, etc. To do that, you would need to have Command Prompt shortcut saved somewhere, preferably on desktop. Close your Console window and create a shortcut to the Command Prompt. Open the Console through that shortcut.
Please note that, if you are using your default Windows 10 theme, you cannot Click and Drag the shortcut to copy it. Instead:
- Search for Command Prompt in the Start Menu
- Right-click on the shortcut →
Open File Location - In the Explorer window that opens, find the link to Command Prompt and copy it to desktop.
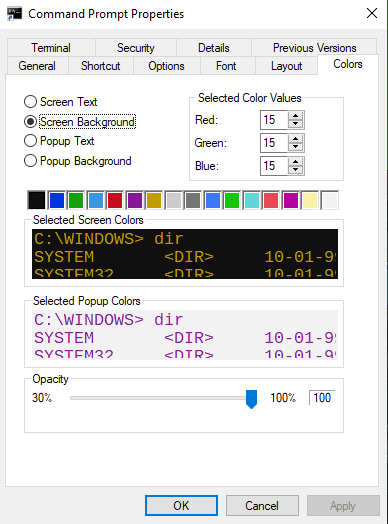
If you now right-click and select Properties window, you will be able to customize a world of settings. For instance, you can specify the starting location for your terminal. By default, it starts in your user folder, which isn't very helpful if you keep your codebase somewhere else.
To set up your starting location:
- Pick up a place where you will keep your codebase (for example,
D:\Documents\Codebase). - Open
Command Prompt Properties→Shortcuttab. - Specify the
Start inlocation to be your codebase location. - Navigate the other tabs to set up the color, font and layout options of your preference.
- After restarting your Command Prompt, it will start with the color scheme and in the location specified.
For your convenience, these are the preferences we're using:
Font: Liberation Mono (download the latest release and install the fonts in yourFontsfolder on Windows), size 18.Layout:- Window Width: 120.
- Window Height: 30.
Colors:- Screen Text: Red 140, Green 114, Blue 9
- Screen Background: Red 16, Green 16, Blue 16
As the first action in your new terminal, let's create a directory for our project!
As a refresher, Command Prompt works by processing commands. Any line you type into it is considered either a command, or a name of a file (either a program or a script). Each command is executed from a directory which is represented before the > symbol. The first word is the command, and then usually follow parameters that this command may or may not recognize.
For instance, if we type cd .. we send a command “Change Directory” with parameter .. (Two dots mean “Parent directory”).
If we type dir, we send the command “Show contents of the directory” with no parameters, the command will print the contents of a directory. The first parameter is the path of the directory to view contents of.
If your codebase is located on a different drive than the one you start in, you'll need to “switch” the drives first. This means typing the drive's letter followed by the colon (like D: if you want to switch to drive D). Below we assume that your codebase is located at the D:\Documents\Codebase.
C:\Users\Yakvi> D:
D:> cd d:\documents\codebase
D:\Documents\Codebase> mkdir handmade
D:\Documents\Codebase\> cd handmade
D:\Documents\Codebase\> _An extra thing that we'd like to touch regarding the Command Prompt is discussed in the Create a Virtual Drive subsection.
Set Up the Text Editor
To edit the source files, any text editor can do the job. Notepad on Windows, for example, is perfectly capable to do it. However, text editors created specifically for the purposes of source file editing come with a variety of additional features, such as automated formatting, code highlighting, smart completion, quick navigation, etc.
We will occasionally provide relevant tips on how to use the editor 4coder. In this section, we will provide some setup tips both for 4coder and Visual Studio Code (also know as VSCode), an alternative text editor developed by Microsoft.
One thing to note that, as a rule of the thumb, when selecting your editor you should carefully choose how much it gets in your way, and compare it versus the various quality of life improvements it offers. Perhaps, there's a way to replicate the improvements or at least mitigate the distractions?
4coder Setup
After you downloaded 4coder, you will get a zipped folder. Unzip it somewhere, for example to w:\apps. Now, you can open it by double-clicking 4ed.exe, and it will open with 4coder as its working directory.
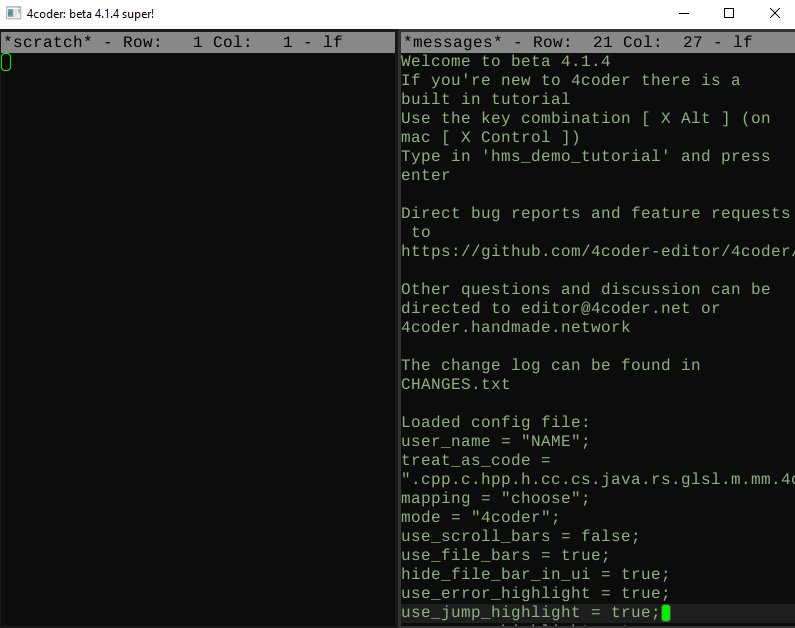
As the top message on the screenshot says, if you hit Alt-X shortcut and type in “demo”, you can select command hms_demo_tutorial. Follow this tutorial to get a hang of its main features.
Overall, Alt-X is the main command lister. For instance, if you would like to change the theme from theme-4coder to theme-handmade-hero, hit Alt-X, type in theme and choose the appropriate theme from the Theme lister.
If you'd like to change your default settings, open the config.4coder file (using the Interactive Open command or by hitting Ctrl-O shortcut), and default_theme_name to the theme of your choice. While you are here, check out other settings like mode or automatically_load_project. Hit Ctrl-S to save your changes.
If you want to start 4coder from your code directory, type the following command in the Command Line:
W:\handmade\code> w:\apps\4coder\4edYou can also add 4coder shortcut script, we'll look into it in Set Up Environment Variables subsection.
VSCode Setup
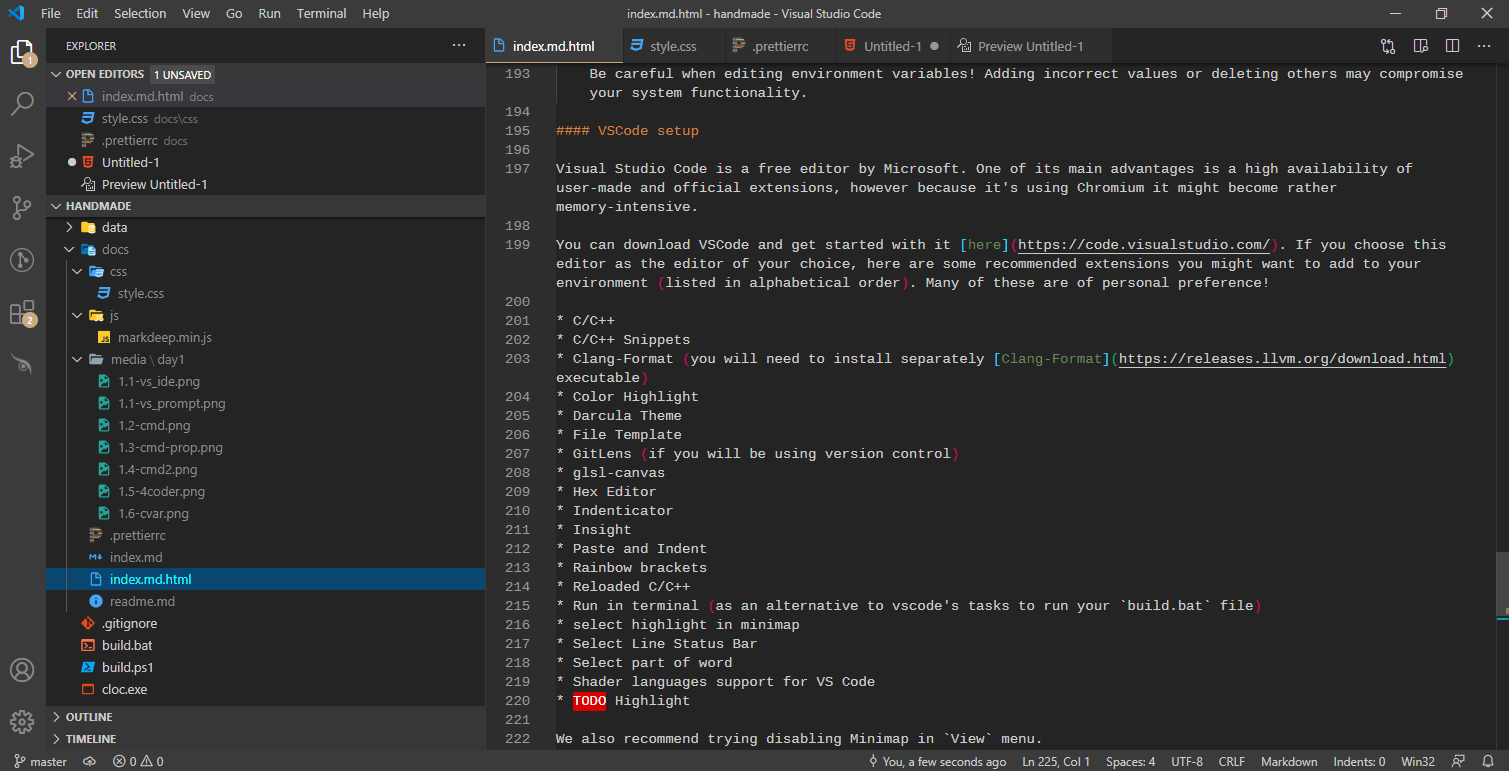
Visual Studio Code is a free editor by Microsoft. One of its main advantages is a high availability of user-made and official extensions, however because it's using Chromium it might become rather memory-intensive.
You can download VSCode and get started with it here. If you choose this editor as the editor of your choice, here are some recommended extensions you might want to add to your environment (listed in alphabetical order).
Keep in mind many of these are of personal preference!
- C/C++
- C/C++ Snippets
- Clang-Format (you will need to install separately Clang-Format executable)
- Color Highlight
- Darcula Theme
- File Template
- GitLens (if you will be using version control)
- glsl-canvas
- Hex Editor
- Indenticator
- Insight
- Paste and Indent
- Rainbow brackets
- Reloaded C/C++
- Run in terminal (as an alternative to vscode's tasks to run your
build.batfile) - select highlight in minimap
- Select Line Status Bar
- Select part of word
- Shader languages support for VS Code
- TODO Highlight
Overall, however, you might want ot disable anything else that would distract you from development: Minimap, Menu bar, Side bar and the terminal (when you aren't using them).
You can also enable autosaving by clicking File → AutoSave. Default is autosave after 1 second of inactivity, but you can change autosave options in the preferences.
If you're using IntelliSense, you might want to consider to tinker with you C/C++ Configurations:
- Press
F1and type the option “C/C++ Configurations” (you can choose UI or JSON) - As
Include path(includePathin JSON) set yourcodefolder:${workspaceFolder}/code/**
We're peeking a bit in the future, but you might want to also force include your platform .cpp file by adding its full path to the forcedInclude list.
If you would like to use Visual Studio as your editor, you can follow the guide outlined here: Setting up project in Visual Studio
Create the First Code File
Once we have our compiler and text editor at the ready, we can launch the latter and make a simple single C++ source file that we use to actually get our build going.
- Launch your text editor.
- We need a folder where all our code would live. Create a folder called
codeinside yourhandmadedirectory. You can use the following command line prompt:
W:\handmade> mkdir code
W:\handmade> cd code
D:\Documents\Codebase\> _code folder
- Create a new text file and save it as
win32_handmade.cppinside yourcodefolder.
Ctrl-N and typing their names.Minimum Code You Will Need
In this file we're going to do absolutely nothing (yet). We're going to insert just the entry point for Windows. Where to learn more about this? Whenever you're programming on Windows, you might want to always check out a website called MSDN (now also known as Microsoft Docs). It is the documentation of everything that is on Windows.
Much of the Windows core functionality has fallen into obscurity or obfuscated by the newer API. Additionally, while this newer API is actively pushed by Microsoft and many developers, this might not be something you actively need in game development. So searching for the minutia of the programming API on Windows might become complex. The MSDN is huge, and it's hard to find your way around. So one reason this course exists is exactly to help finding the correct (or some of the correct) calls and articles. Hopefully this series will become a backbone that would show you want to search for.
However, even if we will present the direct links to many of the articles, this doesn't mean that you should learn how to use MSDN. If you want to program on Windows, you'll need to learn to navigate this website, read these pages and understand what they say in order to fully understand everything that's going on.
If we search for WinMain, which is the entry point for Windows, you will quickly find the related article. WinMain is the entry point that Windows will be looking for in our program1, everything starts from here. Its syntax is specified at the top of its MSDN article we provided above:
int CALLBACK WinMain(
  HINSTANCE hInstance,
  HINSTANCE hPrevInstance,
  LPSTR     lpCmdLine,
  int       nShowCmd
);
This is the part we copy and paste in our win32_handmade.cpp file. We will also include the file windows.h, which is the header file on Windows containing many of the function definitions that we will need to call in order to get our job done.
#include <windows.h>

int CALLBACK
WinMain (HINSTANCE hInstance,
         HINSTANCE hPrevInstance,
         LPSTR     lpCmdLine,
         int       nShowCmd)
{
}We assume that the reader has a basic knowledge of reading C code. If not, you can watch the short series Intro to C to get you started. To recap, what happens is that we're including a header file, the definitions of functions we can call and types we can use that Windows wants us to use in order to communicate with us. And lower below is the entry point where Windows pass us some parameters:
HINSTANCE hInstance: Handle to our executable.HINSTANCE hPrevInstance: At this point, this is legacy, so the value passed is always 0.LPSTR lpCmdLine: A C string describing how the command line was set when we ran the program.int nCmdShow: A sort of a weird one of the bunch2.
We aren't going to do anything in here, other than returning 0. In WinMain, this stands for “everything ran smoothly, we're done here”.
int CALLBACK
WinMain (HINSTANCE hInstance,
         HINSTANCE hPrevInstance,
         LPSTR     lpCmdLine,
         int       nShowCmd)
{ return (0);}Configure Everything for Development
We'll leave our source file as a stub, because we need to get this building and executing as it is. Before we can do that however, we need to do some final preparations.
Set Up Environment Variables
To compile, we're going to call Visual Studio, that we installed earlier (see Set Up the Compiler subsection), or rather its command cl. Unfortunately, even after you've installed Visual Studio you will get an error:
W:\handmade> cl'cl' is not recognized as an internal or external command,
operable program or batch file.
The reason for it is that every command is being looked up in the system Path. If we type cl we can't find it because it's not in the Path. The basic way of doing it would be running a particular script that will set up our command line for us.
The file we're looking for is called vcvars64.bat. It's located deep inside the Visual Studio install folder. In Windows Explorer, head over to your Program Files (x86), find the folder Microsoft Visual Studio, and then go down until you find folders VC → Auxiliary → Build.
For Visual Studio 2019 Community edition, this path would therefore be C:\Program Files (x86)\Microsoft Visual Studio\2019\Community\VC\Auxiliary\Build\vcvars64.bat.
You can easily find a reference to it if you search for x64 Native Tools Command Prompt for VS 2019 in your Start Menu. Right click the link in the menu → Open File Location → Right click on the file → Properties, and copy the address in quotes in the “Target” window.
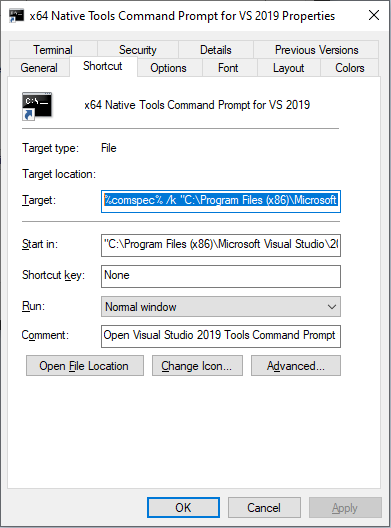
The reason Visual Studio is in Program Files (x86) folder (instead of simply Program Files) is a historical accident. When Windows was running only in 32-bit on x86 processors, there was a push from Intel to go to a new processor line called Itanium, based on a proprietary 64-bit architecture. Meanwhile, due to the licensing limitation AMD stayed with x86. They started developing their own version of x64 architecture though, to stay competitive.
At the end, the Itanium project didn't pan out at all, even if it was championed by Intel. Nobody wanted to go to a completely new architecture and switch to this whole new thing so that didn't work out. It was AMD's architecture, a version of x86 upgraded to handle 64 bit (while being able to run the x86 code just fine) that was endorsed and adopted.
Also it was at that time that the 64-bit versions of Windows started to get published. We'll talk a bit more about the differences between 32-bit and 64-bit CPUs later in this course when it becomes more relevant. What happened also at that time however, probably due to an attempt to keep the legacy programs running, was Microsoft's decision to make two separate Program Files directories: programs that are compiled to run under the 32-bit version of Windows end up installed in Program Files (x86) one, while the programs compiled under the 64-bit version go into Program Files.
As for Visual Studio, as of 2020 it still hasn't been updated to run on 64-bit computers.
So now, if you run the vcvars64.bat in your Command Prompt you will see the following message:
W:\handmade>"C:\Program Files (x86)\Microsoft Visual Studio\2019\Community\VC\Auxiliary\Build\vcvars64.bat"**********************************************************************
** Visual Studio 2019 Developer Command Prompt v##.#.##
** Copyright (c) 2019 Microsoft Corporation
**********************************************************************
[vcvarsall.bat] Environment initialized for: 'x64'

W:\handmade> _
vcvarsall.bat message. What vcvars64 does is simply calling vcvarsall and asking it to set up dev environment in 64-bit mode.
You can call vcvarsall.bat directly by replacing "PATH_TO_VISUAL_STUDIO\vcvars64.bat" with "PATH_TO_VISUAL_STUDIO\vcvarsall.bat" x64.
Note also that the “x64" part should go outside of the quotes.
So now, if you run cl in your Command Line, you will see a different message:
W:\handmade>clMicrosoft (R) C/C++ Optimizing Compiler Version ##.#.##### for x64
Copyright (C) Microsoft Corporation.  All rights reserved.

usage: cl [ option... ] filename... [ /link linkoption... ]

W:\handmade> _cl now works correctly.Be mindful that this command must be run each time you restart your Command Prompt. In order to avoid doing it manually, you can set it up to run automatically:
- Create a new batch file named
shell.bat, open it in any text editor. You can save the file in a directory called “misc” inside your project. - Insert the following code:
@echo off

call "PATH_TO_VISUAL_STUDIO\vcvarsall.bat" x64
@echo off: a command to not display all the lines as they are getting executed.@symbol means that this line is included (so that your script won't print “echo off”, either).callcommand is required to call a batch file from another batch file.
- Save the file and exit.
- Open
Propertiesto your shortcut to the Command Prompt. - In the
Target, add the line/k "[path to your shell.bat file]"
Upon restart of the Command Prompt, you should be greeted with the vcvars initialization messages.
You can go even one step further and expand your Path to include the misc directory, so that each time the system looks up a command it checks in there, as well.
@echo off

call "PATH_TO_VISUAL_STUDIO\vcvarsall.bat" x64set path=w:\handmade\misc;%path%
If you use 4coder, you can now add a shortcut 4ed.bat file inside your misc folder, containing the path to your editor:
@echo off

start [PATH_TO_4CODER]\4ed
The start command allows you to return to the Command Line without having to wait for 4coder to exit.
Now you can simply run the 4coder by typing in 4ed!
Last, you can add a command cls so that the screen is cleared after the environment has been set for us:
@echo off

call "PATH_TO_VISUAL_STUDIO/vcvarsall.bat" x64
set path=w:/handmade/misc;%path%clsRemember to restart your terminal for the changes to apply!
Build.bat
If you got this far, congratulations! That is the drudgework of setting up a machine to actually develop on. We can now start our dev environment with a double-click on an icon, and we can run our editor, compiler and debugger from here. This is some great progress right there.
So anyway, if you can call cl from your command line, we can build an executable. That is mostly all we need. Let's get to compiling.
Here is how we are going to do the builds. It is highly unusual way3 in a world where the builds take complex make files.
In the root folder of our project (i.e. handmade), we will create a file named build.bat. A .bat (batch) file is a script, a list of things that the command line should do.
What other programmers do is setting up a so-called “Make system” using a tool like GNU Make, Ninja, CMake, etc4.
The reason why it's unusual is because people are used to the fact that compiling all the code takes a long time. The whole point of a make file is that you only compile that code that changed, and that's what these build utilities do: they try to optimize things so that they only do the minimal amount of work necessary to rebuild the project. And when projects tend to get very large, they tend to be very slow. But, as it turns out, if you just code sanely, you can compile very large programs (certainly larger than it would take to make a full professional game on this stream) in only a few seconds.
So, in our course, there're no build tools. There's only a batch file, that's all there is. And this batch file compiles the code. Compiles all the code, every time.
In conclusion, what we're going to do is to make the build.bat file:
@echo off

cl code\win32_handmade.cpp
We would take the source file we created in Subsection 2.1 and build it. This would be enough. However, we don't want to build it where it is right now, inside code directory. The compilation creates many secondary files which quickly mess up the code directory. Instead, we want the build output to go in a separate folder, let's call it build, to keep our source directory clean. For this, we will “virtually change” the folder using commands pushd and popd. Unlike the cd command, pushd remembers the original directory it switched from, so that popd can return to it once we're done.
We will also create a build directory if it doesn't exist already (using the command mkdir). The build directory will be living in handmade directory, so one step higher than the folder we're currently in (code), so we'll need to navigate “up” using the `..\` pseudo-directory.
@echo offmkdir build
pushd build
cl ..\code\win32_handmade.cpp

popd
So now, if you run the build.bat script and dir the build directory, you'll see your executable!
W:\handmade> buildMicrosoft (R) C/C++ Optimizing Compiler Version XX.XX.XXXXX for x64
Copyright (C) Microsoft Corporation.  All rights reserved.

win32_handmade.cpp
Microsoft (R) Incremental Linker Version XX.XX.XXXXX.0
Copyright (C) Microsoft Corporation.  All rights reserved.

/out:win32_handmade.exe
win32_handmade.obj

W:\handmade>dir build
 Directory of W:\handmade\build

    <dir>          .
    <dir>          ..
            89,600 win32_handmade.exe
               650 win32_handmade.obj
        2 File(s)         90,250 bytes

W:\handmade> _
Now you may ask: where does all the complicated build stuff come in? The answer is there isn't going to be any. The only additional thing is that we will start putting on the cl line additional things which are options to the compiler. Because the compiler has a lot of options, and we're going to specify how the compiler produces the executable. For instance, we can set already the -Zi flag (option) that, after rebuilding, would allow us to step into our code.
cl -Zi ..\code\win32_handmade.cpp
/ instead of - (i.e. /Zi instead of -Zi). These are interchangeable on Windows, so use whichever you prefer.
In 4coder, you can now setup your project so that each time you resume your coding session, you can pick up the code from where you left it. Simply hit the command setup_new_project and follow the instructions:
Alt-X → setup_new_project
- Build Target: code/win32_handmade.cpp
- Output Directory: build
- Output: win32_handmade.exe
automatically_load_project in the config.4coder set to true, the editor will automatically load your project on your next session.
To quickly build in 4coder, simply press Alt-M shortcut or F1 if you loaded your project. Alt-Comma closes the compile window.
Debugging in RemedyBG or Visual Studio
We now have a working Win32 program build by the Command Line using our own batch file. If we now want to step into that, we should start the debugger.
Set Up RemedyBG
We now need to set up the program through which we will be analyzing and debugging our code while it's running, i.e. a debugger. (Debugging is just a fancy word for “hunting for own mistakes”).
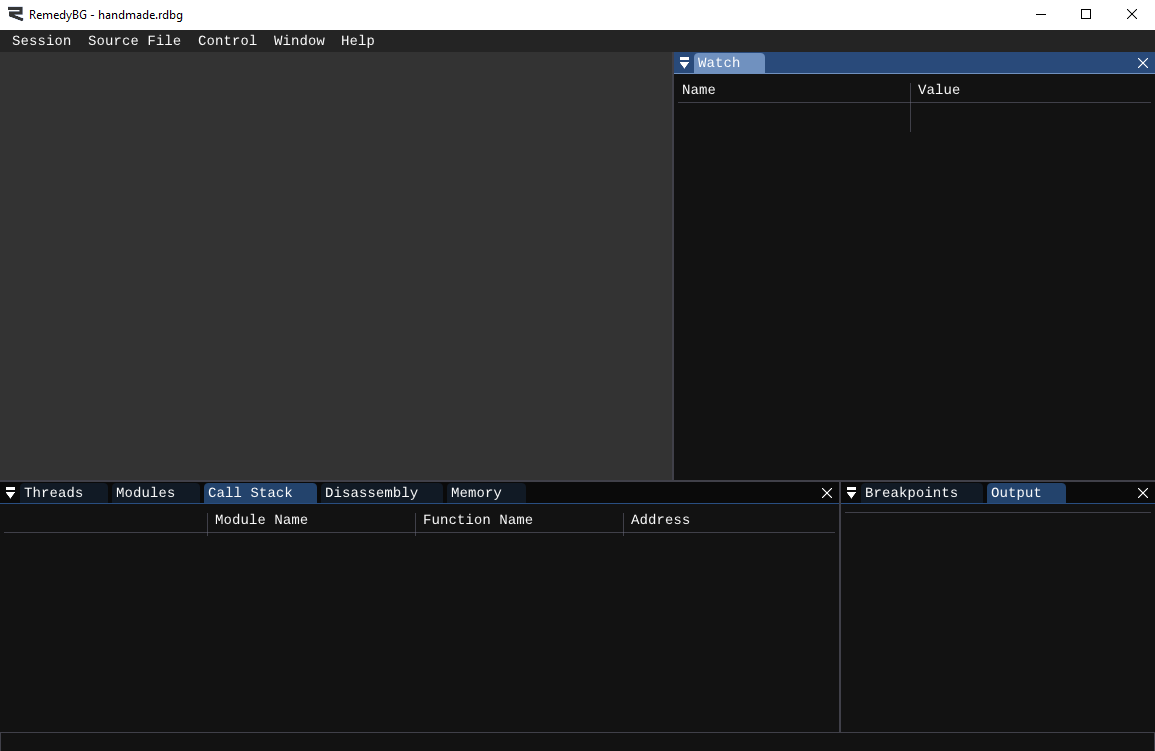
Visual Studio provides a debugger out of the box, and it's fine. Visual Studio itself is slow to boot and, overall is pretty gargantuan. For a nice sleek debugging experience, we recommend a debugger called RemedyBG. While still in development, this program already matches all of the essential functionality from Visual Studio.
Once you downloaded the latest version, unzip it somewhere on your hard drive.
Let's make a build.bat file in your misc directory to run it.
@echo off

start [PATH_TO_REMEDYBG]\RemedyBG build\win32_handmade.exeYou'll need to set where are we running the program from. In any relatively low-level piece of code there's a so-called “Current Working Directory”, from which the program was launched. Everything that you do when you reference external files in your code (like loading files) you should use with a relative path, relative specifically to Current Working Directory. In short, it's a path which is important for us to set from the get-go, so that we always reference things correctly.
In order to set ourselves for success, let's make a directory called data in the root handmade directory. In this directory, all the packaged assets (art, sounds, etc.) will live. Then, in RemedyBG, in the menu Session -> Working Directory, change it to W:\Handmade\Data.

Additionally, save your session so your settings are preserved, click Session -> Save as... and save it as misc/handmade.rdbg. You then can modify the debug.bat so that this session is loaded automatically.
@echo off
start [PATH_TO_REMEDY_BG_FOLDER]\RemedyBG misc\handmade.rdbgSet Up Visual Studio Debugger
If you aren't interested in trying out RemedyBG just yet, you can instead use debug.bat to start Visual Studio debugger:
@echo off

devenv build\win32_handmade.exe
If you run debug from your command prompt now, Visual studio will load a dummy solution. You can then right-click on the win32_handmade in Solution Explorer → Properties to change your Working Directory to w:\handmade\data. Click File → Save win32_handmade to save your solution as handmade.sln in misc folder, then modify your debug.bat file to load the solution directly.
Save As... dialog popping up, simply close the window. Visual Studio will ask you if you want to save your solution. Say yes, and save it.@echo off
start devenv misc\handmade.sln
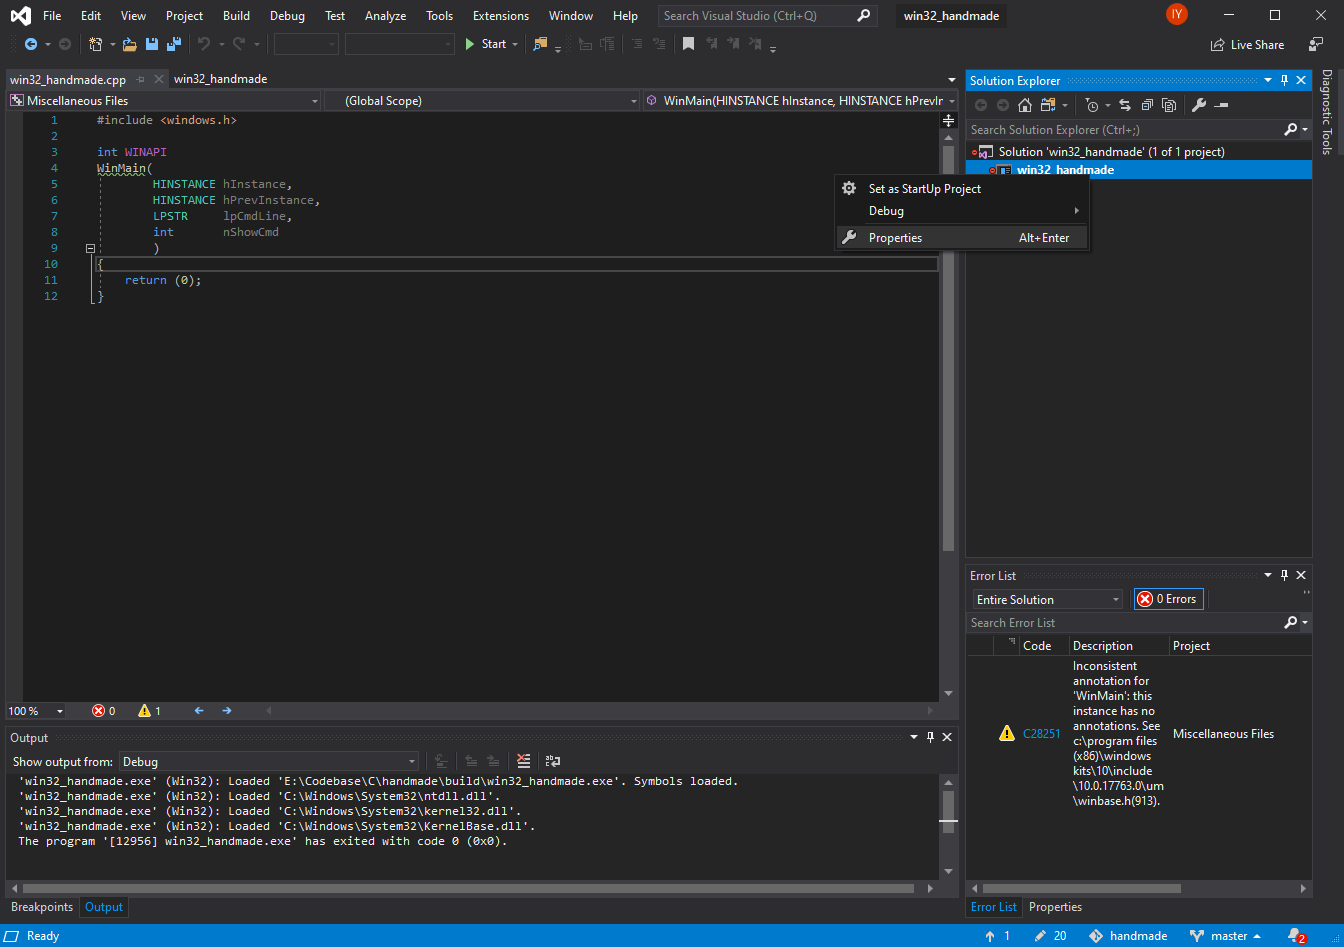
handmade.sln in your text editor. Change StartingDirectory value to W:\handmade\data and save the file.
This is one of the reasons why you should try out RemedyBG. ;)
Debugging Your Program
Since we specified our working directory to be Data, you should create this folder before we get going. Place it inside your handmade directory.
Once you completed your setup, while in the debugger, hit F11 on your keyboard or Control -> Step Into (Line) (RemedyBG) / Debug -> Step Into (Visual Studio). You will see your source file appear on the screen, and a yellow arrow indicating the start of your WinMain function body. This arrow represents your current position in the program execution. If you hit F11 a couple more times, it will go out of the program and into the disassembly (This is C runtime wrapping up your program exit). Hit Shift-F5 to stop the debug process.

Call Stack
The debugger can display a number of useful windows that you should know about:
- Call Stack
- Watch
- Output
- Breakpoints
- Threads
- Disassembly
- Memory
And many, many more that might or might not be that useful. These are available in the Window menu of RemedyBG or in Debug → Window during a debug session on Visual Studio. We will touch on them at the various stages of this book. For now, let's look at the Call Stack.
Start a new debug session (hit F11 again) and open the Call Stack. You will see an entire “train” of functions that called each other until we arrived to the current point (if you don't see the full stack in Visual Studio, right click your call stack and select Show External Code).
| Module name | Function Name | Address |
|---|---|---|
win32_handmade.exe | int WinMain(...) | ... |
win32_handmade.exe | __scrt_common_main_seh() | ... |
kernel32.dll | ... | |
ntdll.dll | ... |
The call stack is read from bottom up (most recent call at the top). ntdll.dll and kernel32.dll are the actual operating system. We are going to talk about what generally dlls are later, so let's skip those. But then the operating system calls into win32_handmade.exe, not into the WinMain we defined, but into __scrt_common_main_seh().
In conclusion, if we really want to see where the code starts when Windows calls us, this is where the code starts. There's a list of things that happen first, that we did not write, to set up a bunch of things (which we really aren't going to use).
Add Something to Do for the Program
Let's have some fun. We worked so hard for this lesson, so let's just make something functional: a message box! This will also serve us as a test that our program is running properly.
In order to pop up a message box, we call the Windows function MessageBox. Let's open the link to see its syntax and copy paste in our program. Make sure to paste it inside the curly braces of your WinMain but before the return!
    int MessageBox(
      HWND    hWnd,
      LPCTSTR lpText,
      LPCTSTR lpCaption,
      UINT    uType
    );    return (0);
int at the beginning is its return type. We don't care about this function's return value right now so we should remove it.
int before MessageBox, you will get the error C2440: 'initializing': cannot convert from 'initializer list' to 'int'!Then, this function takes the following parameters:
HWND hWnd: a handle to a window. We don't have one yet, so we just pass 05.LPCTSTR lpText: a C string to display inside the message box. Don't forget the Double quotes for a C string! (")LPCTSTR lpCaption: a C string to serve as the message box title.UINT uType: one of the predefined values as outlined further down the page. This determines how the message box looks and what it does. We will use a mix of values by bitwise OR combining information icon with the OK button.- While bitwise operators are a staple in programming, they are a bit of an advanced topic. For now, suffice to say that we want our message box to contain an Information Icon and an OK button, and we tell it by writing
MB_ICONINFORMATION | MB_OK. Read more about the Bitwise Operators in Subsection 8.2.
- While bitwise operators are a staple in programming, they are a bit of an advanced topic. For now, suffice to say that we want our message box to contain an Information Icon and an OK button, and we tell it by writing
Combining all these things together and putting them on one line, we get our Message Box call:
    MessageBox(0,
               "This is Handmade Hero.",
               "Handmade Hero",
               MB_ICONINFORMATION | MB_OK
); return (0);We can even go further and compress it on one line:
MessageBox(0, "This is Handmade Hero.", "Handmade Hero", MB_ICONINFORMATION | MB_OK); return (0);Import a Library
Now, if you try to compile now, the compilation will go fine, but you will be immediately halted by the linker which is called right after the complier:
/out:win32_handmade.exe
/debug
win32_handmade.obj
win32_handmade.obj : error LNK2019: unresolved external symbol __imp_MessageBoxA referenced in function WinMain
win32_handmade.exe : fatal error LNK1120: 1 unresolved externalsLet's look at the bottom two lines.
The compilation result is recapped by the fatal error LNK1120: there was 1 “unresolved external”, which is further clarified in the error LNK2019: we're missing one symbol __imp_messageBoxA. What does this mean?
During the compilation, the compiler (and the linker) only knows about the files that we specify in the cl line of our build.bat. In our previous compilation everything went smoothly:
- Compiler built the
.cppfile and produced the.objfile - Linker linked the
.objfile together and produced the.exefile
In this case, the linker went to look for the function MessageBoxA declared in windows.h but not defined, and didn't find it.
However, there's something else that happens under the hood: we need to bind with (running) Windows at runtime, we can't just have its functions defined in our code. So the linker needs to find the places where we call Windows and patch those references with the Windows' own code that's running at that time in memory. In order to that, we need to use what's called an Import Library (not to be confused with the normal libraries, also .lib). This library will do just that: it will put some markers in our code that, upon its loading, will be found by Windows and pointed to the actual functions running in memory.
We were able to link successfully beforehand, because there're a one implicit library that is imported together with the CRT (kernel32.lib). However if we try, for example, to call into the UI system to draw our message box, we need to let the linker know about a new library (user32.lib) to import.
To recap, when the linker combines all the .obj files and makes an executable, we should add an import library for the runtime functions that we use. Let's do just that:
cl -Zi ..\code\win32_handmade.cpp user32.lib
A and W suffixes in Windows functions
Note that the function linker was looking for is MessageBoxA, while we called for MessageBox. This is because in Windows, any function that takes a string as input has an ANSI and a Wide (Unicode) version, and a macro decides which function to call. By default, the ANSI mode is enabled, but you can short-circuit this and call the version you prefer directly:
MessageBoxA(0, "This is Handmade Hero.", "Handmade Hero", MB_ICONINFORMATION | MB_OK);Recap
And there you have it! Today, we covered a lot of ground: set up our tools for writing, building and debugging our program, our dev environment, compiled our first program, and even dived a bit into the intricacies of the compiler and linker! Tomorrow, we will start laying down the groundwork to open our window and display something on the screen.

run dropdown list with a few options like “Normal Window”, “Minimized”, “Maximized”. This is what's passed in nCmdShow. It's bizarre that Windows developers decided to pass it on together with the WinMain, and not through some function call.
NUL or nullptr. Feel free to use your preferred null identifier.
Exercises
Before we move on, make sure you are comfortable with all this. If you made mistakes and learned from them, it's even better! It's practice, trial and error which will solidify all these notions in you, so that by the end of the day you'll just know it.
Below we're proposing a few exercises but feel free to think about something different! This is your world, and you're the creator.
A Different Message Box
Instead of using MB_ICONINFORMATION | MB_OK flags, try to put a different set of flags to your MessageBoxA. Change a message. See what happens if you have more than one button and you click one.
Respawning Message Boxes
Use the return of MessageBoxA to potentially spawn more message boxes. Spam yourself.
Basics of Programming
In this section, we will be detailing some of important programming concepts that we will encounter along the way. Some of these will be general programming, some C-specific, and others might be even more specific than that.
Entry Point on Windows
WinMain is an entry point for windows applications. An entry point is a function that gets called, executes the code inside it, and returns to whoever called it.
But who called us in the first place? It's not actually the operating system that called us. "C Runtime Library” (CRT) was the one who's responsible for calling us. CRT is something that ships with all the C compilers, as mandated by the C specification (for Windows, you can find documentation on MSDN). In turn, the CRT was called by Windows.
It is possible to disable the CRT library to get called by the operating system directly. This can have positive effect on the size of your binary and the number of dependencies. However removing CRT is not simple, because compiler accounts on CRT for many things in our code. If you are interested to learn more, check out this discussion on Handmade Network.
Bitwise Operators
Bitwise operators are operators that have a specific action on single bits inside the value. Of these Bitwise OR operator (single vertical bar, |) is a bitwise operator which checks if each bit of two values is set. The resulting number will have all corresponding bits set.
In this case, bitwise OR is used in uType as a way of setting flags in a bit field, where each bit means a specific thing. by “ORing” the different bits together, you can have multiple things happening at once (in our case, we want the OK button to appear, as well as the information icon).
As you can see from the definitions in the Parameters section, MB_ICONINFORMATION is a label for “hexadecimal 40" (i.e. binary 0100 0000), while MB_OK is a label for 0. We still want to specify it to avoid confusion, should we decide to replace it with, for example, OK and Cancel button set (MB_OKCANCEL, 1).
This is a valid solution to a problem where the output is configurable. Depending on the situation, a similar solution might be achieved by:
- A list of booleans to pass as separate parameters
- A config struct
- Multiple separate functions each doing its own thing
- Etc.
(back to Section 5)
Side Considerations
In this section, we will be showcasing additional things you might want to do to make your life easier, and to follow more closely our own way of doing things.
Create a Virtual Drive
One command to note is subst. This command can be used to assign a drive letter (like Z:) to a path on a hard drive. This can come handy to point your codebase root folder, especially if you move the codebase to another machine or location.
For more details, simply type subst /? in the command line.
subst and Amiga computer veteransCasey notes that this habit of his is highly unusual, and that you can be completely free to skip it. It might be a legacy habit of him working a lot with the Amiga computers popular in the late 80's... or of the people who watched Handmade Hero a lot.
Let's assign w drive to our codebase, create a handmade directory in it, and move into the directory.
D:\Documents\Codebase> subst w: d:\documents\codebase
D:\Documents\Codebase> w:
W:\> cd handmade
startup.bat file with the following commands:
@echo off
subst w: [your codebase location]
Save this file in %appdata%\Microsoft\Windows\Start Menu\Programs\Startup folder.
So now, coming back to Command Prompt Properties → Shortcut, you can specify its Start in location as w:\handmade. Remember to restart!
If you're coming from Subsection 1.2, you can continue by going to the Set Up the Text Editor subsection.
Navigation
Up Next: Day 2. Opening a Win32 Window
- Bit Field is a sequence of bits, usually stored as an
unsigned intof a known length. It's used to read and write individual bits using bitwise OR and specific constants. - Bitwise operators operate on one or more bit patterns or binary numerals at the level of their individual bits. It is a fast and simple action, directly supported by the processor, and is used to manipulate values for comparisons and calculations.
- Bitwise OR is a binary operation that takes two bit patterns of equal length and performs the logical inclusive OR operation on each pair of corresponding bits. The result in each position is 0 if both bits are 0, while otherwise the result is 1.
- Flag
- Function
- Parameter
-DEBUG Creates debugging information for the executable.
-Zi Generate a separate PDB file that contains all the symbolic debugging information for use with the debugger. Implicitly sets -DEBUG flag.
Setting up project in Visual Studio