Welcome to “Handmade Hero Notes”, the book where we follow the footsteps of Handmade Hero in making the complete game from scratch, with no external libraries. If you'd like to follow along, preorder the game on handmadehero.org, and you will receive access to the GitHub repository, containing complete source code (tagged day-by-day) as well as a variety of other useful resources.
Last time, we set up our dev environment allowing us to launch our text editor (we showcased 4coder and Visual Studio Code). We then created a simple Win32 application launching a modest message box. We made a “make file” for it, just batch file compiling something directly into the build directory. We then learned how to launch the debugger (RemedyBG or Visual Studio), with some simple actions like stepping into our code.
But a message box is not a very useful thing for a game to pop up; in fact, if you ever see one pop up in a game, this usually means that the game has encountered a very serious error, and it's not something you'd ever want to have. What we'll try to do is to open a window which is a bit more useful.
The window that we are going to open is a basic Windows one. All the programs go through a specific path for opening a window, and we're going to follow that path as well, for a while. But shortly after we are going to create a special buffer in memory which we can write to ourselves, do all the rendering into and, once we're ready, display in the window.
(Top)
1 Window Class
1.1 WNDCLASSA Implementation
1.1.1 WindowClass Values Before and After Initialization
1.1.2 Filling out the WindowClass
1.1.3 Window Class Style
2 Main Window Callback
2.1 Refactoring: Rename Variables
2.2 Process Some Messages
2.3 Get a Result
3 Register the WindowClass
4 Create a Window
4.1 Window Message Queue
4.2 Translating and Dispatching Messages
5 Drawing Something to Our Window
5.1 “Animating” the Window
6 Recap
7 Exercises
7.1 Intercept More Messages
7.2 Custom Window Options
8 Programming Basics
8.1 Concerning typedefs
8.2 Struct Initialization
8.3 Switch Statements
8.4 Pointers
8.5 Loops
9 Navigation
Window Class
From the earliest days of Windows, to start out opening your windows you had to declare and register a Window Class (i.e. WNDCLASS). If we open up MSDN, we can quickly find the relevant article (in this case, we need a simple WNDCLASSA structure1). This is how it looks:
typedef struct tagWNDCLASSA {
  UINT      style;
  WNDPROC   lpfnWndProc;
  int       cbClsExtra;
  int       cbWndExtra;
  HINSTANCE hInstance;
  HICON     hIcon;
  HCURSOR   hCursor;
  HBRUSH    hbrBackground;
  LPCSTR    lpszMenuName;
  LPCSTR    lpszClassName;
} WNDCLASSA, *PWNDCLASSA, *NPWNDCLASSA, *LPWNDCLASSA;If you're unfamiliar with the Windows' way of decorating its structs and functions, it might look quite scary! Don't worry about it too much though. And, if you'd like to learn more about what this all means, we dive deeper in Subsection 8.1.
WNDCLASSA Implementation
We now have our WNDCLASSA that we want to define in our program. This is a recurring pattern in the Win32 API: In order to do some function you need to:
- Create a struct.
- Fill it out with as desired.
- Call a function with this struct as a parameter.
The struct therefore serves as a parameter list to the function you are calling, a set of informational variables to communicate to a function when you call it2. Let's do just that:
MessageBoxA(0, "This is Handmade Hero.", "Handmade Hero", MB_ICONINFORMATION | MB_OK);WNDCLASSA WindowClass = {}; return (0);
You will note that we added a couple of braces ({}). This allows us to initialize the whole struct to 0. For more information, read Struct Initialization subsection.
WindowClass Values Before and After Initialization
Let's see what's going on in here, under the hood. Compile your program and head out to the debugger.
In RemedyBG or Visual Studio debugger, if you press F9 next to your WindowClass declaration, you'll see a red circle appearing next to the line. This means you set up a breakpoint: a point where the program will stop and let you inspect its state. You then should find your Watch window and type in the name of your WindowClass structure.
If you did everything correctly, once you run the program (F5) it should halt at the line you highlighted, and the current value of WindowClass appear in your Watch window:
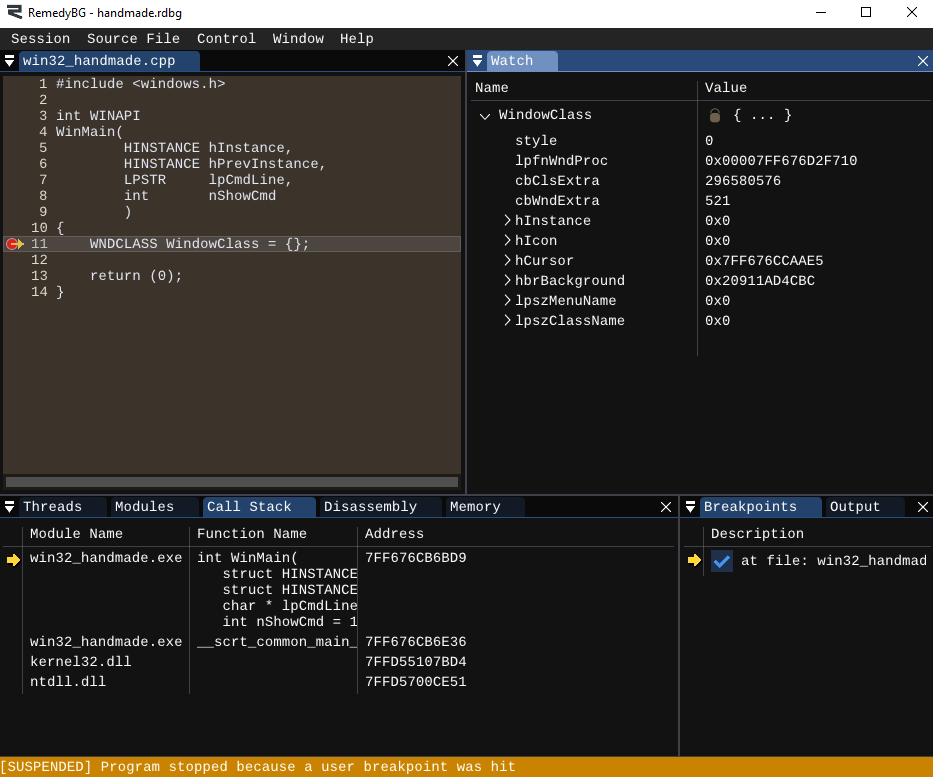
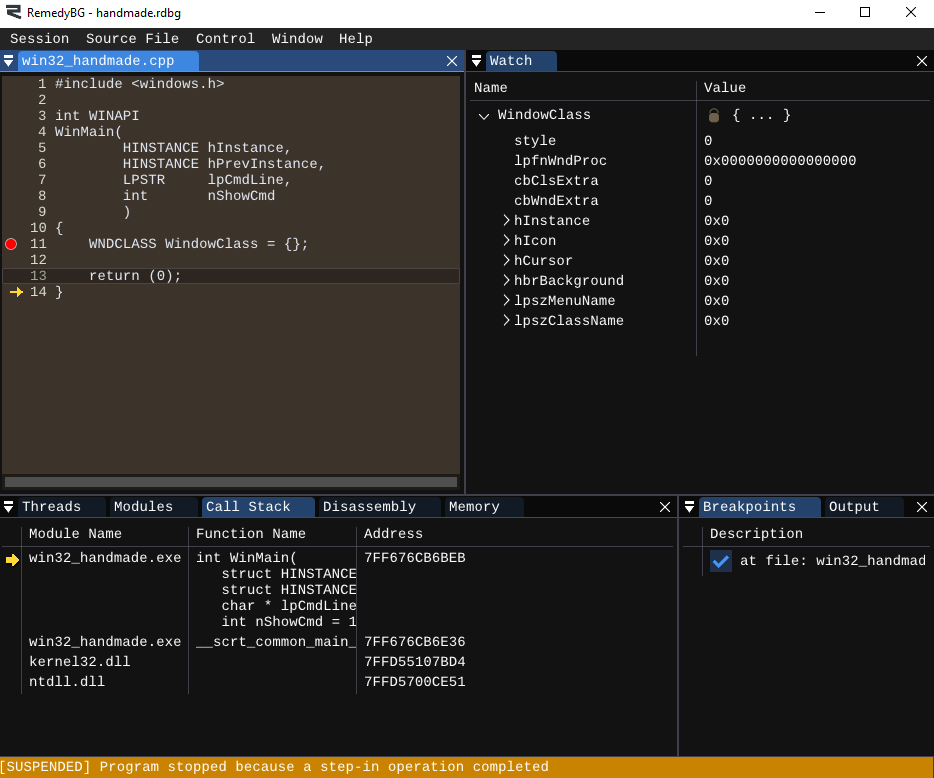
As you can see, the values are completely random. This is because the program actually stops before the line is executed, and the values in WindowClass are garbage. You wouldn't want to pass this struct to any function! But if you hit F11 once to step over this line, you will notice that all the values in the struct have been cleared to 0 (which is what we wanted):
Unless the code is in a performance-critical area, it is a good practice to apply the so-called Zero is Initialization principle. For most of the code we won't be using any constructors or other advanced initialization techniques of C++. As long as it was cleared to zero, most structures would work fine moving forward.
This is quite different from a C++ model where everything has a constructor, and there's a lot of things happening at the start of the life of a variable.
In a performance-critical area, even the “initialize to zero” step are to be skipped. The variables will be immediately initialized with specific values.
Filling out the WindowClass
Let's look back at the members of our WindowClass:
UINT      style;
WNDPROC   lpfnWndProc;
int       cbClsExtra;
int       cbWndExtra;
HINSTANCE hInstance;
HICON     hIcon;
HCURSOR   hCursor;
HBRUSH    hbrBackground;
LPCSTR    lpszMenuName;
LPCSTR lpszClassName;WNDCLASSA members.Which ones do we want? We want to skip a few, and some definitely want to fill out. Let's replace start assigning the fields that we need and remove the ones that we don't:
style: a bit field which sets the properties of our window to have.lpfnWndProc: a pointer to the window function that we will define in a second. This function defines how the window responds to events.cbClsExtra: how many extra bytes we need to store alongside ourWindowProc. We don't really need to do it, so we delete it.cbWndExtra: same ascbWndExtra, it allows to reserve some extra memory, this time for the window. Again, we don't have a use for it.hInstance: the instance handle of the currently running code. We have receivedhInstancewith ourWinMainso we can simply pass it along- If we didn't, there's a handy Kernel call
GetModuleHandle(0), which returns just the same thing.
- If we didn't, there's a handy Kernel call
hIcon: handle for our game icon. For now, we will comment it out and return to it once we're ready to set the icon for our game (much later down the line).hCursor: handle for the cursor. Our game will not have a cursor, so we'll leave it at 0.hbrBackground: allows to clear the background for us, these are relevant if we're using [Windows Brushes]. We don't need this, so it can also go.lpszMenuName: the name for your menu if you use the default Windows one. We don't want this, either.lpszClassName: Name for our Window Class. We need it because, once we create our window, we'll need to pass the class name again for the window to use.
WNDCLASSA WindowClass = {};
WindowClass.style = ;
WindowClass.lpfnWndProc = ;
WindowClass.hInstance = hInstance;
// WindowClass.hIcon;
WindowClass.lpszClassName = "HandmadeHeroWindowClass";This leaves us with 4, potentially 5 values to set out of 10, the rest are cleared to 0. Let's go back to the couple values we do need to think a bit harder about.
Window Class Style
UINT style is of type UINT, which is defined by Windows to be a 32-bit unsigned integer (a.k.a. unsigned int). You can set it as specified in the Window Class Styles guide. In here, you will find several values which, as many things in Windows by now are there more for legacy support purposes. We are however interested in a couple:
MSDN is your friend; it will tell you what you need to know.
CS_CLASSDC/CS_OWNDC: Allocates a Device Context per class / window.- Device Context is a structure used by Windows to keep the state of a drawing while we're drawing to the window. It was initially intended to be used in conjunction with the brushes.
- Normally, Windows would have several device contexts available. When a program needs to draw, it gets one, uses it and then gives it back.
CS_CLASSDC/CS_OWNDCallows programs to declare their intent of focusing on graphics. In this case, there would be no reason of sharing a device context.CS_CLASSDCallows a class to request unique ownership rights for one device context, whileCS_OWNDCwould request a unique device context per window.- In the end,
CS_OWNDCis the one we're going to use, if only for the peace of mind. We won't have to return here if we ever decide to open a new window.
CS_HREDRAW/CS_VREDRAW: Redraws the entire window (as opposed to only the affected piece) if movement or resizing changes the width/height of the client area (in case of movement, this would happen if part of the window goes off screen). We want to use both here.
At this point however, we need to verify if all of these options are even relevant anymore in this day and age. Let's put a TODO note so that we can return to at a later stage. It might be an interesting exploration journey at some point, but for now we'll set it aside.
// TODO(casey): Check if HREDRAW/VREDRAW/OWNDC still matterWindowClass.style = CS_OWNDC | CS_HREDRAW | CS_VREDRAW;WindowClass.lpfnWndProc = ;
WindowClass.hInstance = hInstance;
// WindowClass.hIcon;
WindowClass.lpszClassName = "HandmadeHeroWindowClass";Main Window Callback
Now, we have one element remaining: the mysterious lpfnWndProc. What is that? And how would you have known what it was if this guide wasn't here to tell you? Well, here's another example of how MSDN can help you.
If you look at the Members section of WNDCLASSA article, you will see that lpfnWndProc is a “pointer to the window procedure. [...] For more information, see WindowProc.” If you follow the link to the latter, you will see that this new article defines what that procedure is right there, in the Syntax window:
LRESULT CALLBACK WindowProc(
  HWND   hwnd,
  UINT   uMsg,
  WPARAM wParam,
  LPARAM lParam
);WindowProc function.
As you can see, this is a CALLBACK. The keyword CALLBACK is exactly what it sounds like: Windows calls us back from its code to have us do something for it. And you can see that it gets passed 4 mysterious parameters: an HWND, a UINT, WPARAM and LPARAM. It also returns an LRESULT.
We haven't really dealt with these up until now. Even if we already saw type UINT which is nothing else than a 32-bit unsigned integer, we don't know what it means. We're going to check MSDN and see what all this is, but for now what we do know is that this will be our Main Window Callback, so let's implement it as such in our code. As Windows doesn't care how this function will be called (but only of its signature), we will call it just that, MainWindowCallback.
Make sure to add it outside of our WinMain! And inside the WinMain, we can then “register” it as our lpfnWndProc, which is nothing else than our function name.
LRESULT CALLBACK
MainWindowCallback(HWND hwnd,
                   UINT uMsg,
                   WPARAM wParam,
                   LPARAM lParam)
{
}
int CALLBACK
WinMain(...) {
//...WindowClass.lpfnWndProc = MainWindowCallback;//...
}
This callback will be called any time Windows needs to send something to a window of this class (our WindowClass) to have it do something.
Refactoring: Rename Variables
There's one sidestep that we'd like to make before we move on.
To make things a bit less cryptic, let's rename all our variables to something more understandbale to us. Thus, our hInstance becomes Instance, lpCmdLine becomes CommandLine, etc.
Unfortunately, we cannot rename Windows struct members, so we'll have to leave them as they are, but we can easily do it for the functions. This is because in C and C++, the function signatures are really only about types. The compiler will only check the type of something you're trying to pass (in case of MainWindowCallback, it's HWND, UINT, WPARAM, LPARAM, in this exact sequence). The name of the parameter is up to us, so let's change it to our liking:
//...

LRESULT CALLBACKMainWindowCallback(HWND Window,
                   UINT Message,
                   WPARAM WParam,
                   LPARAM LParam){
}

int CALLBACKWinMain(HINSTANCE Instance,
        HINSTANCE PrevInstance,
        LPSTR     CommandeLine,
        int       ShowCode){
    WNDCLASS WindowClass = {};

    WindowClass.style = CS_OWNDC | CS_HREDRAW | CS_VREDRAW;
    WindowClass.lpfnWndProc = MainWindowCallback;    WindowClass.hInstance = Instance;    // WindowClass.hIcon;
    WindowClass.lpszClassName = "HandmadeHeroWindowClass";

//...
}
Older Microsoft's API made use of so-called “Hungarian notation”. The name refers to its inventor's, Charles Simonyi, country of origin, and also hints at a peculiar way of the Hungarians of saying their last name before the first name.
The prefixes and name abbreviations you see here are nothing else that a naming convention adopted when even the space for the source files and variable names was limited, but also to provide clarity to the type this variable brings. Thus, from the name hInstance we can deduce that it's an Instance of type HANDLE, lpCmdLine is a Command Line of type long pointer, etc.
Nowadays, many programmers moved away from these conventions and prefer simple and explicit names for their variables, and leave the types at the variable declarations, and the code follows our personal taste of reading them. You can decide whichever way you prefer.
One thing however that is recommended pretty much universally is: once you choose a style, stick to it in the whole project. It's very difficult to maintain a codebase which is written in different styles and naming conventions, let alone expand it.
If you are interested in reading more, check out this article on Wikipedia.
Process Some Messages
Let's look at the parameters we're getting for our MainWindowCallback (don't forget about MSDN!):
HWND: A handle to the window. This is an opaque (to us) piece of data that we can pass back to Windows to identify a window. It's like Windows says: “Hey, here's the handle to your window. If you need to talk to me about the window, pass it back, and I'll know what you mean”.UINT: The message. This is the coded message that Windows is asking us to handle in the callback. The messages vary greately, and you can find many lists on MSDN. As you can see, over the ages the number of messages has grown to become absurdly huge, the number of messages you can receive.
That said, most of these messages will be irrelevant for our project, and even less so now that we're starting. “Animation Control Messages”, “Combo boxes”... Since we are not going to be using Windows hardly at all (we'll be basically opening a window and then doing everything else ourselves), we mostly care about basic window operations. These all fall under the WM category, and we will not need much else.
The list for WM category is still big. To narrow it down even further for now, let's focus entirely on very a few Window Notifications.
In order to process messages, we will be using a switch. If you'd like to learn more, check out the Switch Statements subsection.
LRESULT CALLBACK
MainWindowCallback(HWND Window,
                   UINT Message,
                   WPARAM WParam,
                   LPARAM LParam)
{    switch (Message)
    {
        case:
        {

        } break;

        default:
        {
            // Do something in case of any other message
        } break;
    }
}The constants which you see, for instance, here, are nothing else than unique numbers identifying that message. So which messages do we want to deal with first?
WM_SIZE: When the user changes the size of the window.WM_DESTROY: When Windows deletes our window.WM_CLOSE: When the user clicks on that little X in the top-right corner.WM_ACTIVATEAPP: When the user clicked on the window and it became active.
switch (Message)
{    case WM_SIZE:
    {

    } break;

    case WM_DESTROY:
    {

    } break;

    case WM_CLOSE:
    {

    } break;

    case WM_ACTIVATEAPP:
    {

    } break;
    default:
    {
        // Do something in case of any other message
    } break;
}For now, we are not going to do anything useful inside these cases. We will only output to the debug console when these messages fire. To do that, we're going to call the function OutputDebugStringA.
As you can see from its MSDN article, this function takes simply a LPSTR, a string, as the text to output. We will use it to output the message name and newline symbol (\n). In order to see the message, you should be debugging the program, and the messages will go in the Output window of your debugger.
    case WM_SIZE:
    {        OutputDebugStringA("WM_SIZE\n");    } break;

    case WM_DESTROY:
    {        OutputDebugStringA("WM_DESTROY\n");    } break;

    case WM_CLOSE:
    {        OutputDebugStringA("WM_CLOSE\n");    } break;

    case WM_ACTIVATEAPP:
    {        OutputDebugStringA("WM_ACTIVATEAPP\n");    } break;
Get a Result
As it is now, we still won't be able to compile our program. The compiler (and, later, Windows), will expect us to return to whoever called the function a specific parameter of type LRESULT (as it says on its signature). It was a similar case for WinMain, where we returned a 0. As a bit of refresher, here is the signature for a WindowProc:
LRESULT CALLBACK WindowProc(
  HWND   hwnd,
  UINT   uMsg,
  WPARAM wParam,
  LPARAM lParam
);WindowProc function.
The type LRESULT is simply a return code saying what we did with the message. From its type definition we can further see that it's a Long pointer (i.e. up to 64 bits). Windows will give potentially different meanings to this result, depending on the message that was passed in first place.
How do we know which LRESULT to return when? We look at the documentation, of course! For instance, MSDN tells us that if we deal with WM_CLOSE and process the message, LRESULT should be 0. This is actually true for most cases, so let's initialize our LRESULT to 0 and also return it at the end. If we'll want to change our Result, we'll be able to do so inside a respective message's case block.
LRESULT CALLBACK
MainWindowCallback(HWND Window,
                   UINT Message,
                   WPARAM WParam,
                   LPARAM LParam)
{    LRESULT Result = 0;    switch (Message)
    {
        //...
    }
    return (Result);}
Finally, let's deal with our default case. This is going to be a catch-all for allll those myriads of messages that Windows would decide to throw our way and that we will essentially ignore. In our default case, Result is going to be... whatever Windows decides it to be.
Window, Message, WParam and LParam. To get this default treatment, we need to simply call the function called
In this sense, our function positions itself between Windows and Windows. We say: before this message gets any further, let's see if we are interested in treating it in some way (in this case: is it one of these 4 we care about?). If so, that's it, move along, if not you can deal with it in the manner you see fit. Even more than that: sometimes we will want to do something extra on top of the default treatment a message gets. We will deal with that message and then pass it back to Windows for default process.
The default Windows procedure is actually documented in all the message-related articles on MSDN, and is called DefWindowProc.
LRESULT WINAPI DefWindowProcA(
  HWND   hWnd,
  UINT   Msg,
  WPARAM wParam,
  LPARAM lParam
);
As you can see, this function has the exact same function signature as our MainWindowCallback. The only difference is, instead of being a CALLBACK as we are, it's a WINAPI (which means that we are calling it instead)3. Let's call it in our default case:
    LRESULT Result = 0;

    switch (Message)
    {
        //...
        default:
        {            Result = DefWindowProc(Window, Message, WParam, LParam);        } break;
}We're simply passing down the same parameters we were passed. We don't care what they mean and what they are, we just pass them along. Our task will be to figure out a response to the messages we chose.
We now have a (very barebones) callback function. let's quickly compile to ensure that we compile successfully.
W:\handmade\>buildA subdirectory or file build already exists.
Microsoft (R) C/C++ Optimizing Compiler Version ##.##.##### for x64
Copyright (C) Microsoft Corporation.  All rights reserved.

win32_handmade.cpp
Microsoft (R) Incremental Linker Version ##.##.#####.#
Copyright (C) Microsoft Corporation.  All rights reserved.

/out:win32_handmade.exe
/debug
win32_handmade.obj
user32.lib

W:\handmade\> _
Register the WindowClass
We're almost ready of opening our window using our WindowClass, but before we can do it, we need to register the latter.
It's as easy as calling a function may be. The function in question is called RegisterClassA. It takes a pointer to a WNDCLASS structure and... that's it.
If you'd like to learn more about the pointers, check out subsection 8.4.
    // WinMain
    WindowClass.lpszClassName = "HandmadeHeroWindowClass";    RegisterClassA(&WindowClass);    return(0);
If you look in the syntax of RegisterClassA function, you will see that it returns an ATOM. Nowadays it's a mostly obsolete type that is used to create windows and in a small bunch of other functions. Even there, this use is purely optional.
In fact, an atom table is a “system-defined table that stores strings” and their IDs. An ATOM is just that, an ID of that can be converted to a string.
If you are interested in learning more, check out this article on MSDN.
Registering RegisterClass could fail, and in that case it will return 0. It's highly improbable, it almost never happens, but it might happen. Let's ensure that 0 is not returned to us before we proceed. We will use it by putting the RegisterClass function as the criteria of an if statement. If the value is not 0, we continue the program; if it is, we simply exit.
As for the case when it fails? In the future we might create an advanced logging system to report the error, so let's leave a TODO for it:
    if (RegisterClassA(&WindowClass))    {
        // Window Class Registration successful, the rest of our WinMain
        // the rest of our WinMain
    }
    else
    {
        // Window Class Registration failed
        // TODO(casey): Logging
} return(0);Create a Window
So now we're finally getting to today's objective! Let's create a window! The function responsible for it is called... CreateWindow. There are two versions of it: an old version, CreateWindowA, and a newer version?. The only difference is that Ex function allows to specify more window style options. Let's go for the latter.
HWND CreateWindowExA(
  DWORD     dwExStyle,
  LPCSTR    lpClassName,
  LPCSTR    lpWindowName,
  DWORD     dwStyle,
  int       X,
  int       Y,
  int       nWidth,
  int       nHeight,
  HWND      hWndParent,
  HMENU     hMenu,
  HINSTANCE hInstance,
  LPVOID    lpParam
);CreateWindowExA syntax.Wow, that's a lot of parameters! But they are all quite straightforward, we'll go through them one by one.
This function returns a HWND, a handle to the created window. We will need it for other things, so let's store it in a variable Window.
dwExStyle(extended style): this is one of those bit fields like the one we've seen in the WindowClass style. By now you should know the drill: find documentation, choose the style options that you want, and chain them together using the bitwise OR operator (|). Which option do we want? Actually none for now, so let's put a nice0.lpClassName(class name): We have that one, we defined it above! So we'll just pass it straight from ourWindowClass.lpWindowName(window name): Let's call itHandmade Herofor now.dwStyle(style): Another bit field. Here we'll want to specify a few options from the get-go:WS_OVERLAPPEDWINDOW: An aggregate option, combining together several other ones. This option will give our window a typical thick frame, three buttons in the top right corner, a menu and a caption.WS_VISIBLE: Ensures that our window will be on visible and top when it spawns.
XandY: Starting coordinates of the window. We... are not going to specify these just yet. Instead, we're going to use the special valueCW_USEDEFAULTto let the operating system to put the window where it sees fit.nWidthandnHeight: Width and Height, we're also going to skip these for now and let Windows deal with it via CW_USEDEFAULT.hWndParent(parent window): for those cases if you want to have a window inside another window. This is not the case for us so we just put a0there. Windows will therefore use Desktop as our “parent window”hMenu:0, we don't have a menu to pass here.hInstance: this is easy, we just pass it ourInstancehandle.lpParam: any other parameter we'd like to pass to your window. This would be passed with theWM_CREATEmessage, so that you can intercept it and do something you like. We're fine, so just leave at 0.
If you filled out everything correctly, you should have something similar:
    if (RegisterClassA(&WindowClass))
    {        HWND Window = CreateWindowExA(0,
                                      WindowClass.lpszClassName,
                                      "Handmade Hero",
                                      WS_OVERLAPPEDWINDOW | WS_VISIBLE,
                                      CW_USEDEFAULT,
                                      CW_USEDEFAULT,
                                      CW_USEDEFAULT,
                                      CW_USEDEFAULT,
                                      0,
                                      0,
                                      Instance,
0); }We can compress all this a bit to look better:
    if (RegisterClassA(&WindowClass))
    {        HWND Window = CreateWindowExA(0, WindowClass.lpszClassName, "Handmade Hero",
                                      WS_OVERLAPPEDWINDOW | WS_VISIBLE,
                                      CW_USEDEFAULT, CW_USEDEFAULT,
                                      CW_USEDEFAULT, CW_USEDEFAULT,
                                      0, 0, Instance, 0);    }
Similarly to RegisterClassA, should in some hypothetical circumstance CreateWindowExA fail, it will also return 0. Let's add another check to ensure that our Window handle is valid.
        if (RegisterClassA(&WindowClass))
        {
            HWND Window = CreateWindowExA(...);            if (Window)
            {
                // Window creation successful!
            }
            else
            {
                // Window Creation failed!
                // TODO(casey): Logging
            }        }
        else
        {
            // Window Class Registration failed
            // TODO(casey): Logging
        }
Some programmers prefer being more explicit and writing something along the lines of if (Window != NULL) instead. There's no real reason for it, and you can simply write as we do. While such a comparison would yield us a boolean value, in C true and false are defined simply as 1 and 0, respectively.
Window Message Queue
Now, if you compile and run your program, you will see that the window quickly blinks in and out of existence. This is exactly what you told it to do: Create window, check if it exists.... and return 0 out of WinMain. At this point, Windows considers your program complete, cleans everything up and closes your window.
Because we want our window to exist more than a fraction of a second, we need a so-called message loop. We will induce our window to be always open and read Windows' messages until one of them simply doesn't tell the window to close, or we break out of that loop.
In order to read the messages, we need to pull it from a Windows system called Windows Message Queue. It works the following way: when a window is created, it also sets up a queue for itself which starts to be filling up with all sorts of messages. These may be sent by Windows or anyone else who uses the Windows system. Our task would be to loop through this message queue, extract all the messages and read them.
For today, we can use the GetMessage function. This function allows us to pull the messages off our queue and process them.
We will change this once we are ready to animate our game.
BOOL GetMessage(
  LPMSG lpMsg,
  HWND  hWnd,
  UINT  wMsgFilterMin,
  UINT  wMsgFilterMax
);GetMessage Syntax
As you can see, GetMessage returns a BOOL (i.e. true or false) and takes four parameters:
lpMsg(Message): A pointer to the message of typeMSG. We'll need to define it and then pass its address (using the&sign) to this function, so that it can be filled out if a message arrives.hWnd(Window): A window handle. We can pass to it ourWindowor we can pass0. In the latter case,GetMessagewill collect any message directed at our program. Let's do that.wMsgFilterMinandwMsgFilterMax: These serve to filter out specific messages. In our case, we want all the messages, so we leave these at0.
if (Window)
{    MSG Message;
    GetMessage(&Message, 0, 0, 0);}
else
{
    // Window Creation failed!
    // TODO(casey): Logging
}
This program will exit as fast as the previous one because we still don't have a loop. Luckily, GetMessage itself can help us out here. If we look at the documentation, we can see that “If the function retrieves a message other than WM_QUIT, the return value is nonzero. If the function retrieves the WM_QUIT message, the return value is zero.”
This means that, if we put GetMessage as a test condition in a while loop, this program will run forever, until someone posts a “quit” message to the queue (and it gets retrieved by GetMessage).
To learn more about the while and for loops, check out the Loops subsection.
if (Window)
{
    MSG Message;    while(GetMessage(&Message, 0, 0, 0))    {
        // process message and go get another message
    }
    // Exit procedures}
else
{
    // Window Creation failed!
    // TODO(casey): Logging
}
BOOL may return any number, not only true or false, including −1 in case of invalid window handle.
While this is not the way we will implement our message loop in the future anyway, and this code will be replaced by the more robust code that better suits our needs, for the sake of correctness, if you want to make use of GetMessage in your code, you may use the example provided in the documentation, or a construct such as this one:
for(;;)                              // a for loop which would run forever
{
    MSG Message;
    BOOL MessageResult = GetMessage(&Message, 0, 0, 0);
    if (MessageResult > 0)          // 0 is the WM_QUIT message, -1 is invalid window handle
    {
        // Do work in your window
    }
    else
    {
        break;                      // break out of the loop
    }
}// Exit proceduresTranslating and Dispatching Messages
We're still not out of the woods yet. If you'll try to compile and debug the program, you will notice that it runs forever, even if you try to close it (the only way to stop it would be to stop debugging). That's... not exactly what we had in mind, right? Well, that's fine, this is due to the fact that hitting Alt-F4 or the red X button doesn't create a WM_QUIT message, but WM_CLOSE. And we're basically ignoring this message by replacing its default behaviour with an OutputDebugStringA call (see Subsection ?).
However, if you try to resize the program, or minimize the window, it doesn't react to your inputs at all. Moreover, if you check the Output window in your debugger, you will only notice a single WM_ACTIVATEAPP and WM_SIZE message (and more WM_ACTIVATESIZE messages if you switch in and out of the window). We don't get additional WM_SIZE messages if we try to resize the window, or any WM_CLOSE messages at all!
Debugging new process...[OK] Process ID: #####
WM_ACTIVATEAPP
WM_SIZE
WM_ACTIVATEAPP
WM_ACTIVATEAPP
WM_ACTIVATEAPP
This is because we don't do anything with our messages (and the messages that do come through to our MainWindowCallback aren't sent by our window). We simply pul them out of the queue and... discard them. In order to send the messages to our MainWindowCallback (and then to DefWindowProc), we need to dispatch our message. The Windows command to do that is called simply DispatchMessageA.
LRESULT DispatchMessageA(
  const MSG *lpMsg
);DispatchMessageA syntax
As you can see, the syntax for DispatchMessageA is super simple, it only takes a pointer to the message. Moreover, we're not interested in the LRESULT this function returns so we can simply discard it. Let's plug it in our message loop:
MSG Message;
BOOL MessageResult = GetMessage(&Message, 0, 0, 0);
if (MessageResult > 0)
{    DispatchMessageA(&Message);}
MainWindowCallback ourselves, however this is generally considered not a good idea. Windows expects the control flow to be in a specific shape, and it's better not to go against this set of things.
While we're at it, we can add another useful function called TranslateMessage. It has nearly identical syntax except it returns a BOOL:
BOOL TranslateMessage(
  const MSG *lpMsg
);TranslateMessage syntax
This function doesn't have a purpose right now, but might be useful later. It's used to “translate” Windows virtual key character codes to actual char symbols, and post the result as a new message to the queue. Let's add it before our DispatchMessageA call:
MSG Message;
BOOL MessageResult = GetMessage(&Message, 0, 0, 0);
if (MessageResult > 0)
{    TranslateMessage(&Message);    DispatchMessageA(&Message);
}We'll talk more about virtual keyboard input once we get to our input system.
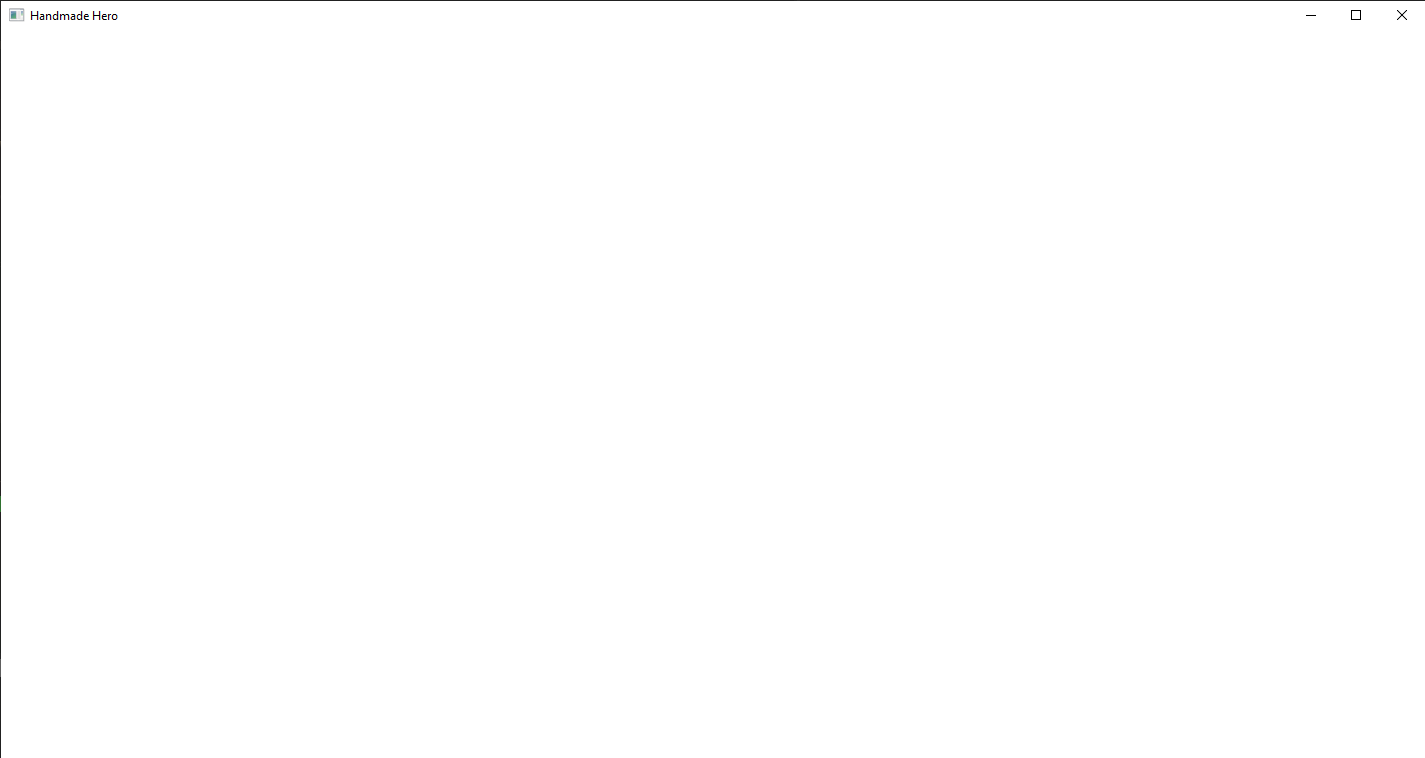
So there you have it! Your barebones window. It's not pretty, it cannot be closed unless you force it from the debugger (Shift-F5) or the Task Manager, but you can rezise it, minimize and maximize it!
Additionally, if you inspect your Output window you will see a great many messages sent by resize and close messages. We will never, however, get a WM_DESTROY message because it will come from someone trying to forcefully close our window, or if we call it ourselves.
Drawing Something to Our Window
Let's have some fun. As of now, your window doesn't have any defined contents, so it might start white, black, “transparent”, or whatever else way Windows decides. Resizing it also randomly changes its contents. Instead, let's try and give our window some specific color.
We're going to do it by securing a special path for the WM_PAINT message inside our MainWindowCallback. We are also going to make use of the Device Context that we secured for ourselves during the class registration, as well as the workflow Windows intended us to use for painting. This workflow intends us using the BeginPaint and the EndPaint functions, PAINTSTRUCT structure, as well as the use of various “brushes”.
HDC BeginPaint(
  HWND          hWnd,
  LPPAINTSTRUCT lpPaint
);

BOOL EndPaint(
  HWND                hWnd,
  const LPPAINTSTRUCT *lpPaint
);BeginPaint and EndPaint syntax.
As you can see, BeginPaint returns a handle to one of those Device Contexts. We may should store it for painting. Both BeginPaint and EndPaint take window handle and a apointer to a PAINTSTRUCT. The latter is a set of parameters that Windows fills out in BeginPaint, containing some useful information like rcPaint (rectangle where we can paint), fErase (a boolean saying whether or not we paint or erase), etc.
    case WM_ACTIVATEAPP:
    {
        // ...
    } break;
    case WM_PAINT:
    {
        PAINTSTRUCT Paint;
        HDC DeviceContext = BeginPaint(Window, &Paint);

        // Do our painting here

        EndPaint(Window, &Paint);
    } break;
default: // ...In here, we can get as extravagant as we want to. Since we've done a lot already today, and we aren't going to make use of this system moving forward, let's use a simple call to PatBlt (“Pat Blit”). This is a super simple function, allowing us to fill out a rectangle with a specified color or pattern.
BOOL PatBlt(
  HDC   hdc,
  int   x,
  int   y,
  int   w,
  int   h,
  DWORD rop
);PatBlt syntax.
hdc: The device context handle. We just got one, so we'll pass it down.x, y: Top left coordinates of our painting rectangle.w, h: Width and Height of our painting rectangle.rop: Keyword for the operation to do. Let's fill it withWHITENESSconstant for now.
So where we can get the x, y, w and h? We have our PAINTSTRUCT with plenty useful information, including the RECT of the painting area. As you can see from documentation, RECT structure contains a left, top, right, and bottom. This gives us immediately x and y, while Width and Height can be obtained by simply subtracting right from left, and bottom from top:
    case WM_PAINT:
    {
        PAINTSTRUCT Paint;
        HDC DeviceContext = BeginPaint(Window, &Paint);
        int X = Paint.rcPaint.left;
        int Y = Paint.rcPaint.top;
        int Width = Paint.rcPaint.right - Paint.rcPaint.left;
        int Height = Paint.rcPaint.bottom - Paint.rcPaint.top;
        PatBlt(DeviceContext, X, Y, Width, Height, WHITENESS);
        EndPaint(Window, &Paint);
    } break;
We compile... and get a LNK2019 error: unresolved external symbol ....PatBlt. If you remember Day1 you should have the exact solution for it in mind.
If we inspect better the documentation for PatBlt, we will quickly see that it requires Gdi32.lib library. That's simple, let's add it in our build.bat!
cl -Zi ..\code\win32_handmade.cpp user32.lib gdi32.lib“Animating” the Window
WARNING: This section contains code which may potentially trigger seizures for people with photosensitive epilepsy.
As you remember from its documentation, PatBlt allows us to set our window to WHITENESS or to BLACKNESS. Let's alternate between the two each time we process WM_PAINT message!
Let's assign our PatBlt operation (which is a DWORD type) to a variable, similar to how we assigned X, Y, Width and Height before using them. However, we will do one thing differently and mark the variable as static:
HDC DeviceContext = BeginPaint(Window, &Paint);
int X = Paint.rcPaint.left;
int Y = Paint.rcPaint.top;
int Width = Paint.rcPaint.right - Paint.rcPaint.left;
int Height = Paint.rcPaint.bottom - Paint.rcPaint.top;static DWORD Operation = WHITENESS;PatBlt(DeviceContext, X, Y, Width, Height, Operation);
EndPaint(Window, &Paint);
static keyword and the scope
In C/C++, static is actually quite a confusing keyword: it has three meanings depending on the context. We will return to its definitions more in detailed in the next chapter.
In this particular case, by marking Operation as static, it will be declared only once for the whole duration of the program. Only on the first time you step into WM_PAINT the Operation will be initialized, after that the application will skip the initialization step and will remember its previous value.
In our case, Operation will be initialized to WHITENESS only once, the rest of the times we can return and swap its current value to its opposite, like so:
static DWORD Operation = WHITENESS;if (Operation == WHITENESS)
{
    Operation = BLACKNESS;
}
else
{
    Operation = WHITENESS;
}PatBlt(DeviceContext, X, Y, Width, Height, Operation);

EndPaint(Window, &Paint);
Assign vs. Equal to operators
Note that == and = mean totally different things in C/C++.
=(Assignment operator) assigns the right value to the left variable.==(“Equal to” operator) compares if the left and right values are mathematically equal.
= instead of == in the if statement and producing all sorts of errors as a result.
WARNING: This section may potentially trigger seizures for people with photosensitive epilepsy. You may want to skip observing the results and call it a day here.
If you compile and run the program now, you will see the window change color each time the window is resized. If you bring it closer to the border, you will notice it's only repainting the portions which were previously hidden.
Recap
And there you have it! Opening a window is some great progress and, if you look back, it's not that much of code. We set up our own Window Class; additionally, we started laying the ground work of our main window callback. Finally, we were in position to open our window and we immediately started drawing some crazy stuff into it.
Next time, we will be defining the MainWindowCallback messages a bit more appropriately, as well as create a bitmap which we will then display to our window. This will bring us to the point where we can actually render our game.
...A and ...W notation in Day 1. To recap, any function that takes a string as input has an Ansi and a Wide (Unicode) version, and a macro decides which function to call. Here, you can use the macro WNDCLASS or the ANSI/Wide version, as you prefer.
Exercises
Intercept More Messages
Try to look around the message lists. See if you find some of your liking; then add the relevant case to your switch statement, add a debug line and try to have it go off during your program execution. Try to see if you can do something with the data they might bring.
Custom Window Options
Right now, we are letting Windows used default size and position of our Window. What if you put some actual values into it? Does CreateWindowEx operate as you would expect it to?
Try adding some different styles to dwStyle. See what results does it bring you.
Programming Basics
Concerning typedefs
As you can see, WNDCLASS (or, to be precise, WNDCLASSA) is a C struct, with some interesting decoration. Let's look at it more closely.
- The struct itself is defined as
struct tagWNDCLASSA {...};In C, a struct is just a record, a collection of variables that together. When you refer to a struct, you refer to a specific memory layout where each of these individual things is sequentially ordered and (usually) stored back to back4. - You will note that the struct is actually called tagWNDCLASSA. The reasons for this are, in part, historical. The bottom line is because the Windows headers want to support both C and C++ compilation.
- In C++, it's enough for you to declare the struct to start immediately using it.
struct dim
{
    int Width;
    int Height;
};

dim ScreenDimension;
- In C, however, this is not true. C does not look up the names of types if you don't decorate them accordingly.
struct dim
{
    int Width;
    int Height;
};

       dim ScreenDimension;  // error C2065: 'dim': undeclared identifier
                             // error C2065: 'ScreenDimension': undeclared identifier

struct dim ScreenDimension;  // OK
- If you want to avoid using again and again the keyword
struct, you can create analiasof sorts using the keywordtypedef. Think of this keyword as a way to specify a name for something declared previously.
struct dim {...};

typedef struct dim dim_t;

struct dim ScreenDimension;  // OK
dim_t OtherDimension;        // Also OK
typedefis a powerful keyword. It allows creating multiple types at the same time, using one source and separated by a comma (,):
struct dim {...};

typedef struct dim dim, *pDim, twoDim[2];               // typedef 3 types in one call

dim ADimension;
pDim PointerToDim = &ADim;                              // take the address of our dim and store it as pDim. * not necessary!
twoDim DoubleDimension = { ADimension, ADimension };    // take two dims and store it in twoDim array type.

// etc., etc.
- Finally, it's possible to
typedefpreemptively, without having to go to a separate line, and that is what Windows headers are doing. The complete solution would be the where we started:
typedef struct tagWNDCLASSA {
...; // contents of the struct
} WNDCLASSA, *PWNDCLASSA, *NPWNDCLASSA, *LPWNDCLASSA;

// WNDCLASSA WindowClass; -> struct tagWNDCLASSA WindowClass;
// PWNDCLASSA WindowClass; -> struct tagWNDCLASSA *WindowClass;
// NPWNDCLASSA WindowClass; -> struct tagWNDCLASSA *WindowClass;
// LPWNDCLASSA WindowClass; -> struct tagWNDCLASSA *WindowClass;
At this point, you have probably noticed that WNDCLASSA comes with not one, but with three pointer types. In fact, there's *P... (pointer), *NP... (near pointer) and *LP... (long, or far pointer). At this point, this is an anachronistic residual of a 16-bit era of MS-DOS, which became obsolete with the advent of 80386 Intel processors in 1985. If you're still interested, further reading is available here.
For all intents and purpuses on a modern 32-bit+ operating system, they are the same type, a pointer to WINCLASSA structure.
Another note: struct identifier shouldn't necessarily be different from one of its types (i.e. it can be simply typedef struct WNDCLASSA.... instead of tagWNDCLASSA) or even be there (typedef struct {...} WNDCLASSA, ...;). The way Windows headers do it is somewhat the more explicit way, supposedly to support some old compiler.
(Continue following along: Subsection 1.1)
Struct Initialization
Let's look at the braces {} we provided in subsection 1.1.
A variable must not necessarily be initialized. You can simply declare it (like this: int x;, WNDCLASSA WindowClass, etc.) and move on, if that is your intention. However, what if we want to initialize a variable to a value? In case of a simple type, you just write its initial value after = (in the example above, int x = 5;). In case of a struct, you can use the values inside the braces (i.e. WNDCLASSA WindowClass = { MyStyle, "Hello" };, etc.). The elements that you don't assign value to, all the elements onwards, are set to 0. If you simply assign it {}, you zero out the whole struct, however big it is.
We want to do this here, because a) it's more readable to see which value you assing to which element, and b) because we don't even need to fill out all the elements.
{0} instead of {}, but {0} can also be used in C++.(Back to Subsection 1.1)
Switch Statements
The switch statement allows to test if a variable we get equals any constant value. If it does, you apply a relevant case to it.
Remember that by executing the case you don't automatically fall out of the switch! You need to use the break statement in order to not keep executing all the cases that follow.
If no value falls under a specific case, you can specify a default to execute if every other fails.
The way we are going to write switch statements in this course might seem a bit unusual if you've seen these statements elsewhere because each case statement is limited by a basic block (delimited by braces ({})). While this is not required, it allows defining variables specific to that case, and they will not “spill” outside to another case. This is due to the fact that, after you close your block, you go outside of those variables' scope and they cease to exist. break will go just outside the block, again in a mix of a convention, convenience and practicality.
(Back to Subsection 2.2)
Pointers
Every variable, function, struct, everything in computer has a location in memory, its address. This address is nothing more than a number that, as any other number in C, may be manipulated with ease. To get something's address, or a pointer to something, you simply put the ampersand symbol (&) before a variable's name. To learn the contents of an address (“dereference a pointer”), you simply put a star operator (*) before the pointer in question.
There's a lot more to know about the pointers, and this course will certainly touch a lot on this subject.
For a more in-depth overview on pointers, you can watch the short series Intro to C where this topic is covered in detail.
For our purposes, to pass a pointer to our WindowClass, we simply write &WindowClass.
Loops
There're many ways to create a “loop”, or to repeat execution of a chunk of code. Two common ways to implement a loop is to use while or for keywords.
A while loop has one condition which is being tested at the beginning of the loop. If the test is true, the program will execute the code inside and immidiately return to test again. If the test is false, the program will skip the while block and continue after the scope of the statement.
A for loop is an iteration loop. Usually it's used the following way: initialize a variable i; compare if i is smaller than some value; increment i and go into loop if true, otherwise break out. All this is compactly represented at the head of the loop as follows:
for (int i = 0; i < SomeValue; ++i)
{
// do your operations
}
However, strictly speaking you don't have to fill out the head parts, all or any. And if you leave it as (;;) this loop will simply run forever, unless some other condition inside it breaks it out. In the same way, a while (1) or while (true) loop will also run forever.
(Back to Subsection 4.1)
Navigation
Previous: Day 1. Setting the Windows Build
Up Next: Day 3. Allocating a Back Buffer
- Breakpoint
- Debugger
- Function signature
- Handle
- Pointer
- Scope
- Step over
- Type
- Win32 API
- Brushes
- Device Context: a structure used by Windows to keep the state of a drawing while we're drawing to the window.
- Events
- Zero is Initialization