Welcome to “Handmade Hero Notes”, the book where we follow the footsteps of Handmade Hero in making the complete game from scratch, with no external libraries. If you'd like to follow along, preorder the game on handmadehero.org, and you will receive access to the GitHub repository, containing complete source code (tagged day-by-day) as well as a variety of other useful resources.
Today we're going to talk about game memory management, or at least the beginnings of the philosophy of memory management. We're obviously going to talk quite a bit about memory throughout this course as the need arises, but today we're going to lay foundation for that.
(Top)
1 Intro to Memory Management
1.1 Why Talk About Allocation Now?
1.2 General Philosophy
1.3 Point of Departure
1.4 Our Approach
2 Add the Memory to our Program
2.1 Design the API
2.2 Implement the Windows layer
2.3 Add Fixed Memory Address
3 Assertions
4 Recap
5 Exercises
5.1 Practice Assertions
6 Side Considerations
6.1 PerfMon
7 Navigation
Intro to Memory Management
Why Talk About Allocation Now?
Why do we even want to start talking about memory management now? After all, we still have some things to do in the sound systems maybe, definitely in our input systems... why memory now? Besides, we don't even use any memory right now, why would we want to start doing it?
Well, if you look in your handmade.cpp, you'll see the answer right there:
local_persist int XOffset = 0;
local_persist int YOffset = 0;
local_persist int ToneHz = 256;
This isn't pretty. We did this to get things working while we were playing around defining our platform API. If you recall, local_persist is an alias with which we call static variables inside the functions. For all intents and purposes local_persist is a global variable, it's just that other functions can't access it.
It's not a good idea having things like that lying around, and certainly it's not something we'll even be able to do with everything. If you'd define a local_persist variable 4GB big who knows what would happen... and it probably wouldn't be good.
So today we could use these values and pretend these are the actual game state that we're going to focus on once we finish building our platform API.
We haven't done any memory management yet. All we have is a sound buffer and a bitmap buffer. We simply ask for these two flat buffers from the operating system once, without ever freeing them. Our program is completely memory-stable because of that, and there's no such thing as “running out of memory” here (for the most part, anyway. If it starts at all, it's good to go.)
General Philosophy
In many modern programming languages, memory management is often done automatically for the programmer. Various systems of the so-called garbage collection start up and begin operating even before the program enters its main loop. They would catch all the unused data, fill up and eventually free in large chunks.
This is not necessarily a good thing in general, and this is definitely not a good thing in game development, where performance and code execution speed is key.
Think about this: Every time you do memory allocation, you introduce a failure point into your program. Memory is a limited resource, and every time you ask for more memory, your request can fail. Should that happen, and should the result of the allocation be important to you, you either should handle it or simply presume that you run on an infinite memory device.
That said, if you go deep enough into the memory request rabbit hole, you will run in eventual crashes, stalls, etc., due to memory paging and other nastiness.
It's always better not to have to deal with that headache and build programs that don't have such failure cases, programs which just aren't going to fail. This way you can focus on what is the joy of programming.
We will try to reply to the question: Can we just never allocate any memory during our game loop? Surprisingly for many, the answer seems to be yes. We're going to do a simple flat partition: grab a chunk of memory during the program start-up (not dissimilar to what we did with the render buffer), pre-decide how much are we going to allow each subsystem to use, and run those subsystems in such a way that they must run in that space. They will never go outside the boundary that you give them and ask for more memory later down the road.
These techniques differ from the general practices you find these days. Even many games that are shipped as “allocation festivals”, juggling with memory all over the place. But, after all, isn't it fun exploring different ways of doing things?
Point of Departure
We'll start off with a demonstration of how we recommend not to do things. Often times, you would see “guides for beginners” having the code similar to the following:
struct game_state
{
    int XOffset;
    int YOffset;
    int ToneHz;
};

internal game_state *
GameStartup()
{
    game_state *GameState = new game_state;
    if(GameState)
    {
        GameState->XOffset = 0;
        GameState->YOffset = 0;
        GameState->ToneHz = 256;
    }

    return (GameState);
}

internal void
GameShutdown(game_state* GameState)
{
    delete GameState;
}
This sort of thing continues of the chain of new and delete continues throughout all the code. Need to load a game asset? new game_asset! Need to create a character? new character! New piece of terrain? You get the drift.
Furthermore, it's usually not even written in such a manner. There usually are multiple additional levels of obfuscation which prevent you from understanding what's really going on: there are constructors and destructors, overloading new to handle allocations... in high-end code, error checking all the way.
It's not inherently bad, but it's definitely not what we're going to do. Here's why:
- If you follow this pattern, you have to have a strategy for the failure cases. Either you handle it somehow, or you accept that your program can crash at any moment.
- It adds another loop back to your platform abstraction. Right now we have our platform neatly packing our graphics and sound buffer, user input, and passing them to the game. We don't have any round-trips after that: the game will finish doing its work and hand back the completed buffers to the platforms.
What do we mean by the latter?
Imagine a situation where you enter GameUpdateAndRender (from the platform layer) start your initialization and... immediately call the platform back to allocate the memory. This back-and-forth conversation between the platform and the game is what creates unnecessary complexity.
To put it in the other way, this is what we have now:
And this is what you have if you add callbacks (for memory or anything else):
If you then were to create an implementation for another platform (say, Linux), you would then need to spend multiple weeks simply to understand what's going on here.
Our Approach
So how are we going to approach this topic?
We will simply pass to our game a thing called, say, game_memory. That's it. As with other pieces of our code, once that memory is set up, we won't do anything else to it until our program closes. As a result, if the initial setup will work, the game will never crash. Platform layer could potentially crash, platform itself could crash, but our game will continue strong.
What will the setup entail? It will involve allocating some memory, pre-partitioning it as necessary, packing it up in the struct. Every frame, we will send this memory to our game with the rest of structures.
Add the Memory to our Program
Enough with the words, let's start coding!
Design the API
First thing first, let's imagine how the usage will change in handmade.cpp:
- We will receive memory from our platform in one big
void *blob. - We will then cast it to whatever our
game_statewill be. - For now this game state only contains what were our
local_persistvariables.
internal voidGameUpdateAndRender(game_memory* Memory, game_input *Input,                           game_offscreen_buffer* Buffer, game_sound_output_buffer *SoundBuffer)
{    game_state *GameState = (game_state*)Memory->PermanentStorage;            GameState->XOffset = 0;
    GameState->YOffset = 0;
    GameState->ToneHz = 256;
    game_controller_input *Input0 = &Input->Controllers[0];
    if (Input0->IsAnalog)
    {
        // NOTE(casey): Use analog movement tuning        GameState->ToneHz = 256 + (int)(128.0f * (Input0->EndX));
        GameState->YOffset += (int)(4.0f * Input0->EndY);    }
    else
    {
        // NOTE(casey): Use digital movement tuning
    }

    if(Input0->Down.EndedDown)
    {        GameState->XOffset += 1;    }
        GameOutputSound(SoundBuffer, GameState->ToneHz);
    RenderWeirdGradient(Buffer, GameState->XOffset, GameState->YOffset);}
Now, we can imagine that really we will have a size and the pointer to the actual memory inside the game_memory struct. Furthermore, we can already divide our memory in two parts: permanent (to store the game state) and transient (to store the work which can eventually be cleared). So we modify our GameState line as follows:
game_state *GameState = (game_state*)Memory->PermanentStorage;
You can read more about similar strategies in this article by GingerBill: Memory Allocation Strategies, part 1
Last but not least, we'll need an initialization step, where we initialize our variables only at the first pass! This suggests that we'll need a IsInitialized variable inside the memory block:
if (!Memory->IsInitialized)
{    GameState->XOffset = 0;
    GameState->YOffset = 0;
    GameState->ToneHz = 256;
    Memory->IsInitialized = true;
}To recap:
- Whatever our game state is, it will be cast straight to permanent memory.
- Memory blocks are a
void *because we don't know what will go into them when in platform layer. However, once we enter the game layer, we immediately cast to the relevant state. - There will be an initialization step on the first frame.
- It's necessary our memory to be cleared to zero at startup.
Based on this knowledge, let's define game_memory structure inside handmade.h (and, while we're at it, game_state as well. We will throw it in a separate spot though to indicate it's not relevant to the platform API.). Remember to change GameUpdateAndRender signature!
struct game_input
{
    game_controller_input Controllers[4];
};
struct game_memory
{
    u64 PermanentStorageSize;
void *PermanentStorage; // NOTE(casey): REQUIRED to be cleared to zero at startup

    u64 TransientStorageSize;
    void *TransientStorage;

    b32 IsInitialized;
};
internal void
GameUpdateAndRender(game_memory *Memory, game_input *Input,
                    game_offscreen_buffer* Buffer, game_sound_output_buffer *SoundBuffer);
//
//
//

struct game_state
{
    int ToneHz;
    int XOffset;
    int YOffset;
};
That should be fine by now, we can take care of the Windows layer! But before we do that, let's write a couple of useful macros while we're in handmade.h. These macros will help us calculate the sizes in Kilobytes, Megabytes and Gigabytes and will become useful in just a second.
#if !defined(HANDMADE_H)
#define Kilobytes(Value) ((Value) * 1024LL)
#define Megabytes(Value) (Kilobytes(Value) * 1024LL)
#define Gigabytes(Value) (Megabytes(Value) * 1024LL)
#define Terabytes(Value) (Gigabytes(Value) * 1024LL)
#define ArrayCount(Array) (sizeof(Array) / sizeof((Array)[0]))
Why do we multiply by 1024? and what's that LL thing at the end?
- Technically, we aren't calculating the Kilo-, Mega-, or Gigabytes amount here. It's actually Kibi- Mebi- Gibibytes, i.e. a multiple of the bytes in the digital information space. We use 1024 because it's a multiple of 2, (210, to be precise), and thus lends itself quite easily for memory operations. We use the Kilo-/Mega-/etc. denominations because it's simpler to think about.
LLsimply means that the compiler should read the number as along long, i.e. a 64-bit value. We don't want any? issues!
Implement the Windows layer
On the platform side, things should be equally straightforward. In the roughly the same spot where we allocated space for our sound samples, we can define our game memory and actually allocate it.
By now you should be able to do it by yourself, so try and think how would you allocate, let's say, 64 megabytes of PermanentStorage and 2 gigabytes of TransientStorage.
Here's how we did it:
s16 *Samples = (s16 *)VirtualAlloc(0, SoundOutput.SecondaryBufferSize,
                                               MEM_RESERVE | MEM_COMMIT, PAGE_READWRITE);
            game_memory GameMemory = {};
GameMemory.PermanentStorageSize = Megabytes(64);
GameMemory.TransientStorageSize = Gigabytes(2);

GameMemory.PermanentStorage = VirtualAlloc(0, GameMemory.PermanentStorageSize,
                                            MEM_RESERVE | MEM_COMMIT, PAGE_READWRITE);
GameMemory.TransientStorage = VirtualAlloc(0, GameMemory.TransientStorageSize,
                                            MEM_RESERVE | MEM_COMMIT, PAGE_READWRITE);
game_input Input[2] = {};
game_input* OldInput = &Input[0];
game_input* NewInput = &Input[1];
//
// ...
// GameUpdateAndRender(&GameMemory, NewInput, &Buffer, &SoundBuffer);
Yes, we did it using the good ol' VirtualAlloc. As with most systems with memory security, it comes with an added benefit of clearing your memory to zero!
Now, one thing that absolutely cannot happen is going into our main loop with invalid game memory. So let's make sure we have valid memory (including, by the way, the sound memory) before proceeding:
int WinMain(...)
{
    //...
    if (RegisterClassA(...))
    {
        //...
        if (Window)
        {
            //...
            s16 *Samples = (s16 *)VirtualAlloc(...);

            game_memory GameMemory = {};
            GameMemory.PermanentStorageSize = Megabytes(64);
            GameMemory.TransientStorageSize = Gigabytes(2);

            GameMemory.PermanentStorage = VirtualAlloc(...);
            GameMemory.TransientStorage = VirtualAlloc(...);            if (Samples &&
                GameMemory.PermanentStorage &&
                GameMemory.TransientStorage)
            {                // ... We are ready to do the main loop            }
            else
            {
                // Memory allocation failed
                // TODO(casey): Logging
            }        }
        else
        {
            // Window Creation failed
            // TODO(casey): Logging
        }
    }
    else
    {
        // Window Class Registration failed
        // TODO(casey): Logging
    }

    return (0);
}Compile, run and verify in the debugger the following:
- That
PermanentStorageSizeandTransientStorageSizeare calculated as you expect them to. - That
PermanentStorageandTransientStoragereceive valid pointers. - That your game runs as it used to.
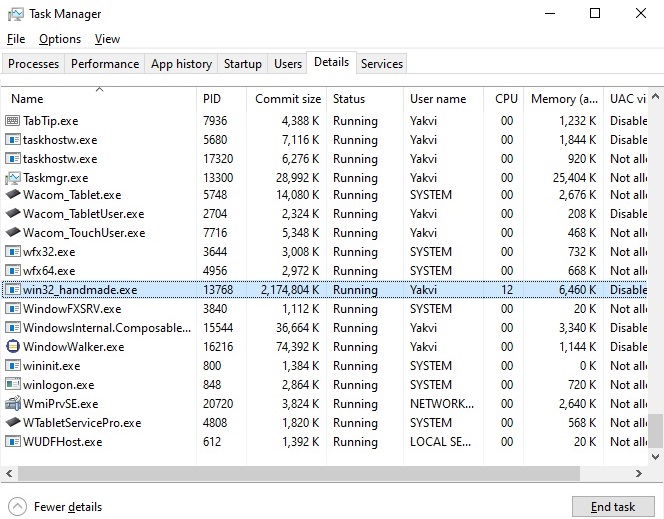
Moreover, if you open the task manager, you can see that the commit size is roughly 2GB, exactly what we wanted.
If so, everyone's happy! Because sometimes, you really should do things to make yourself happy.
Add Fixed Memory Address
Let's have some fun! VirtualAlloc allows us to set a base address where we'd like to store the allocated memory. This isn't something that we'd be doing for the released game, but we might do it for our debug build! This allows us to:
- Have a pointer point at the same location in a section of a program.
- Have an easier life in some parts of debugging.
First, we need to find a way to separate between the “debug” build and “release” build. MSVC compiler provides _DEBUG flag automatically, but it's a bit vague. What we really need is the distinction if a) something is used for the slow code or the fast code and b) if something is used for the internal or release use.
We have HANDMADE_WIN32 defined in the build.bat. Let's go ahead and define another couple of flags, HANDMADE_INTERNAL and HANDMADE_SLOW:
pushd build
cl -DHANDMADE_WIN32=1 -DHANDMADE_SLOW=1 -DHANDMADE_INTERNAL=1 -FC -Zi ..\code\win32_handmade.cpp user32.lib gdi32.lib
popd
We can also leave ourselves a reminder in handmade.h regarding what these values represent:
#if !defined(HANDMADE_H)
/*
  NOTE(casey):

  HANDMADE_INTERNAL:
    0 - Build for public release
    1 - Build for developer only

  HANDMADE_SLOW:
    0 - No slow code allowed!
    1 - Slow code welcome.
*/
Now, back to our previous goal. On 64-bit Windows systems, virtual address space of a program ranges from 0 to ~4 Terabytes. Let's say our memory block will sit somewhere in the middle of this space, like at 2 terabytes. We will do it only for our development build, otherwise it'll be at 0 (which means VirtualAlloc decides automatically the address of the memory). We'll use this address to allocate PermanentStorage:
#if HANDMADE_INTERNAL
    LPVOID BaseAddress = (LPVOID)Terabytes(2);
#else
    LPVOID BaseAddress = 0;
#endif
    game_memory GameMemory = {};
    GameMemory.PermanentStorageSize = Megabytes(64);
    GameMemory.TransientStorageSize = Gigabytes(2);    GameMemory.PermanentStorage = VirtualAlloc(BaseAddress, GameMemory.PermanentStorageSize,                                                MEM_RESERVE | MEM_COMMIT, PAGE_READWRITE);
As for the TransientStorage, we could do the same thing, and allocate that memory at some other address. Or we could simply allocate one big chunk of memory, and then divide it between the permanent and the transient storage like this:
game_memory GameMemory = {};
GameMemory.PermanentStorageSize = Megabytes(64);
GameMemory.TransientStorageSize = Gigabytes(2);u64 TotalStorageSize = GameMemory.PermanentStorageSize + GameMemory.TransientStorageSize;GameMemory.PermanentStorage = VirtualAlloc(BaseAddress, TotalStorageSize,                                            MEM_RESERVE | MEM_COMMIT, PAGE_READWRITE);GameMemory.TransientStorage = ((u8 *)GameMemory.PermanentStorage +
GameMemory.PermanentStorageSize);Hopefully it's clear what's going on here:
- We specify the sizes for each memory block
- We calculate the total size
- We allocate the memory only once
- We then offset the transient memory pointer to point after the size of the permanent memory.
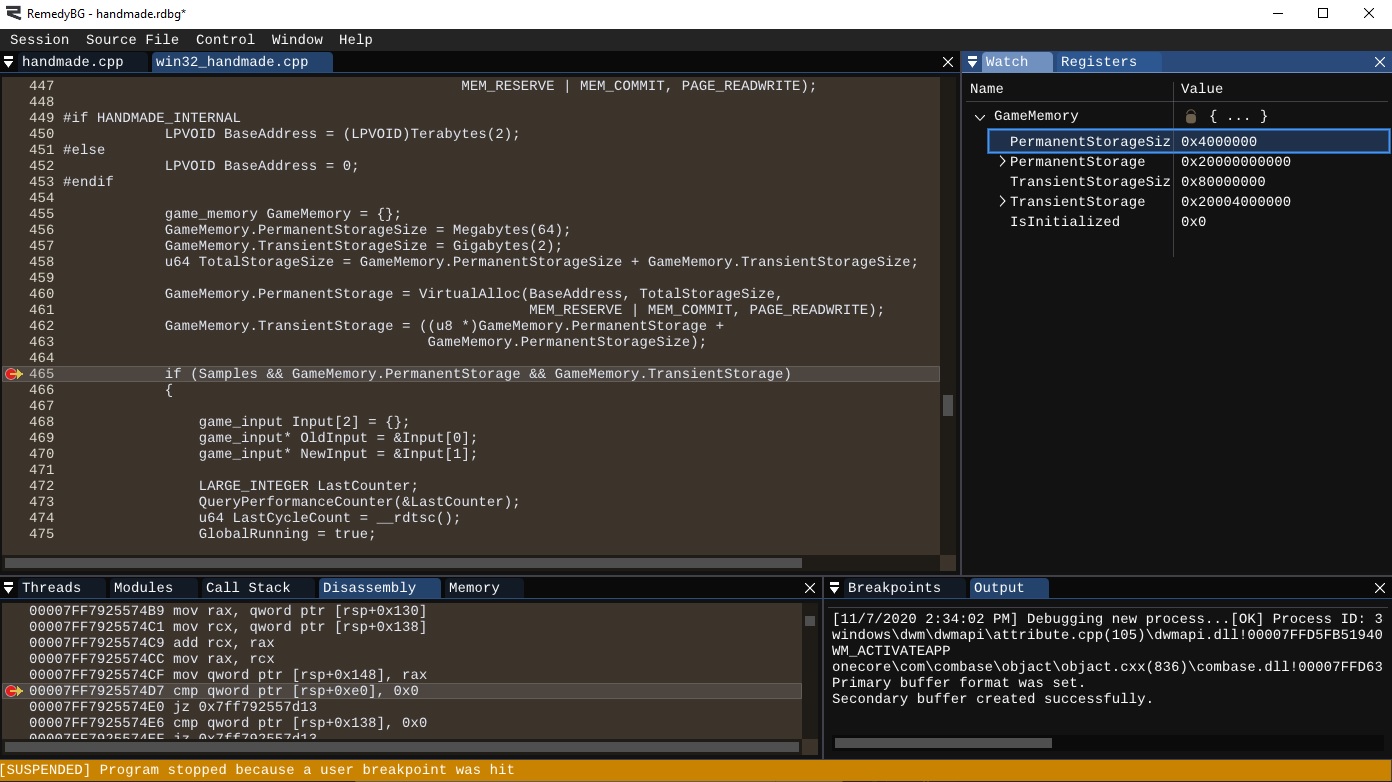
Let's compile and verify the following in the debugger:
- Our base address for
PermanentStorageis at exactly0x20000000000. - The
PermanentStorageSizeis at0x4000000, so the address ofTransientStorageis0x20004000000.
- Have a fixed address in virtual alloc on our machine
- Same pointer in the same program
- Debugging is simpler
- Add the base address if we're on the internal build
Assertions
While we talk about memory, we might as well start talking about the assertions.
What is an assertion anyway? In programming, it's a statement that some condition, expression or value is true at that point of the program execution. It's somewhat similar to what we do with the if (Window)/if (Memory)` blocks, except in this case we expect that there is a potentially a case where the Window might not be created, memory might not be allocated. For assertions, there isn't a second guess: it's a tool to ascertain that some statement is true, otherwise something in the code has gone terribly, terribly wrong.
Assertions are a development tool. They are great for catching up bugs early, for validating things to ensure we don't miss anything. You should strive to put as many as you feasibly can in your code. Why? Because, while the assertions definitely have some cost in performance during the development, they are stripped away from the final product, so you really don't lose anything from adding assertions, only gain.
We have a practical case to start using assertions on: when we pass our memory to the game, we cast it as the game_state. Naturally, before casting we want to assert that game_state is never bigger than the memory!
In code, this looks as simple as this:
internal void
GameUpdateAndRender(...)
{    Assert(sizeof(game_state) <= Memory->PermanentStorageSize);    game_state *GameState = (game_state*)Memory->PermanentStorage
    // ...
}So what happens in the assertion? * If the condition is true, nothing. Code continues as usual. * If the condition is not true, we flat-out crash, debugger catches the error and halts at that specific spot.
We do it by attempting to write to the null pointer (operation which will always crash), but there're other tools, like the Windows' DebugBreak. Let's add the definition of the Assert to handmade.h, and they will work only if we're on HANDMADE_SLOW build:
#if HANDMADE_SLOW
#define Assert(Expression) if (!(Expression)) { *(int *)0 = 0; }
#else
#define Assert(Expression)
#endif
#define Kilobytes(Value) ((Value) * 1024LL)
#define Megabytes(Value) (Kilobytes(Value) * 1024LL)
#define Gigabytes(Value) (Megabytes(Value) * 1024LL)
#define Terabytes(Value) (Gigabytes(Value) * 1024LL)That's it, that's all you need to know about the assertions for now.
Recap
Memory management is a highly controversial topic. We don't want to take any extreme sides and try and convince you that our way is better that the others. Maybe it's not, who knows? However, throughout this course we'll use one specific way of approaching memory, and today we laid foundations to that. We were so efficient that we could even do some tricks with it and touch some other subjects (like assertions)!
We hope you enjoyed today's episode of Handmade Hero Notes, and we'll see you next time, when we'll move to the topic we've been putting aside for way too long: reading and writing files.
Exercises
Practice Assertions
Try review the code you've written thus far. Where do you definitely want to make sure things you've received are valid? Write assertions in those places.
Side Considerations
PerfMon
If you open Task Manager and go into the “Details” tab (or “Processes” if you're still on Windows 7), you will see the list of all the running processes and some information related to them. You can then right-click on the header bar and select even more columns, like “Commit Size”, “Working Set”, etc.
What do all these fields even mean?
- How much it asked for
- actually touched
- resident/not resident in memory
It can get even more in-depth than that. If you find PerfMon in your start menu (or Performance Monitor), you can go in, pick a process and pick more fields to track over time. These are all the performance-measurement tools that can become more useful if you are doing allocations on the fly, but since we simply allocate a large block of memory for ourselves, our own usage is pretty limited.
If you want to dive even deeper, check out Mysteries of Memory Management Revealed.
Navigation
Previous: Day 13. Platform-Independent User Input
Up Next: Day 15. Platform-Independent Debug File I/O
- Assertions
- Garbage collection
- Integer Promotion
- Memory allocation
Memory Allocation Strategies, part 1
Mysteries of Memory Management Revealed