Welcome to Day 7 of “Handmade Hero Notes”, the book where we follow the footsteps of Handmade Hero in making the complete game from scratch, with no external libraries. If you'd like to follow along, preorder the game on handmadehero.org, and you will receive access to the GitHub repository, containing complete source code (tagged day-by-day) as well as a variety of other useful resources.
It's hard to believe we've already gone through 7 days done. We now have our own window rendering, we managed to make our input working on gamepad and keyboard, and today we'll start working on the sound. It will take us a while, so let's jump straight into it!
(Top)
1 Introduction to Sound Programming for Games
2 Initialize DirectSound Overview
2.1 Load the Library
2.2 Create a DirectSound Object
2.3 Set Cooperative Level
2.4 Create a Primary Buffer
2.5 Create a Secondary Buffer
3 Deep Dive: DirectSound Objects
3.1 Methods
3.2 Virtual Function Tables
3.3 COM Interfaces
3.4 Deep Dive into the Disassembly
4 Recap
5 Exercises
5.1 Read on Other Audio APIs
5.2 Implement Another Audio API
6 Programming Notions
6.1 API
7 Side Considerations
7.1 About Game Optimization
8 Navigation
Introduction to Sound Programming for Games
There are many sound APIs. Shocking, right? And the one we're about to implement is not necessarily the best the lowest-level available, or even the fastest. We're going to be using DirectSound so it will have as much compatibility as possible with the older systems. Sure, the number of users on these older systems is practically zero at this point, but there's not a lot of cost for us to have it running, at least for the majority of the code so far.
Alternatives for DirectSound are many, and none of them are particularly good. Thing is, audio is complicated. You've seen so far intro to video handling, input handling, and really, if you look back there's not that much code in it to make each individual piece of it work. Sound is difficult because it can never stop, and should always be as close to perfect as possible.
A workflow using DirectSound starts with allocating a buffer of sound. And this buffer is circular: each time sound reproduction arrives to the end, it loops around to the beginning, so that it constantly goes around that buffer in circles. In other words, a circular buffer.
Let's say we allocate a pretty long buffer, 2 seconds for instance.
As you might know, these days its pretty common to have 48 kHz which means that there're 48000 samples per second, so our 2 second buffer would contain 96000 of the sound samples. This means that, at any given point in time, sound hardware is reading a chunk of our memory in order to reproduce the sound. This can be represented by a cursor on this buffer.
If our game is running at 60 frames per second, we should be producing 800 samples per frame in order to line up our audio to the video. And we can't really write straight under the cursor as we risk to produce bad data as a result. This means that we need to write a bit ahead of the cursor. Let's say it's our game cursor. We will be writing there our sound frames, and when hardware cursor will catch up, new sounds will be played.
But not too much! Otherwise the sound lag would be too noticeable to ignore.
In conclusion, our objective is to always be a little bit ahead of the hardware cursor.
Why two seconds buffer? If we're playing the game at 60 frames per second, a 16 ms buffer should be enough! We're doing it to prevent possible “frame drops”. There are two possible approaches here:
- We'll be writing waaay ahead from where we are right now. This however implies a lot of potential data overwriting.
- Writing only one frame ahead of us. This would imply that we stick to 16 frames per second, and if we take too long to draw the next frame, we skip. This is the solution we're going for.
Here is where the long buffer comes into play. Normally, if you ever heard a program go “drrrrr” on a sound that was playing, that was because the buffer was too small, and the program was infinitely repeating it. If you have a two second buffer? You can simply stop sending samples, and the contents of the buffer (whatever happened in the past two seconds) will be playing instead. Of course, if the frame delay happens when there's a big explosion happening, you might hear that sudden jump, but the sound still will be smooth, there's a lot of sound to be playing until you come back.
Having such a giant buffer proves quite effective. Even if your game for some reason is struck by some disaster, the sound will still be fine.
Now there're other considerations that we'll need to take into account, like where will we put our “page flip”? How to keep the video and audio feed synchronized? Etc. These are all the considerations that we will not deal with today.
We will focus solely on simple matters like:
- Open a handle to DirectSound.
- Get this buffer up and running, where DirectSound would have its infinite loop on, and place the same sound over and over and over.
At the end, this is just some memory that we're writing to. As we did with the bitmap, we write sound bits to a buffer, and DirectSound fetches those bits to reproduce the sound to the speakers.
Initialize DirectSound Overview
To get started, let's #include DirectSound header file, dsound.h:
#include <windows.h>
#include <stdint.h>
#include <xinput.h>#include <dsound.h>
If you remember, we initialized XInput at the very beginning of our WinMain. Unfortunately, we cannot do this for DirectSound as it requires a window handle. So right after we make sure that our Window is a vaild handle, we'll start initializing DirectSound. Let's simply throw in function call Win32InitDSound:
if (Window)
{
    HDC DeviceContext = GetDC(Window);
    Win32ResizeDIBSection(&GlobalBackbuffer, 1280, 720);    Win32InitDSound();
    // ...
}
Now, we don't have Win32InitDSound function yet, we'll need to create it. For now it won't have any return and won't have any parameters, but we can always modify the signature later if we need it. Let' define Win32InitDSound right after Win32LoadXInput.
What do we need to do inside this function? Well, we'll need to:
- Load the library
- As with the controller, absence of sound shouldn't necessarily be showstopper
- “Create” a DirectSound object
- The way DirectSound is implemented is having the so-called “objects”. Object model was a popular programming paradigm for Windows API for some time.
- Set cooperative level
- We need to bind the object with our window and set up specific sound settings
- “Create” a primary buffer
- At this point, this is a holdover from the time when you were writing directly to the sound card. You can't access the sound card any more, but you still need to create the primary buffer so that you can set the “mode” of things.
- We will only ever use it to set our wave format.
- “Create” a secondary buffer
- This is the buffer we're going to write our samples to.
- Start it playing!
We'll take care of the “playing” part in another call. As for the initialization, let's put our steps in the function:
internal void
Win32LoadXInput()
{
    // ...
}
internal void
Win32InitDSound()
{
    // NOTE(casey): Load the library
    // NOTE(casey): Create a DirectSound object
    // NOTE(casey): Set cooperative level
    // NOTE(casey): "Create" a primary buffer
    // NOTE(casey): "Create" a secondary buffer
}In theory, this would give us sound on Windows.
You'll notice that DirectSound is not as clean as XInput, which only took us a few calls to get running, and a few more to get running without crashing. Granted, sound is more complicated than a controller with a defined button set, but still.
Load the Library
Loading the library is the same as we did with XInput. We try to load from a .dll and if we succeed we do the rest.
In this case, the library we're after is called dsound.dll.
// NOTE(casey): Load the library HMODULE DSoundLibrary = LoadLibraryA("dsound.dll");

if(DSoundLibrary)
{    // NOTE(casey): Create a DirectSound object
    // NOTE(casey): Set cooperative level
    // NOTE(casey): "Create" a primary buffer
// NOTE(casey): "Create" a secondary buffer }Create a DirectSound Object
In order to create a DirectSound object we need to call DirectSoundCreate. Again, to avoid loading a .dll that the user might not have, we'll need to do the same abstraction maneuver as we did last time with the XInput functions. If you remember, we did the following for the functions we wanted to retrieve:
#definea function prototype with the signature we want.- Make a
typedefof that, so that you can use it as a variable. - Create a stub function in case we fail to properly load the actual functions.
- Set up a global variable for that function pointer. By default it will point to the stub function.
#definethe same name as the original function for that variable.
And then, in the init code:
GetProcAddressof the function we're interested in, and store it in the global variable.- If the function pointer is not valid (i.e.
0), revert back to the stub function.
And this will finally yield a function that we can call.
This would be the plan.. except it would be a bit of overkill for our purposes. We're only ever calling this function once, immediately after fetching its “ProcAddress”. So really, we can get rid of steps 3-5 and define the variable locally.
Let's look at the DirectSoundCreate function syntax:
HRESULT WINAPI DirectSoundCreate(LPCGUID pcGuidDevice, LPDIRECTSOUND *ppDS, LPUNKNOWN pUnkOuter);Let's go ahead and implement the plan above. Immediately after the analagous blocks we made for XInput, we can lay down the following:
// NOTE(yakvi): XInputSetState
#define X_INPUT_SET_STATE(name) DWORD WINAPI name(DWORD dwUserIndex, XINPUT_VIBRATION *pVibration)
typedef X_INPUT_SET_STATE(x_input_set_state);
X_INPUT_SET_STATE(XInputSetStateStub) { return (ERROR_DEVICE_NOT_CONNECTED); }
global_variable x_input_set_state *XInputSetState_ = XInputSetStateStub;
#define XInputSetState XInputSetState_// NOTE(yakvi): DirectSoundCreate
#define DIRECT_SOUND_CREATE(name) HRESULT WINAPI name(LPCGUID pcGuidDevice, LPDIRECTSOUND *ppDS, LPUNKNOWN pUnkOuter)
typedef DIRECT_SOUND_CREATE(direct_sound_create);
We then can try and load the function, and if it's loaded, try to call it. DirectSoundCreate takes the following parameters.
pcGuidDevice: The id of the sound card we're trying to open. Since we don't care which device will be outputting the sound, we'll leave it at0.ppDS: Pointer to the pointer to aIDirectSoundstructure. We will provide it, and the function will fill in the address of this structure, similar to what we did when we were peeking messages in ourWinMain.pUnkOuter: Should always be0.
DirectSoundCreate returns an HRESULT which must be processed with SUCCEEDED macro which then can return true or false.
If you are confused by the above, that's totally fine. Suffice to say that we need to wrap DirectSoundCreate() call in SUCCEEDED.
SUCCEEDED is defined as a check whether or not the result is greater or equal to 0.
We could separately check for if (DirectSoundCreate) and then if (SUCCEEDED(DirectSoundCreate(...))), or we could do it all in one go, using logical AND operator (double &&), not to be confused with the bitwise AND (single &)!
// NOTE(casey): Load the library
// ...
if(DSoundLibrary)
{
    // NOTE(casey): Get a DirectSound object     direct_sound_create *DirectSoundCreate = (direct_sound_create*)
                                    GetProcAddress(DSoundLibrary, "DirectSoundCreate");
    IDirectSound *DirectSound;
    if(DirectSoundCreate && SUCCEEDED(DirectSoundCreate(0, &DirectSound, 0)))
    {        // NOTE(casey): Set cooperative level
        // NOTE(casey): "Create" a primary buffer
// NOTE(casey): "Create" a secondary buffer }}Set Cooperative Level
We now need to configure the DirectSound “object” we've got. This is enabled by setting its “cooperative level”.
The function we're going to call is called SetCooperativeLevel. However, we aren't calling it from Windows directly. Instead, the pointer to this function is stored inside our DirectSound. The call takes the following parameters:
hwnd: Handle to our windowdwLevel: Priority level we request. Since we'd like to set up custom sound format, we need to setDSSCL_PRIORITY.
Again, we'll need to check whether we SUCCEDEED in our call. If we do, we aren't going to actually set any settings just yet. We'll return to it in our next lesson, for now let's add a todo.
direct_sound_create *DirectSoundCreate = (direct_sound_create*)
                                GetProcAddress(DSoundLibrary, "DirectSoundCreate");
IDirectSound *DirectSound;
if(DirectSoundCreate && SUCCEEDED(DirectSoundCreate(0, &DirectSound, 0)))
{
    // NOTE(casey): Set cooperative level    if (SUCCEEDED(DirectSound->SetCooperativeLevel(Window, DSSCL_PRIORITY)))
    {
        // NOTE(casey): "Create" a primary buffer
    }    // NOTE(casey): "Create" a secondary buffer
}Create a Primary Buffer
Next, we're going to call CreateSoundBuffer to get our primary buffer. As a reminder, initially this was supposed to be the actual buffer on the sound card. Now, it will simply provide us a pointer to DirectSoundBuffer “object” from which our audio samples will be read. We want to set up a primary buffer explicitly because we'll thus make sure that our audio is not upsampled or downsampled by the system. It probably won't do much on newer operating systems but we'll do it just in case anyway.
CreateSoundBuffer takes the following parameters:
lpcDSBufferDesc: A pointer to the DSBUFFERDESC structure.lplpDirectSoundBuffer: A pointer to the pointer to anIDirectSoundBufferobject.pUnkOuter: We must pass0here
You'll notice that the parameters are almost identical to DirectSoundCreate. The latter two shouldn't present any problem, let's look better at the DSBUFFERDESC structure in a second.
Again, this should be wrapped inside SUCCEEDED macro, and again, it's the function that we call from DirectSound “object”.
// NOTE(casey): Set cooperative level
if (SUCCEEDED(DirectSound->SetCooperativeLevel(Window, DSSCL_PRIORITY)))
{
    // NOTE(casey): "Create" a primary buffer    DSBUFFERDESC BufferDescription = ;

    IDirectSoundBuffer *PrimaryBuffer;
    if(SUCCEEDED(DirectSound->CreateSoundBuffer(&BufferDescription, &PrimaryBuffer, 0)))
    {
        // Set up primary buffer
    }}
// NOTE(casey): "Create" a secondary buffer
Now, back to our DSBUFFERDESC structure.
First thing of note is that it must be cleared to zero, whatever its size it. We already did it in the past, using = {}, so let's do it here as well.
Let's see what else we need to set:
dwSize: The size of the wholeDSBUFFERDESCstructure. We set it tosizeof(BufferDescription).dwFlags: a bit field. Acceptable flags are specified here. Of all listed we might potentially needDSBCAPS_GLOBALFOCUS, but we definitely needDSBCAPS_PRIMARYBUFFERsince it identifies the buffer as primary.dwBufferSize: The size of the buffer that we're interested in, in bytes. Usually this would be where we specify the size, but since it's a primary buffer we pass0.- Since we're on the topic, let's quickly think about the secondary buffer size. While this should be a straightforward calculation, we can make this part even simpler: whoever calls
Win32InitDSound, decides what the desired buffer size is.
- Since we're on the topic, let's quickly think about the secondary buffer size. While this should be a straightforward calculation, we can make this part even simpler: whoever calls
dwReserved: Pass0lpwfxFormat: Pass0if it's a primary buffer...guid3DAlgorithm: settings for 3d sound emulation. we don't need it, so pass0to it as well.
Since all the fields are cleared to zero using = {}, this leaves us with only two settings that we need to set ourselves:
if (SUCCEEDED(DirectSound->SetCooperativeLevel(Window, DSSCL_PRIORITY)))
{
    // NOTE(casey): "Create" a primary buffer    DSBUFFERDESC BufferDescription = {};    BufferDescription.dwSize = sizeof(BufferDescription);
    BufferDescription.dwFlags = DSBCAPS_PRIMARYBUFFER;    IDirectSoundBuffer *PrimaryBuffer;
    if(SUCCEEDED(DirectSound->CreateSoundBuffer(&BufferDescription, &PrimaryBuffer, 0)))
    {
        // Set up primary buffer
    }
}
// NOTE(casey): "Create" a secondary buffer
We're still not out of the woods yet. In order to finalize our primary buffer setup, we need to set the wave format using the SetFormat function. This function is a bit different, in that it's called from the buffer instead of DirectSound.
As its only parameter, SetFormat takes a pointer to a WAVEFORMATEX structure. It has the following syntax:
typedef struct tWAVEFORMATEX {
  WORD  wFormatTag;
  WORD  nChannels;
  DWORD nSamplesPerSec;
  DWORD nAvgBytesPerSec;
  WORD  nBlockAlign;
  WORD  wBitsPerSample;
  WORD  cbSize;
} WAVEFORMATEX, *PWAVEFORMATEX, *NPWAVEFORMATEX, *LPWAVEFORMATEX;WAVEFORMATEX structure.Unfortunately, this structure has the members which depend upon each other, so it's imperative that we set them in a different order from how they appear here.
wFormatTag: The format of the waveform-audio. We're going to be working with the PCM method (i.e. Pulse-Code Modulation), so the format tag would beWAVE_FORMAT_PCM.nChannels: We want stereo sound, so we pass2.nSamplesPerSecond: We're going to have it passed as a parameter to our functionwBitsPerSample: We want16bits per sample (CD quality), so that's what we're going to pass.nBlockAlign: How many bytes are there per unit of samples.- Since we pass two channels in Left-Right sequence, we can simply compute
nChannelstimeswBitsPerSample, divided by the number of bits in a byte (8).
- Since we pass two channels in Left-Right sequence, we can simply compute
nAvgBytesPerSec: How many bytes will the samples occupy in one second. We can calculate it by multiplyingnSamplesPerSecondfornBlockAlign.cbSize: Size of any extra information we might want to pass. We don't have any, so just leave it at0.
Pay attention at the order these things are defined! Make sure you don't use things before actually defining them. Compiler will not complain, but your sound will not be what you expect it to be.
Take for instance nBlockAlign. This information is redundant as you can easily calculate this value inside your call directly, without introducing a potential failure point for the user, if they forgets to initialize the dependant values first.
If you really have to do this, you want the variables to be initialized in the same order they are are positioned on the struct. Help the user succeed and prevent bugs for them!
Set the users up for success, don't set them up for failure.
We mentioned “API” a lot. If you're unfamiliar what exactly this means, head over to subsection 6.1.
Since we'll use it for both of our buffers, we can place the WAVEFORMATEX structure outside, right after we get our DirectSound “object”.
Finally, we call SetFormat function and, after we've done everything, our function will look roughly in the following way:
internal voidWin32InitDSound(HWND Window, s32 SamplesPerSecond, s32 BufferSize){
    // NOTE(casey): Load the library
    HMODULE DSoundLibrary = LoadLibraryA("dsound.dll");
    if(DSoundLibrary)
    {
        // NOTE(casey): Get a DirectSound object
        direct_sound_create *DirectSoundCreate = (direct_sound_create*)GetProcAddress(DSoundLibrary, "DirectSoundCreate");
        IDirectSound *DirectSound;
        if(DirectSoundCreate && SUCCEEDED(DirectSoundCreate(0, &DirectSound, 0)))
        {            WAVEFORMATEX WaveFormat = {};
            WaveFormat.wFormatTag = WAVE_FORMAT_PCM;
            WaveFormat.nChannels = 2;
            WaveFormat.nSamplesPerSec = SamplesPerSecond;
            WaveFormat.wBitsPerSample = 16;
            WaveFormat.nBlockAlign = (WaveFormat.nChannels * WaveFormat.wBitsPerSample) / 8; // 4 under current settings
            WaveFormat.nAvgBytesPerSec = WaveFormat.nSamplesPerSec * WaveFormat.nBlockAlign;
            if (SUCCEEDED(DirectSound->SetCooperativeLevel(Window, DSSCL_PRIORITY)))
            {
                // NOTE(casey): "Create" a primary buffer
                DSBUFFERDESC BufferDescription = {};
                BufferDescription.dwSize = sizeof(BufferDescription);
                BufferDescription.dwFlags = DSBCAPS_PRIMARYBUFFER;

                IDirectSoundBuffer *PrimaryBuffer;
                if(SUCCEEDED(DirectSound->CreateSoundBuffer(&BufferDescription, &PrimaryBuffer, 0)))
                {                    if (SUCCEEDED(PrimaryBuffer->SetFormat(&WaveFormat)))
                    {
                        // NOTE(casey): We have finally set the format of the primary buffer!
                    }                }
            }
            // NOTE(casey): "Create" a secondary buffer

        }
    }
}Create a Secondary Buffer
Last step for Win32InitDSound before we can play the sound is to set up secondary buffer. We'll need to fill out a new BufferDescription and pass a few more parameters to it, but largely the process remains the same. We'll use the secondary buffer to write the sound samples.
The code for the secondary buffer remains largely the same as for the primary buffer, we'll only need to have a different buffer description.
dwFlags: since we don't really need anything, we'll just leave it at0.dwBufferBytes:BufferSizethat we'll be getting from whoever calls this function.lpwfxFormat: We don't need to set format of our wave again, we can use the one we have already, so simply pass the address toWaveFormathere.
if (SUCCEEDED(DirectSound->SetCooperativeLevel(Window, DSSCL_PRIORITY)))
{
    // ...
}// NOTE(casey): "Create" a secondary buffer
DSBUFFERDESC BufferDescription = {};
BufferDescription.dwSize = sizeof(BufferDescription);
BufferDescription.dwBufferBytes = BufferSize;
BufferDescription.lpwfxFormat = &WaveFormat;

IDirectSoundBuffer *SecondaryBuffer;
if(SUCCEEDED(DirectSound->CreateSoundBuffer(&BufferDescription, &SecondaryBuffer, 0)))
{
    // NOTE(casey): All good, secondary buffer works as intended
}
You'll notice we check quite a few times for SUCCEEDED so far. But what if you don't succeed? Usually there would be some sort of logging system in place reporting error messages. Currently we don't have any diagnostics system in place, but we might as well leave a few TODO's for the future. We leave it as the exercise for the reader.
You'll quickly notice that there're many potential failure points. In a good API, you aim to reduce the failure points as much as possible, so this is something you can keep in mind for the future.
As a final touch, let's print out a diagnostic just to see that the Primary and Secondary buffers are up and running:
if (SUCCEEDED(PrimaryBuffer->SetFormat(&WaveFormat)))
{    OutputDebugStringA("Primary buffer format was set.\n");}
// ...
if(SUCCEEDED(DirectSound->CreateSoundBuffer(&BufferDescription, &SecondaryBuffer, 0)))
{    OutputDebugStringA("Secondary buffer created Successfully.\n");}
If you try to compile now, the compiler should let you know that you're missing parameters in your Win32InitDSound call. Let's fix that.
Window: Pass the handle to ourWindow.SamplesPerSecond: We've said that we want 48000 Hz frequency, so we'll pass just that.- For clarity, we'll extract it to
SamplesPerSecondvariable.
- For clarity, we'll extract it to
BufferSize: We said that we wanted a two secondBufferSize. Since we said we wanted 16-bit samples (sizeof(s16)), playing in2channels, for2seconds, on48000frequency, the size should be the multiple all this mulitiplied together.- Let's extract part of it to the
BytesPerSampleandSecondaryBufferSizevariables, again for clarity.
- Let's extract part of it to the
if (Window)
{
    int XOffset = 0;
    int YOffset = 0;    int SamplesPerSecond = 48000;
    int BytesPerSample = sizeof(s16) * 2;
    int SecondaryBufferSize = 2 * SamplesPerSecond * BytesPerSample;

    Win32InitDSound(Window, SamplesPerSecond, SecondaryBufferSize);    // ...
}Now, compile, run and make sure your implementation works correctly. Step into the code and make sure the values are valid. Verify that the Output messages are printed out as intended, and you're good to go.
Deep Dive: DirectSound Objects
We said at the beginning that DirectSound works as an object. We never called it an object because it doesn't use C++ object programming models. Instead, it implements something called “COM Interface”.
When we call into DirectSoundCreate what we really get is an object with a Virtual Function Table, or vtable for short. Vtables are usually something one associates with C++, and we won't be covering much of that. But a short introduction is in place to understand what really goes on here.
Methods
Normally, if you define a struct, you simply put some data in it:
struct some_struct
{
    s32 X;
    s16 Y;
};

// ...

some_struct Foo;
Foo.x = 0; etc.
This signals to the compiler that it needs to prepare some memory. The things that are in the struct will come together (possibly with some padding in between them) in the order in which the occur and in the sizes that they occur. In the example above, we have a 64-byte struct: 32 bits for X, 16 bits for Y and 16 bits for padding (so that the memory is aligned to 4-byte boundary).
C++ allows you to do some other things inside a struct. For instance, you can do a method declaration inside the struct as follows:
struct some_struct
{
    s32 X;
    s16 Y;
    void DoSomething();};
This would enable you to call that function (which in this context is called “method”) in the same way you access another piece of data (e.g. our Foo could make a call Foo.DoSomething()). It works as any function: you can pass parameters to it, return values, etc. Let's, for example, add an int C parameter to it.
The only difference would be syntactic: instead of defining a function as we usually did, you'll need to use the “scoping operator” ::.
struct some_struct
{
    s32 X;
    s16 Y;
    void DoSomething(int C);};

void some_struct::
DoSomething(int C)
{
    // function definiton...
}
Thus the function, instead of being declared at the file scope, is declared in the some_struct object. So you can't just call it like DoSomething, you should always call it from one of its “instances”.
Under the hood, compiler rewrites this function. Among other things, the compiler will insert a pointer to the struct which contains the function. The actual signature would be thus void some_struct::DoSomething(some_struct *this, int C). this pointer will be used to reference anything that implicitly happens within the method. So like in a normal function, you can reference C, initialize new variables normally... but if you reference, for instance, X, compiler would automatically convert it to this->X. In any other function, X would be undefined, but since we declared it in our some_struct, we can reference it in our method.
There a few other differences (again, totally syntactic) which we'll not dive deeper into since we'll not be using these. However what we described above is key to understanding what's happening with DirectSound here, as well as how the COM interfaces work in general.
Virtual Function Tables
If we go one step further, we can declare our DoSomething method as virtual:
struct some_struct
{
    s32 X;
    s16 Y;
    virtual void DoSomething(int C);};
Suddenly, DoSomething becomes more complicated than a regular function or even method. It's not just a syntactic thing any more, there's more than that. When compiler sees virtual keyword, it will insert something called “vtable pointer” at the top of the struct definition. At the same time, outside of the some_struct the compiler will create a virtual function table, or vtable for some_struct.
The vtable contains several function pointers that should be called when you are using some_struct. So now, when you call Foo.DoSomething(), the program will look up the address to DoSomething inside the vtable:
- Get the pointer on top of
some_struct(that the compiler silently inserted) - Access the vtable for
some_struct. - Look at the index of vtable to which
DoSomethingcorresponds. - Jump to the address
DoSomethingpoints to. - Actually call
DoSomething.
Sounds familiar? It's pretty much what we did when we were loading XInput functions. We declared our own function pointers, assigned variables and jumped to them, so that we could call them. virtual functions work in a same manner except that, instead of single global pointers, there're global tables (one per struct using virtual functions), and the only way to access the correct table is to look up the pointer inside the struct pointing to them.
If it sounds complicated and a lot of extra work, it's because it is. There's double indirection going on here before the final dispatch. This leads to the fact that virtual functions come at a cost in performance which sometimes might be critical. Of course, this cost might vary based on how the compiler optimizes all this, but it's still much different than calling a regular function or method. It's not a “zero-cost abstraction”.
COM Interfaces
Component Object Model, or COM, is a “binary interface” standard introduced by Microsoft in the early '90s. What it does is just implementing vtables.
When calling into DirectSoundCreate, it will return us an object with that vtable in it. That's why we only had to use GetProcAddress only once: all the functions are already defined by windows and packaged in these objects, in a non dissimilar way from how we approached it ourselves. This allows us calling the functions off the actual objects that we got back, and the vtable allows us to call these functions.
Now, where exactly is this vtable located in memory? It actually got mapped in memory when we loaded the dsound.dll! So the .dll itself had a vtable in it when it got loaded, and we're pointing to it from our DirectSound object, calling from that jump table inside the object.
Deep Dive into the Disassembly
Let's go inside the debugger to see what's going on. It doesn't really matter what language you program in: CPU has to do everything, so no matter how fancy stuff looks to the language, CPU will have to do whatever work is required to make that happen. Languages sometimes make things simpler to the programmer but not necessarily to the CPU.
- Set a breakpoint on a call of a function we've defined and start debugging.
- Once the breakpoint hits, open Disassembly.
- In Visual Studio, you can right-click the line and select “Go to Disassembly” or press
Alt-G.
- In Visual Studio, you can right-click the line and select “Go to Disassembly” or press
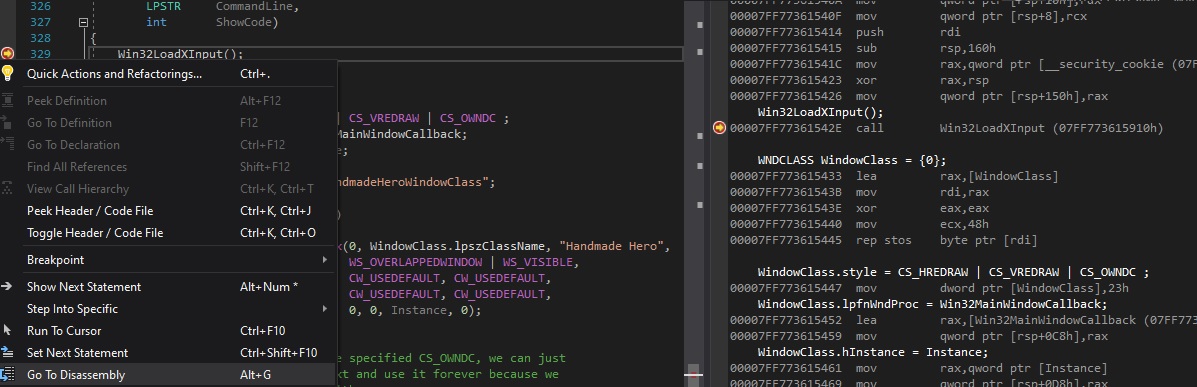
You will see the Disassembly window. It might look complicated at first but it simply represents all the machine code that each line of your code generates. There's the instruction address, the actual instruction (mov, push, call, etc.), and the parameters passed to the processor with that instruction. These can be addresses, memory registers, raw values. You can further customize your Disassembly experience by right-clicking anywhere on disassembly and enabling or disabling the flags of your choice.
Anyway, back to our function. If you look, for instance, at Win32LoadXInput, you will notice that our call corresponds to one instruction: a direct call of our function. It was the linker that, during the linking phase of compiler, put the address of the function directly in the code. Once we step into it, we go straight in our function.
Now, every time you use a virtual function, you're incurring in much more overhead than that. If you set a breakpoint at DirectSound->SetCooperativeLevel call and inspect the Disassembly, you will see that it generated a more instructions.
mov rax, ptr [some memory location]: First indirection, loadDirectSound.mov rax, ptr [rax]: Second indirection, load the vtable.mov r8d, 2: Start packing the parameters (probably?)mov rdx, ptr [Window]: set registerrdxto the value of ourWindowpointer.mov rcx, ptr [some memory location]: set registerrcxto probably theDSSCL_PRIORITY's value.call ptr [rax]: CallSetCooperativeLevelfunction pointer from the vtable.test,jl: test forSUCCEEDEDand skip to another part of code if the result isfalse.
You don't really have to be an expert in the assembly language to see that it's more work than our simply function call. Sure, there're additional things like loading the parameters into the registers and testing for the result, but even the call itself goes through three steps before it actually happens. Maybe in the optimized mode these instructions would be simplified, but that is the idea.
Recap
DirectSound is not a great API. However, in your programming life you will encounter all sorts of API. Some will be good, others not so much. You'll need to learn to read, understand and implement documentation. But even still, you can fit the whole function on one screen. It's not that many lines of code, and once you're done with it, you're done.
Sure, writing platform code takes a couple weeks of work, but you shouldn't be afraid of doing it. The benefits of being able to quickly maintain it moving forwards are immense.
Today, we've laid foundation for our sound processing. Even if we can't reproduce any sounds yet, we have DirectSound initialization out of the way. Tomorrow, we'll try to output some basic sounds using it.
Exercises
Read on Other Audio APIs
As we said, DirectSound is an old API. Newer API are avaialable to do the same job. Read more about them here:
Implement Another Audio API
Pick one of the above and try to implement the same code that we did (audio system initialization) in that system.
Programming Notions
API
The acronym “API” literally stands for Application Programming Interface. It can be used between different parts of the same program, between different programs, even between different operating systems and computers.
If we talk about one program, you can imagine an API as a point of contact between clearly distinct different parts of code, modules, where one side is the producer, and the other is the consumer. In some cases, both sides exchange the roles of producer and consumer.
We've seen quite a few Windows API already: Win32 API allows creation of windows and handling of messages, GDI permits device-independent handling of graphics, Memory takes care of, well, memory. XInput, DirectSound... and so on. These are sets of functions, structures, workflows that you must follow if you want to achieve your goals.
We've also seen that not all API are created equal. Some allow a much bigger degree of freedom for the user, while the others are much more concise (and, in some ways, restrictive). Some introduce multiple failure points while the others have only a couple of things that can fail. Some follow very strict procedures while the others only are a couple function calls.
An important part of every API is its documentation. So far we've only seen MSDN as the documentation source, but for each API there should be some docs teaching a potential user how to use it.
When we'll get to designing our API, several objectives might be pursued: to expose some specific functionality (provide a way to access something that's normally closed), to simplify something, or to communicate.
We'll strive to have as little in the way as possible. An ideal API is only one struct to be filled out by the user; can we achieve that?
(Continue to subsection 2.5)
Side Considerations
About Game Optimization
In game development, game optimization matters a lot. It's either you optimize your game, or you write on top of the game engine that was optimized for you.
If you try to run the original “Binding of Isaac” (when it was the Flash game), it will still struggle on the laptop. This is because it was built on top of something that wasn't optimized to be a game engine.
You really should care about optimization. Of course, some code doesn't have to be optimized, but it should be executed fast enough to not create bottlenecks. And while things like graphics and sound should always be optimized, sometimes even higher level game code can be responsible for the slowdowns.
Navigation
Previous: Day 6. Gamepad and Keyboard Input
Up Next: Day 8. Writing a Square Wave to DirectSound
- API
- COM interface
- Vtable
- Methods