Welcome to “Handmade Hero Notes”, the book where we follow the footsteps of Handmade Hero in making the complete game from scratch, with no external libraries. If you'd like to follow along, preorder the game on handmadehero.org, and you will receive access to the GitHub repository, containing complete source code (tagged day-by-day) as well as a variety of other useful resources.
Today we are going to be finishing our sound program. We'll need to have another go at the sound output code that we made: inspect it, and make sure we don't have bugs in there. As we already mentioned, DirectSound is a bit finicky the way you have to use it, so some double-checking is in place.
(Top)
1 Review Writing to DirectSound
1.1 Start Playing after Filling out the Buffer
1.2 About Debugging Sound
1.3 Debug Cursor Position
2 Generate a Sine Wave
2.1 Start Working with the Floating Point Math
2.2 Modify Samples Generation
2.3 Calculate t
3 Deep Sound Debugging
3.1 Verify the Sine Wave
3.2 Step Through the Code
3.3 Refactor the Code
4 Link the Pitch to User Input
4.1 Straight Up Change
4.2 Store Position in the Sine Wave
4.3 Map the Pitch to the Sticks
4.4 Lower the Latency
5 Recap
6 Exercises
6.1 Map the Tone Change to Keyboard
7 Programming Notions
7.1 Intro to Floating Point
8 Side Considerations
8.1 The First Game Jam
8.2 Bit Shifting and Registers
8.3 Fix: Dead Zone for Controller Sticks
9 Navigation
Review Writing to DirectSound
As you remember, we learned how to lock our (secondary) DirectSound buffer, basically meaning that we asked DirectSound to write into it to update the contents that's being outputted by the sound card. At the end of it, we were unlocking the buffer back, allowing DirectSound to play.
Start Playing after Filling out the Buffer
One thing that would be logical is starting to play after we filled our buffer for the first time. Right now, we're playing from the program start, immediately after we initialized DirectSound:
Win32InitDSound(Window, SamplesPerSecond, SamplesPerSecond * 2 * BytesPerSample);
GlobalSecondaryBuffer->Play(0, 0, DSBPLAY_LOOPING);
You'll notice that this results in a delay before your sound starts playing. Let's introduce a boolean that checks if sound is playing and, if not, start playing!
Win32InitDSound(Window, SamplesPerSecond, SamplesPerSecond * 2 * BytesPerSample);GlobalSecondaryBuffer->Play(0, 0, DSBPLAY_LOOPING);b32 SoundIsPlaying = false;// ...
if(SUCCEEDED(GlobalSecondaryBuffer->GetCurrentPosition(&PlayCursor, &WriteCursor)))
{
    if(SUCCEEDED(GlobalSecondaryBuffer->Lock(...)))
    {
        // Writing our samples
        // ...
        GlobalSecondaryBuffer->Unlock(...);
    }
}if (!SoundIsPlaying)
{
    GlobalSecondaryBuffer->Play(0, 0, DSBPLAY_LOOPING);
    SoundIsPlaying = true;
}About Debugging Sound
Another issue that we have is that square wave is a rather harsh wave. It's a bit harder if there any bugs in the sound output, so today we're going to implement another wave: a sine wave!
The sound is an extremely finicky thing, and it might be very hard to find bugs in it, even to realize that there are. Here is a story to illustrate the point. You can read it in its entirety in subsection 8.1, but the gist of it is the following: you would be surprised at how much variance there is in the sound that comes out from speakers or headphones when you plug them in. The more “pure”, responsive to frequency headphones might yield you a world of a difference and show you the bugs and artifacts that on a different hardware you might miss entirely.
In the code that we've written yesterday there's a lot of moving parts, things that we have to think about. It might be complex approaching the sound debugging. Let's look at what we're doing again. When we come through our program the first time, we:
- Initialize DirectSound and create the sound buffer.
- Give the sound buffer something to output.
- Start Playing.
This means that the play cursor (the thing that we are “chasing”), starts moving through the buffer and, as it moves, send to DirectSound whatever it finds in that buffer.
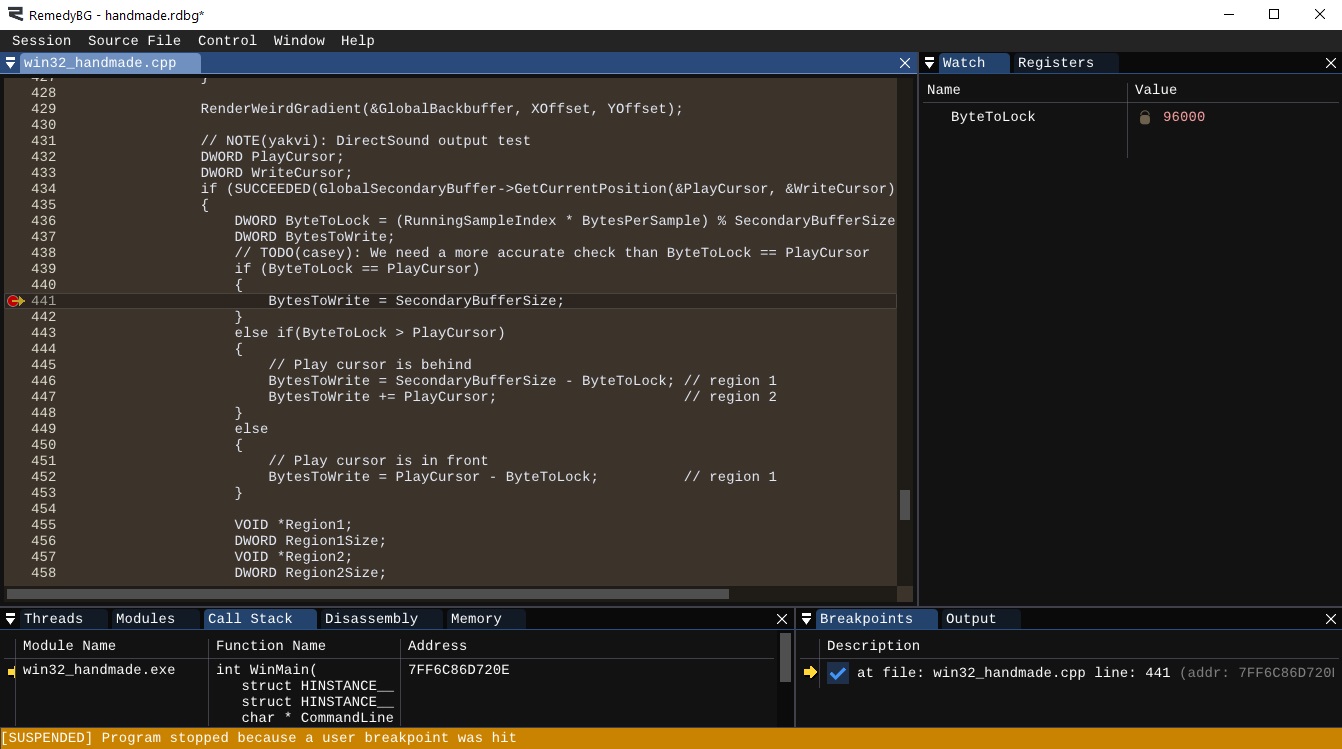
Debug Cursor Position
So where do we start? Let's look at the very beginning and look at our ByteToLock and BytesToWrite calculations.
Right now, we're comparing whether the ByteToLock is greater than the PlayCursor. This means that, if both are at 0, the BytesToWrite will be 0 as well. We could simply say that, if ByteToLock and the PlayCursor are both equal, BytesToWrite would amount to the whole buffer (i.e. SecondaryBufferSize). However, our RunningSampleIndex would have advanced through the whole buffer, and we'd end up at the same place again on our next loop.
We'd have to fill the buffer again, which is totally wrong, since the buffer only now started playing. We could well be on a system which has an inaccurate play cursor position.
What is the play cursor, anyway?
The play cursor is an estimate of where the sound card is playing the sound on the speakers. However, we don't know the details on how this amount is computed. This highly depends on what the sound output chip on your computer, what the drivers are doing, and many other factors. We have no idea what's going on here. Of course, today the updates probably happen much more frequently than it was back in the day, but it's still possible that the play cursor doesn't advance before our next iteration.
We'll probably eventually need to write something more intelligent that would keep track of whether the PlayCursor advanced or not. And say something like “don't take any action until you see that cursor move”. For now, let's simply add the lines we mentioned with a little TODO for posterity:
DWORD ByteToLock = (RunningSampleIndex * BytesPerSample) % SecondaryBufferSize;
DWORD BytesToWrite;// TODO(casey): We need a more accurate check than ByteToLock == PlayCursor
if (ByteToLock == PlayCursor)
{
    // Play cursor is at the same spot
    BytesToWrite = SecondaryBufferSize;
}else if(ByteToLock > PlayCursor){
    // Play cursor is behind
    BytesToWrite = SecondaryBufferSize - ByteToLock; // region 1
    BytesToWrite += PlayCursor;                      // region 2
}
else
{
    // Play cursor is in front
    BytesToWrite = PlayCursor - ByteToLock;          // region 1
}Generate a Sine Wave
We've already said it several times: square wave sure is a simple wave, but it's not a good wave for hearing errors. And you can see just by looking at it: it's completely harsh cut, which is quite unnatural. It's not something that you are really going to see in the real world. Sound is a lot smoother normally, and we don't intuitively know what this should sound like.
We're going to implement a sine wave instead. A sine wave should be familiar for many: it's a smooth continuous wave oscillating between its minimum and maximum indefinitely. A good sine wave sounds as a clear, pure tone to a human ear, with no harmonics. A perfect tone with no noise or harshness. So switching to a sine wave will allow us to have a much easier time in finding the errors in our sound output.

In order to transition away from the square wave, let's rename the references to it in our code: SquareWavePeriod will become WavePeriod, while HalfSquareWavePeriod to HalfWavePeriod. We leave the actual renaming as the exercise for the reader.
Start Working with the Floating Point Math
For the purposes of testing, let's add a math.h library. The math functions to calculate things like sine, cosine, tangent, etc., functions that are built into C Runtime Library. Sometimes they are even built into the CPU! However, not all of of these functions are built into the CPU, plus we said over and over again that we are not going to use any libraries. So eventually we want to reach to a point to implement some of these on our own. It might be a bit of an overkill though, we'll see.
So, at the moment, since we're using that sine function and that's all test code, we'll add in the math.h library. We can also add a TODO to get rid of it eventually:
#include <windows.h>
#include <stdint.h>
#include <xinput.h>
#include <dsound.h>// TODO(casey): Implement sine ourselves
#include <math.h>
The purpose of this course is not to prevent people from using libraries. We aren't using any to show how everything's done, and how to build your own stuff
The functions in math.h mostly operate on the floating point numbers. This will be the first time we'll see them on this course. If you're unfamiliar with how floating point numbers work or want a refresher, please read Intro to Floating Point subsection.
For our convenience, let's add a type definition for float and double to our types so that we can start thinking about them in terms of their size in bits:
typedef int8_t s8;
typedef int16_t s16;
typedef int32_t s32;
typedef int64_t s64;
typedef s32 b32;

typedef uint8_t u8;
typedef uint16_t u16;
typedef uint32_t u32;
typedef uint64_t u64;
typedef float f32;
typedef double f64;Modify Samples Generation
Right now, we have the following code to generate our samples:
s16 *SampleOut = (s16 *)Region1;
DWORD Region1SampleCount = Region1Size / BytesPerSample;
for (DWORD SampleIndex = 0;
        SampleIndex < Region1SampleCount;
        ++SampleIndex)
{
    s16 SampleValue = ((RunningSampleIndex++ / HalfWavePeriod) % 2) ?  ToneVolume : - ToneVolume;

    *SampleOut++ = SampleValue;
    *SampleOut++ = SampleValue;
}

SampleOut = (s16 *)Region2;
DWORD Region2SampleCount = Region2Size / BytesPerSample;
for (DWORD SampleIndex = 0;
        SampleIndex < Region2SampleCount;
        ++SampleIndex)
{
    s16 SampleValue = ((RunningSampleIndex++ / HalfWavePeriod) % 2) ?  ToneVolume : - ToneVolume;

    *SampleOut++ = SampleValue;
    *SampleOut++ = SampleValue;
}
We need to change how we generate our SampleValue, that is currently calculating our square wave. In order to generate the sine wave we'll need to use the Sine function.
If you remember from your trigonometry classes, the Sine function works by taking an angle (usually expressed in radians) and returning a real number from -1 to 1. Obviously, an integer that can be -1, 0 or 1, with nothing in between, wouldn't be very useful here. We need all those values in between to generate a nice sine wave. Of course, you could take the values from ~-2,000,000,000 to ~2,000,000,000 (the approximate range of a signed 32-bit integer) and do some mathy things to get the same result, but since math.h is usually used in the scientific environment, it's usually implemented straight in the floating point numbers directly. That's what we're going to do.
Math.h offers several functions to calculate a Sine. There's sinf which takes a float (f32) and returns a float. There's sin which takes a double (f64) and returns a double. There's even sinl which takes a long double and returns it, although size and precision-wise in MSVC compiler it's the same as double.
We will almost never use 64-bit floating-point numbers in our game. Whenever we'll be using floating-point numbers, speed will be of the essence, and double-precision numbers are always slower than single-precision ones. Even with the modern processors, it only makes sense using doubles when you know you need that extra precision. In case of our sine wave (and in most cases in general) you don't.
So we're going to call sinf. For simplicity for now, let's say that we're going to be in some “SinePosition” when we'll be writing the SampleValue. In math, the running time value is usually designated with the letter t, and we'll need to compute whatever that is, and we'll return to it in a second.
Now, as we said above, sinf returns a sine value between -1 and 1. We however want it to be between -ToneVolume and ToneVolume. So what we'll need to do is to cast to an s16 our SineValue multipled by ToneVolume. This will scale our sine to the desired volume in the 16-bit space and will result in our SampleValue.
Again, as we were saying last time, Region1 and Region2 calculations are identical, so we'll need to repeat it twice.
s16 *SampleOut = (s16 *)Region1;
DWORD Region1SampleCount = Region1Size / BytesPerSample;
for (DWORD SampleIndex = 0;
        SampleIndex < Region1SampleCount;
        ++SampleIndex)
{    f32 t = ; // TODO!
    f32 SineValue = sinf(t);
    s16 SampleValue = SineValue * ToneVolume;    s16 SampleValue = ((RunningSampleIndex++ / HalfWavePeriod) % 2) ?  ToneVolume : - ToneVolume;
    *SampleOut++ = SampleValue;
    *SampleOut++ = SampleValue;
}

SampleOut = (s16 *)Region2;
DWORD Region2SampleCount = Region2Size / BytesPerSample;
for (DWORD SampleIndex = 0;
        SampleIndex < Region2SampleCount;
        ++SampleIndex)
{    f32 t = ; // TODO!
    f32 SineValue = sinf(t);
    s16 SampleValue = SineValue * ToneVolume;    s16 SampleValue = ((RunningSampleIndex++ / HalfWavePeriod) % 2) ?  ToneVolume : - ToneVolume;
    *SampleOut++ = SampleValue;
    *SampleOut++ = SampleValue;
}Calculate t
In order to calculate t for the wave, we'll need to use our RunningSampleIndex which just keeps going up and up and up. Since we know that the period of a sine wave is always \(2\pi\), we multiply this value by our RunningSampleIndex and then divide it by our desired WavePeriod to get the final t.

By making this calculation for each sample, we will be able to find an approximate value corresponding to the related percentage of the volume. The closer the SineValue will be to -1 or 1, the closer the value will be to the negative or positive ToneVolume.
If you look at the figure below, you will see that, over time, all those numbers trace something that resembles a wave. Sure, this wave is not exactly smooth, but that's what the thousands of samples per second are for!
Now, there's one last thing. In order to have full division correctly, we should cast both RunningSampleIndex and WavePeriod to f32 before the division. This way, both numbers will be considered real numbers immediately, and the fraction will not be discarded.
We also need to advance the RunningSampleIndex.
s16 *SampleOut = (s16 *)Region1;
DWORD Region1SampleCount = Region1Size / BytesPerSample;
for (DWORD SampleIndex = 0;
        SampleIndex < Region1SampleCount;
        ++SampleIndex)
{    f32 t = 2.0f * Pi32 * (f32)RunningSampleIndex / (f32)WavePeriod;    f32 SineValue = sinf(t);
    s16 SampleValue = SineValue * ToneVolume;

    *SampleOut++ = SampleValue;
    *SampleOut++ = SampleValue;    ++RunningSampleIndex;}

SampleOut = (s16 *)Region2;
DWORD Region2SampleCount = Region2Size / BytesPerSample;
for (DWORD SampleIndex = 0;
        SampleIndex < Region2SampleCount;
        ++SampleIndex)
{    f32 t = 2.0f * Pi32 * (f32)RunningSampleIndex / (f32)WavePeriod;    f32 SineValue = sinf(t);
    s16 SampleValue = SineValue * ToneVolume;

    *SampleOut++ = SampleValue;
*SampleOut++ = SampleValue; ++RunningSampleIndex;}To recap, what we are doing here is transforming the wave period of the running sample index into the period of sine. We're calling sine, and then multiplying the sine with the tone volume, and that's our sample value.
We don't have the Pi32 right now, so let's quickly define it on top of win32_handmade.cpp.
#define internal static
#define local_persist static
#define global_variable static
#define Pi32 3.14159265359f
We also don't really need HalfWavePeriod any more, so we can get rid of it.
u32 RunningSampleIndex = 0;
int ToneHz = 256;
int ToneVolume = 3000;
int WavePeriod = SamplesPerSecond / ToneHz;int HalfWavePeriod = WavePeriod / 2;Deep Sound Debugging
If you compile and run now... you won't hear the purest of sounds. There will probably be a lot of clicking and “scratchiness”. Of course, we could get this by having our sample value calculated incorrectly, or some other issue. We'll need to find it out.
What's not working properly is probably one of the following:
- The sine wave might not be synthetized correctly. We have just finished implementing the wave, so it might have some errors in it.
- The way we are filling regions might not be correct. We haven't really tested what happens in the sound regions once we get them back, assuming we're getting them correctly.
- Our
ByteToLock/BytesToWritemight be updating incorrectly. Skips can be introduced that should not be here when we start filling out the buffer incrementally.
Of course, there might be other places as well, so we'll need to go hunting for them.
The hunt for the sound bugs is now open!
Verify the Sine Wave
Verifying that our sine wave is calculated correctly is a relatively low-hanging fruit, so let's do that first.
If you recall, our GlobalSecondaryBuffer is 2-second long. That's a lot. So we could write to it only once and never fill it again. If reproducing the same buffer forever won't lead to the same result, our error lies elsewhere.
We can do it quite simply by testing if SoundIsPlaying. The first time we write to the sound buffer, the sound will not be playing, so we can write, toggle the boolean, and prevent any additional buffer editing. Let's add an additional condition to GetCurrentPosition test. As a reminder, we can chain several tests with the logical AND operator (&&):
DWORD PlayCursor;
DWORD WriteCursor;if (!SoundIsPlaying &&    SUCCEEDED(GlobalSecondaryBuffer->GetCurrentPosition(&PlayCursor, &WriteCursor))){
    // ... lock and write to our buffer
}
Another way of testing it would be simply having this whole block run outside of the Running loop. If you factored this code away to a separate function you might try this as an exercise!
In any case, after we compile we should only hear a single click every two seconds, accompanied by a smooth, clean sound. This means that our wave is fine! Let's revert our test back:
DWORD PlayCursor;
DWORD WriteCursor;if !SoundIsPlaying &&if (SUCCEEDED(GlobalSecondaryBuffer->GetCurrentPosition(&PlayCursor, &WriteCursor))){
    // ... lock and write to our buffer
}Step Through the Code
We have now determined, rather definitively, that it's not the sine wave that's responsible for all the artifacts. This means there is a bug in our wave output. As the next step of our investigation, let's look through the code and verify what we know.
If we step through the code from the very start of our sound initialization (place a breakpoint in the debugger by pressing F9 and then step through with F10), we can inspect the various fields we initialize.
- We know we have a buffer which is 48000 samples big, times 4 (the size of our bytes per sample) times 2 (so that we have 2 seconds). This amounts to 384,000 samples. Verify that's exactly what we are passing to
Win32InitDSoundasSecondaryBufferSize, as well as 48000 asSamplesPerSecond. - We can skip ahead to
GetCurrentPositioncall. You can simply set another breakpoint there andF5your way until the breakpoint. - We then calculate the
ByteToLock. Now, here we have chained two operations, a multiplication followed by remainder calculation. We want to multiply the sample index per bytes per sample and then get the remainder. Operator Precedence rules assure us this operation should go as we intend it to, but let's make sure they are executed in sequence we want by adding parenthesis:
if (SUCCEEDED(GlobalSecondaryBuffer->GetCurrentPosition(...)))
{    DWORD ByteToLock = (RunningSampleIndex * BytesPerSample) % SecondaryBufferSize;    DWORD BytesToWrite;
    // ...
}Usually you shouldn't rely on your memory to memorize the operator precedence. Memory may fault, rules may change, and adding parenthesis to make things clearer will never hurt.
Other than that... ByteToLock computation looks fine. We say “wherever our sample index was, times the number of bytes per sample, modded by the entire buffer size, should be where we are in the buffer”. Looks like a solid and straightforward computation.
- We can also verify that
ByteToLockis computed as0during the first and the second run. At the beginning, theRunningSampleIndexis0, so we lock byte0and write the entire buffer, but then the modded value is at0again since we've written the entire buffer exactly once by that point. If we set our breakpoint toByteToWriteand run until the breakpoint (F5), we will see that ourByteToLockshouldn't change. - If the
ByteToLockequals to thePlayCursor, we say that we need to write the entire buffer size. That should happen only one time at the beginning, so let's set a breakpoint inside that block and verify it happens one time only... oh no.
We said that this part should be secured better, and it definitely seems the case. What we intended was that both ByteToLock and PlayCursor should be equal all the time, but this doesn't seem the case. It seems that the write cursor advances roughly the same distance as the RunningSampleIndex, causing us to overwrite the whole buffer again. It is a bug (not necessarily the bug, we'll see it later) because that means that we writing under the write cursor, so we'll need to fix it!
Refactor the Code
The time has come to compress all the sound variables into one struct and extract the sound samples. If you haven't done so already, this is how we approach it.
First, let's define a struct somewhere outside our functions. It will fit all the constants we initialize at the beginning, so we'll call it as win32_sound_output:
struct win32_window_dimension
{
    int Width;
    int Height;
};struct win32_sound_output
{
    int SamplesPerSecond;
    int BytesPerSample;
    int SecondaryBufferSize;
    u32 RunningSampleIndex;
    int ToneHz;
    int ToneVolume;
    int WavePeriod;
};We will then update our constants to be members of this struct:
// NOTE(casey): Sound testwin32_sound_output SoundOutput = {};SoundOutput.SamplesPerSecond = 48000;
SoundOutput.BytesPerSample = sizeof(s16) * 2;
SoundOutput.SecondaryBufferSize = 2 * SoundOutput.SamplesPerSecond * SoundOutput.BytesPerSample;
SoundOutput.RunningSampleIndex = 0;
SoundOutput.ToneHz = 256;
SoundOutput.ToneVolume = 3000;
SoundOutput.WavePeriod = SoundOutput.SamplesPerSecond / SoundOutput.ToneHz;
Win32InitDSound(Window, SoundOutput.SamplesPerSecond, SoundOutput.SecondaryBufferSize);
We will then be in a good position to extract the sound reproduction code (which we mostly verified works fine) in a separate function, and pass a pointer to our new structure. We will also pass the ByteToLock and BytesToWrite so we'll have better control at what part of the buffer we are writing to.
internal void
Win32FillSoundBuffer(win32_sound_output *SoundOutput, DWORD ByteToLock, DWORD BytesToWrite)
{
    VOID *Region1;
    DWORD Region1Size;
    VOID *Region2;
    DWORD Region2Size;
    if(SUCCEEDED(GlobalSecondaryBuffer->Lock(ByteToLock, BytesToWrite,
                                             &Region1, &Region1Size,
                                             &Region2, &Region2Size,
                                             0)))
    {
        // TODO(casey): assert that Region1Size/Region2Size are valid
        s16 *SampleOut = (s16 *)Region1;
        DWORD Region1SampleCount = Region1Size / SoundOutput->BytesPerSample;
        for (DWORD SampleIndex = 0;
             SampleIndex < Region1SampleCount;
             ++SampleIndex)
        {
            f32 t = 2.0f * Pi32 * (f32)SoundOutput->RunningSampleIndex / (f32)SoundOutput->WavePeriod;
            f32 SineValue = sinf(t);
            s16 SampleValue = (s16)(SineValue * SoundOutput->ToneVolume);

            *SampleOut++ = SampleValue;
            *SampleOut++ = SampleValue;

            ++SoundOutput->RunningSampleIndex;
        }

        SampleOut = (s16 *)Region2;
        DWORD Region2SampleCount = Region2Size / SoundOutput->BytesPerSample;
        for (DWORD SampleIndex = 0;
             SampleIndex < Region2SampleCount;
             ++SampleIndex)
        {
            f32 t = 2.0f * Pi32 * (f32)SoundOutput->RunningSampleIndex / (f32)SoundOutput->WavePeriod;
            f32 SineValue = sinf(t);
            s16 SampleValue = (s16)(SineValue * SoundOutput->ToneVolume);

            *SampleOut++ = SampleValue;
            *SampleOut++ = SampleValue;

            ++SoundOutput->RunningSampleIndex;
        }

        GlobalSecondaryBuffer->Unlock(Region1, Region1Size, Region2, Region2Size);
    }
}
Last step of refactoring, we can place the call to this function in place of the code in WinMain.
DWORD PlayCursor;
DWORD WriteCursor;
if (SUCCEEDED(GlobalSecondaryBuffer->GetCurrentPosition(&PlayCursor, &WriteCursor)))
{
    DWORD ByteToLock = (SoundOutput.RunningSampleIndex * SoundOutput.BytesPerSample) % SoundOutput.SecondaryBufferSize;
    DWORD BytesToWrite;
    // TODO(casey): We need a more accurate check than ByteToLock == PlayCursor
    if (ByteToLock == PlayCursor)
    {
        BytesToWrite = SoundOutput.SecondaryBufferSize;
    }
    else if(ByteToLock > PlayCursor)
    {
        // Play cursor is behind
        BytesToWrite = SoundOutput.SecondaryBufferSize - ByteToLock; // region 1
        BytesToWrite += PlayCursor;                      // region 2
    }
    else
    {
        // Play cursor is in front
        BytesToWrite = PlayCursor - ByteToLock;          // region 1
    }    VOID *Region1;
    DWORD Region1Size;
    VOID *Region2;
    DWORD Region2Size;
    if(SUCCEEDED(GlobalSecondaryBuffer->Lock(ByteToLock, BytesToWrite,
                                                &Region1, &Region1Size,
                                                &Region2, &Region2Size,
                                                0)))
    {
        // TODO(casey): assert that Region1Size/Region2Size are valid
        s16 *SampleOut = (s16 *)Region1;
        DWORD Region1SampleCount = Region1Size / BytesPerSample;
        for (DWORD SampleIndex = 0;
                SampleIndex < Region1SampleCount;
                ++SampleIndex)
        {
            f32 t = 2.0f * Pi32 * (f32)RunningSampleIndex / (f32)WavePeriod;
            f32 SineValue = sinf(t);
            s16 SampleValue = (s16)(SineValue * ToneVolume);

            *SampleOut++ = SampleValue;
            *SampleOut++ = SampleValue;

            ++RunningSampleIndex;
        }

        SampleOut = (s16 *)Region2;
        DWORD Region2SampleCount = Region2Size / BytesPerSample;
        for (DWORD SampleIndex = 0;
                SampleIndex < Region2SampleCount;
                ++SampleIndex)
        {
            f32 t = 2.0f * Pi32 * (f32)RunningSampleIndex / (f32)WavePeriod;
            f32 SineValue = sinf(t);
            s16 SampleValue = (s16)(SineValue * ToneVolume);

            *SampleOut++ = SampleValue;
            *SampleOut++ = SampleValue;

            ++RunningSampleIndex;
        }

        GlobalSecondaryBuffer->Unlock(Region1, Region1Size, Region2, Region2Size);
} Win32FillSoundBuffer(&SoundOutput, ByteToLock, BytesToWrite);}If you compile and run, you should now be at the same point as before. We still have the same bug, we just have extracted some code out for potential reuse.
This allows us to use this code elsewhere. For instance, we can say that we want to fill out the sound buffer and start playing immediately after initializing DirectSound, thus getting rid of SoundIsPlaying. We will fill the full buffer, from 0 to our SecondaryBufferSize.
Win32InitDSound(Window, SoundOutput.SamplesPerSecond, SoundOutput.SecondaryBufferSize);b32 SoundIsPlaying = false;Win32FillSoundBuffer(&SoundOutput, 0, SoundOutput.SecondaryBufferSize);
GlobalSecondaryBuffer->Play(0, 0, DSBPLAY_LOOPING);// ... if (!SoundIsPlaying)
{
    GlobalSecondaryBuffer->Play(0, 0, DSBPLAY_LOOPING);
    SoundIsPlaying = true;
}
Now, we can try and fix our bug. We don't need to pre-fill our buffer in the main loop any more, so let's simply say: if our ByteToLock stands in the same position as PlayCursor, do nothing and set BytesToWrite to 0:
DWORD BytesToWrite;
// TODO(casey): We need a more accurate check than ByteToLock == PlayCursor
if (ByteToLock == PlayCursor)
{ BytesToWrite = 0;}Compile, run... and the clicking should be gone! You should be left with the perfectly sounding, pure tone.
It worked! One of the reasons trying to pull the code out, making things cleaner, is that cleaner code has less obscure and banal mistakes in it. Even further yet, we don't need ByteToLock == PlayCursor any longer, we added it to be able to preload our buffer. the else block should handle it. We can also get rid of our TODO.
DWORD BytesToWrite;// TODO(casey): We need a more accurate check than ByteToLock == PlayCursor
if (ByteToLock == PlayCursor)
{
    BytesToWrite = 0;
}if(ByteToLock > PlayCursor){
    // Play cursor is behind
    BytesToWrite = SoundOutput.SecondaryBufferSize - ByteToLock;
    BytesToWrite += PlayCursor;
}
else
{
    // Play cursor is in front or equal
    BytesToWrite = PlayCursor - ByteToLock;
}That said, the compiler should warn us about many of the things, and it can. We just don't have the necessary setting enabled. We'll need to think about warnings and assertions quite soon now.
Link the Pitch to User Input
Let's have some fun! We will change the tone pitch based on the input from the controller. Let's explore how we can make this happen.
Straight Up Change
The simplest and the most intuitive solution would be simply changing the tone Hz and recalculating the Wave Period. Let's say if you press “A” button on your gamepad, you increase the pitch to 512, and if you press “B” button it reverts back to 256:
s16 StickX = Pad->sThumbLX;
s16 StickY = Pad->sThumbLY;

XOffset += StickX >> 12;
YOffset += StickY >> 12;
if(AButton)
{
    SoundOutput.ToneHz = 512;
    SoundOutput.WavePeriod = SoundOutput.SamplesPerSecond / SoundOutput.ToneHz;
}
else if (BButton)
{
    SoundOutput.ToneHz = 512;
    SoundOutput.WavePeriod = SoundOutput.SamplesPerSecond / SoundOutput.ToneHz;
}This will work, and you will hear the tone change. But this also will introduce a new bug into the system: there will be a click at the moment of change. This is because we recalculate where we are in the sine wave every time.
Store Position in the Sine Wave
Right now, we take our running sample index and divide it by the wave period every time. That means our sound will be continuous only if the wave period was continuous. If the latter suddenly changes to something else, we will have a sound glitch right at the point of change.
This direct mapping from the running sample index means that we're incredibly rigid in how this wave looks. If it changes just a bit (like doubling the length of the wave), the whole map changes, and we suddenly find ourselves in a completely different position on the wave:
To be able to fix this issue, we need to keep track of our position in the sine wave, the t of the sine, and then gradually increase it by whichever amount we'd like to advance. And we want to advance by a single increment (as opposed to the whole RunningSampleIndex) multiplied by \(2/pi\) and divided by the wave period:
struct win32_sound_output
{
    int SamplesPerSecond;
    int BytesPerSample;
    int SecondaryBufferSize;
    u32 RunningSampleIndex;
    int ToneHz;
    int ToneVolume;
    int WavePeriod;    f32 tSine;};
s16 *SampleOut = (s16 *)Region1;
DWORD Region1SampleCount = Region1Size / SoundOutput->BytesPerSample;
for (DWORD SampleIndex = 0;
SampleIndex < Region1SampleCount;
++SampleIndex)
{ f32 t = 2.0f * Pi32 * (f32)SoundOutput->RunningSampleIndex / (f32)SoundOutput->WavePeriod; f32 SineValue = sinf(SoundOutput->tSine); s16 SampleValue = (s16)(SineValue * SoundOutput->ToneVolume);
*SampleOut++ = SampleValue;
*SampleOut++ = SampleValue;
SoundOutput->tSine += (2.0f * Pi32 * 1.0f) / (f32)SoundOutput->WavePeriod; ++SoundOutput->RunningSampleIndex;
}
SampleOut = (s16 *)Region2;
DWORD Region2SampleCount = Region2Size / SoundOutput->BytesPerSample;
for (DWORD SampleIndex = 0;
SampleIndex < Region2SampleCount;
++SampleIndex)
{ f32 t = 2.0f * Pi32 * (f32)SoundOutput->RunningSampleIndex / (f32)SoundOutput->WavePeriod; f32 SineValue = sinf(SoundOutput->tSine); s16 SampleValue = (s16)(SineValue * SoundOutput->ToneVolume);
*SampleOut++ = SampleValue;
*SampleOut++ = SampleValue;
SoundOutput->tSine += (2.0f * Pi32 * 1.0f) / (f32)SoundOutput->WavePeriod; ++SoundOutput->RunningSampleIndex;
}If you recompile now, you'll note that this solves this bug.
Map the Pitch to the Sticks
Let's go crazy. We can say “Our pitch depends on whatever the current input from a controller stick is”. Keep in mind that the value from the sticks right now can go up to 65565, so we'll need to tune it down a bit. We'll do all the math in floating point and then will cast down to int.
if(AButton)
{
    SoundOutput.ToneHz = 512;
    SoundOutput.WavePeriod = SoundOutput.SamplesPerSecond / SoundOutput.ToneHz;
}
else if (BButton)
{
    SoundOutput.ToneHz = 512;
    SoundOutput.WavePeriod = SoundOutput.SamplesPerSecond / SoundOutput.ToneHz;
}SoundOutput.ToneHz = 512 + (int)(256.0f * ((f32)StickY / 30000.0f));
SoundOutput.WavePeriod = SoundOutput.SamplesPerSecond / SoundOutput.ToneHz;Lower the Latency
Ok, we've now seen that two second buffer creates a bit too much of a delay. Right now we're writing with a whole buffer latency, so let's try to lower it down.
Let's introduce a latency sample count which would stand for how much ahead of the cursor we'd want to be. For now, let's say it's \(\dfrac{1}{15}\) of a second, and we can adjust it later in case. Eventually we'll want it to be much higher, like \(\dfrac{1}{60}\) of a second.
On our first run, we'll fill our buffer only by whatever the LatencySampleCount is (multiplied by BytesPerSample).
struct win32_sound_output
{
    int SamplesPerSecond;
    int BytesPerSample;
    int SecondaryBufferSize;
    u32 RunningSampleIndex;
    int ToneHz;
    int ToneVolume;
    int WavePeriod;
    f32 tSine;    int LatencySampleCount;};
SoundOutput.SamplesPerSecond = 48000;
SoundOutput.BytesPerSample = sizeof(s16) * 2;
SoundOutput.SecondaryBufferSize = 2 * SoundOutput.SamplesPerSecond * SoundOutput.BytesPerSample;
SoundOutput.RunningSampleIndex = 0;
SoundOutput.ToneHz = 256;
SoundOutput.ToneVolume = 3000;
SoundOutput.WavePeriod = SoundOutput.SamplesPerSecond / SoundOutput.ToneHz;SoundOutput.LatencySampleCount = SoundOutput.SamplesPerSecond / 15;Win32InitDSound(Window, SoundOutput.SamplesPerSecond, SoundOutput.SecondaryBufferSize);Win32FillSoundBuffer(&SoundOutput, 0, (SoundOutput.LatencySampleCount * SoundOutput.BytesPerSample));GlobalSecondaryBuffer->Play(0, 0, DSBPLAY_LOOPING);
We can then introduce a “target cursor” that will offset our PlayCursor by whatever our LatencySampleCount is (multiplied by BytesPerPixel). We'll then use the TargetCursor wherever we were using the PlayCursor before:
DWORD ByteToLock = (SoundOutput.RunningSampleIndex * SoundOutput.BytesPerSample) % SoundOutput.SecondaryBufferSize;DWORD TargetCursor = PlayCursor + (SoundOutput.LatencySampleCount * SoundOutput.BytesPerSample);DWORD BytesToWrite;if(ByteToLock > TargetCursor){
    BytesToWrite = SoundOutput.SecondaryBufferSize - ByteToLock;    BytesToWrite += TargetCursor;}
else
{    BytesToWrite = TargetCursor - ByteToLock;}

Win32FillSoundBuffer(&SoundOutput, ByteToLock, BytesToWrite);This however introduces a bug: there're occasional skips here and there.
In the past couple lessons we talked so much about the circular buffers, that you might have noticed already what the problem is: we didn't account for the fact when the PlayCursor wraps around, and there's not enough space for the TargetCursor. To fix that, we simply need to mod the result of our TargetCursor calculation with the SecondaryBufferSize as we did for our ByteToLock above.
Remember to account for operator precedence! We want multiplication → addition → modulation, and addition is the “weaker” operation, so we need to wrap the operations accordingly.
DWORD ByteToLock = (SoundOutput.RunningSampleIndex * SoundOutput.BytesPerSample) % SoundOutput.SecondaryBufferSize;DWORD TargetCursor = ((PlayCursor + (SoundOutput.LatencySampleCount * SoundOutput.BytesPerSample))
                                          % SoundOutput.SecondaryBufferSize);DWORD BytesToWrite;
//...Recap
We achieved our today's objective of debugging the sound buffer, and even went further!
For now though, we're happy with our sound so next time we'll get to implementing a new and exciting feature: timers!
Exercises
Map the Tone Change to Keyboard
If you don't have access to controllers (or want an extra challenge), you might want to do what we described in section 4 using keyboard. It might be more complex since you currently don't have access to SoundOutput in the Win32MainWindowCallback. What will you do?
Programming Notions
Intro to Floating Point
Floating point numbers are a way to represent in computer systems the real numbers (i.e. the numbers which have a fraction, like the \(\pi\) number). In C and C++, these are expressed in float and double built-in types, for 32-bit and 64-bit accuracy, respectively.
Now, contrary to int or short or long, floating-point types float and double usually have a defined width accross the board. This is because floating point numbers are so complex, there's a whole Standard established for them (called IEEE 754). It's a very rigorously defined thing. There's not a lot of ambiguity as to how these numbers operate, and there are reasons behind all of it. During this course we'll be referring to some of it, but many of the minutia defined we'll never really get to. These minutia are useful in the scientific computing or some very delicate numeric algorithms. For instance, you might care if something is positive or negative zero (which is a thing).
For now you only need to know a few things: floating point number is a number which allows setting up a fraction. Also, by default the compiler assumes that you're writing a 64-bit fraction, so if you want to use a 32-bit fraction, you should add an f at the end, so your numbers end like this: 3.14159f.
We are also going to mostly do our math in the floating point because the modern processors have a lot of horsepower designed to facilitate the floating point math, and we want to take advantage of that. That was not always the case, by the way: old home computers often didn't have the expensive Floating Point Unit (the FPU), and all the math was done in integers simulating floating point behaviour. This of course was quite expensive and taking a lot of processor power away.
Often this was done using what's called the fixed point. Let's visualize the two to understand the difference.
If you take this 32-bit integer, you can imagine various ways into how it can be divided. So far, we were assuming that the integer is one of the following:
- Unsigned: All of the bits act together to give you one value. You have all the bits set each representing a multiple of 2, you add them all together and you end up with a number. For instance, if you have the bottom 3 bits set, you know that your value is \(1 + 2 + 4 = 7\).
- Signed: We've been using negative numbers, and the negative numbers use a system called Two's complement. The high bit determines the sign of the number: if it's set, it's a negative number. The rest of the numbers are encoded in such a way that the math works out anyway even if they are negative. They are interpreted slightly differently, and we will touch this at some point.
There's something else that we could have done with our 32 bits. Let's say we want to have a number that, as in mathematics, has a decimal point that comes after it. To make it happen, we could reserve some bits for the number and some for the fraction. We can arbitrarily decide which part takes how many bits. For instance, we can say that the bottom 8 bits of a 32 bits are the fraction, while the rest will be used to represent the number. This is what is called “Fixed Point Math”:
Considering the value of our fraction (f) can be anywhere from 0 to 255, the actual number can be calculated in the following way:
\begin{equation} N = w + \frac{f}{255} \end{equation}
Even further, if we only want to know what the total number is, you can do it by simply shifting the number w down by 8 (w >> 8). This is what's called truncation, we get rid of the bits before the point we're interested in.
You can do more fun stuff with fixed fraction point. You could do rounding by adding 127 (255 / 2) to your fraction and then truncating. This would increase the number by one if the fraction were less than 128, thus rounding the fraction (if it wasn't, the add would of course not impact the number). In code this would look in roughly the following way:
N = w >> 8;             // Truncation
N = (w + f / 2) >> 8;   // Rounding
N = (w >> 8) + f / 255; // Exact fraction calculation
There're more tricks you can do, but you should get the point by now. You divide your bits in full number and fraction, and then do some math and play around with it as you want. And this is what people did back in the day in order to avoid expensive floating point math.
What is floating point anyway?
You see that in fixed point we arbitrarily decide at what point we stop our whole number and start the number. This has a number of limits as well. In the example above, if we take our 8 bits for fraction, we can never have more than 256 levels of fraction, and you can never have numbers higher than ~16 million if we only ever have 24 bits. Sure you can move the imaginary line left or right to better adjust to your specific needs, but whatever bit you're fixating as the “divider”, all the numbers should follow that boundary.
In floating point... well, the decimal point floats. It's a different way of dividing up your bits, and floating point works completely differently from what fixed point is conceptually, or from what you might imagine. It's divided roughly in the following way:
Floating point allows you to have a much greater flexibility at the cost of having the precision of your operations wary, depending on the values involved. It's subdivided in the following manner:
- Mantissa (sometimes called as “Signifcand field”) represents a fraction. It's not the number you want to store just yet!
- Exponent is the power of
2, indicating how big the number is. In other words, if the value stored in these bits is \(n\), exponent is \(2^n\). - Sign bit it simple. It stores if the value is positive or negative.
This allows you to separate degree of precision you have in specifying the number (which is always going to be the size of the mantissa) from the scale of the value, which is specified in the exponent. The bigger the exponent, the smaller is the number part, and the smaller is the fraction, and the contrary.
And here we come back to the discussion on the precision. If the exponent is very high or very low, information will be lost. Imagine that you have 23 bits of mantissa (which translate to a 7-digit decimal number), with a giant exponent like \(2^{50}\) (which is a lot) you end up with some value with a lot of zeroes at the end. On the other hand, if the exponent were negative (say, $2^{-50}), the mantissa is pushed down, and the final value becomes something like \(0.0000000001\).
In short, the role of the exponent is to slide the decimal around.
(Back to subsection 2.1)
Side Considerations
The First Game Jam
What follows below is a Casey's recounting of the First Game Jam.
A long time ago, we used to do something that was called "Indie Game Jam". And it was it, it was the very first game jam in existence. It was hosted by Sean Barrett and Chris Hecker and was called “0th Indie Game Jam”. It was held in a barn in Oakland, California.
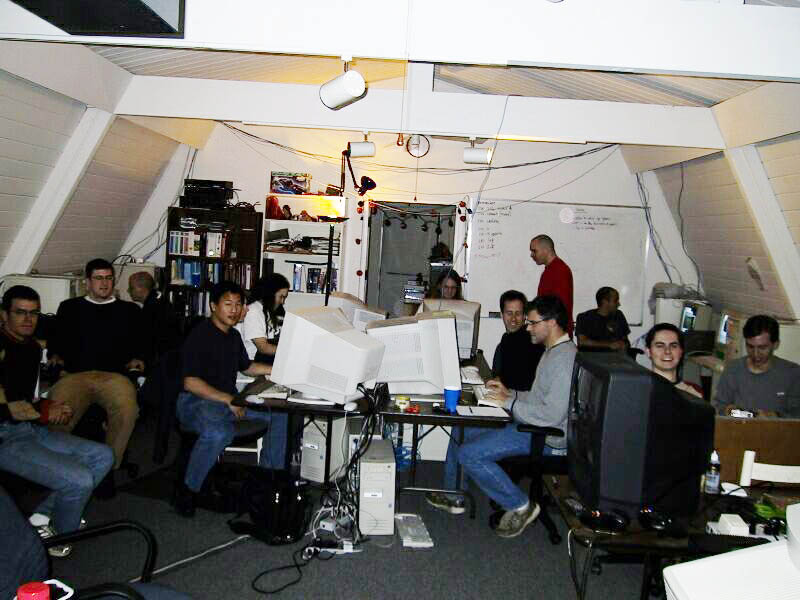
It all started from an email conversation where the various programmers were talking that the computers were just getting powerful enough to draw maybe 100,000 sprites visible on the screen. Just oldschool sprites (animated 2D bitmaps), but still. So the talk started to revolve from “What kind of games might someone make using this kind of power? 100,000 guys visible on a screen is a lot” to “Why don't we get the friendly game developers that we know and see for ourselves?”
At the time, everyone was working on the so-called AAA games (large studio games) at a time. The year was 2001, there was no Unity engine, no App Store, it was 6 years before the first alpha of Minecraft appeared on the internet... There was no such thing as the indie scene. And the invite was “If all these programmers come down for a long weekend, how many games can they make to just play around with the idea of having 100,000 guys?
Casey worked on the core engine for this jam. He took care mainly of the camera code and the loading of the WAD files which contained the actual sprites and other game data. Sean Barrett was doing the rendering, so when everyone got there they could go ahead and start making games with it.
And so that was it, the first game jam that ever was. Since then, that idea of having a theme and a jam, where everyone just packs in and makes a bunch of games in a weekend, has caught on, and there were many others of any kind. Keep in mind that, at the time, the engine had to be prepared beforehand, so that the jammers would show up and just focus on writing the game. People would volunteer to work on the engine, etc.
A couple of years down the line, the fourth and final instalment of the series, Indie Game Jam 3, was centered around audio. The game was going to be oriented around audio, so the engine should have been prepared accordingly. The engine was designed by Atman Binstock (currently chief architect at Oculus VR).

Before the engine was complete, Casey went to visit Atman and had a chance to see the engine in action. It was a busy café in Japan, and they had to listen to the audio using headphones. Now, at the time Casey had extremely precise, professional-grade headphones by Etymotic, so he started listening to the audio the engine was reproducing through those headphones. Suddenly, he realized: Atman had a bug somewhere. He wasn't aligned on buffer or something. He could hear it, some clicking going on.
At this point, Atman switched the headphones, plugged his cheaper headphones and, after listening for a while, said: “I don't know what you're talking about, it sounds right”. So Casey gave him his headphones, so he switched, listened for a couple seconds, and concluded: “I got to buy myself a better set of headphones”.
The moral of the story is the following: different kinds of effects happen to the sound on the way out. When you plug in subpar headphones/speakers, or even good speakers that go through a system designed to have the sound be “better”, “smoother”, “warmer” or whatever you want it to call it. The mutation that happens may make the result sound better (or worse), obscures the truth of what is actually getting of what is actually put out by the computer. So if you have a subtle bug or artifacts in the sound, it's entirely possible you might be oblivious to them as your sound setup wouldn't allow you to hear them.
This is how finicky sound is. And if you really, really want to know if you have a sound bug, beyond actually inspecting the code and trying to verify as much as you can, you have to invest in a pair of highly responsive headphones because you may miss those bugs entirely.
(Back to subsection 1.2)
Bit Shifting and Registers
Bit shifting works by actually moving the bits of the value left or right, thus increasing or decreasing the value by a factor of two per bit. But is it possible to shift too far so that the value “spills” to another adjacent variable?
The answer is no, because bit shifting doesn't happen in memory. All the operations happen in registers, and then the result is stored in memory.
What are the registers anyway?
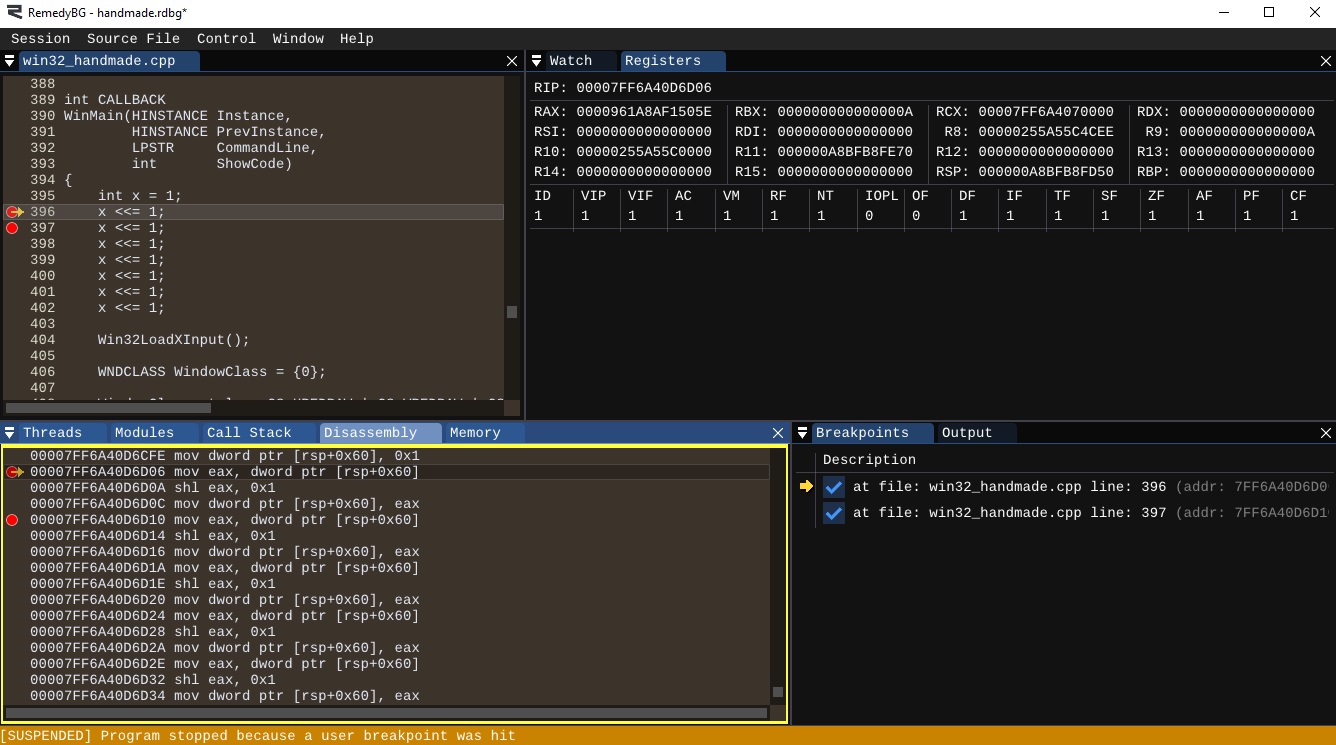
A register is the physically closest “memory” location to the processor, the location which is used for processor operations directly. What happens when any instruction is executed, the machine takes one or more values from memory, stores it in the register and then returns the result to memory. You can quickly test it by declaring an int x = 1; and then bit shifting it multiple times, like that:
int x = 1;
x <<= 1;
x <<= 1;
x <<= 1;
x <<= 1;
x <<= 1;
x <<= 1;
x <<= 1;
If you go to the debugger and open disassembly, you will see that each shift/assignment operation translates to three instructions:
mov eax, ptr: Load the value toeaxregister.shl eax, 1: Shift Left theeaxby 1.mov ptr, eax: Load the value fromeaxregister back.
You can actually see the shifting happening if you open your Registers window or simply type rax in the Watch window. Even further yet, if you type rax,b in the Watch window, you'll be able to see rax register (64-bit version of eax) in bits, so you can see the shifting visually.
In conclusion, even if you go outside the type boundary in the register, when the value is copied to the memory it remains within its limits.
Fix: Dead Zone for Controller Sticks
If you recall, we tried to account for our controller's dead zone by shifting down by 12. This is quite bad code, even for a quick example.
XOffset += StickX >> 12;
YOffset += StickY >> 12;
Now, shifting down by 12 is the same that dividing by \(2^{12}\), right? Well, there's a catch. The catch occurs when there's a negative number. By default, if you shift in C, it does what's called “sign extension”. What that means is if the number was negative, and you shift it down, it continues shifting the high bit, so you end up (in binary) with a number like 1111111111111111 which translates to -1 where in reality we'd expect a 0. This might cause persistent scroll even if you don't provide any input (and you can also hear it if you hooked up your sound to it).
What you want to do instead in such a case is actually dividing by a high number. Let's say 4096:
XOffset += StickX / 4096;
YOffset += StickY / 4096; Well shifting down by 12
Navigation
Previous: Day 8. Writing a Square Wave to DirectSound
Up Next: Day 10. QueryPerformanceCounter and RDTSC
- Fixed-point numbers
- Floating-point numbers
- Real numbers
- Truncation