Welcome to “Handmade Hero Notes”, the book where we follow the footsteps of Handmade Hero in making the complete game from scratch, with no external libraries. If you'd like to follow along, preorder the game on handmadehero.org, and you will receive access to the GitHub repository, containing complete source code (tagged day-by-day) as well as a variety of other useful resources.
We have not quite finished setting up our application: some things need to be cleaned up, and we need to start drawing to our window.
Today, we'll need to create something that would become our buffer of pixels that we can write to in any way that we want. We then need to give it back to Windows, so that it displays it in our window for us. It won't be necessarily the most efficient way of render things on Windows (nowadays everything goes through the 3D graphics card). However, before anything can go to the graphics card, we're going to do everything from scratch ourselves, so we'll need to follow a slightly slower path.
(Top)
1 Windows Message Callback
1.1 Closing the Window
2 Different Meanings of static
2.1 global_variable
2.2 local_persist
2.3 internal
3 Lay Out the Plan
3.1 Backbuffer, Windows, GDI and Us
3.2 Create / Resize DIB Section
3.3 Calculate Client Area
3.4 Some Refactoring
3.5 Update Window
4 Implement Logic
4.1 StretchDIBits Implementation
4.2 CreateDIBSection Implementation
4.2.1 Fill Out BITMAPINFO
4.2.2 Decide on Memory Allocation
4.2.3 Extract More Global Variables
4.2.4 Free Memory
4.2.5 Get the Device Context
4.3 Finish Win32UpdateWindow
5 Inspect Your Work
6 Recap
7 Exercises
7.1 Experiment with the Debugger
7.2 Peeking into Assembly Language
8 Programming Basics
8.1 About Resource Handling
8.2 Define Directive
8.3 void Type
9 Side Considerations
9.1 About Global Variables
10 Navigation
Windows Message Callback
In the previous chapter, we finished setting up our window and getting ready of outputting something into it. We have our callback function and a message loop. The latter is a way to process the message queue, where Windows and other programs add messages. We need to pull these messages, one at a time, Translate and Dispatch them, so that they are sent to our MainWindowCallback function.
We have our message queue which we pull messages from, why can't we process them at the same place, without going through setting up an opaque message dispatch system?
While we're those who pull the messages from our queue, we aren't the only ones who can call our callback function. Windows reserves the right to call that callback function any time it wants to. It does not have to do it inside that DispatchMessageA, and we have to be ready for the operating system to call us back.
Closing the Window
In our MainWindowCallback, we left out a couple of things to fix. One thing is that you cannot close it without interrupting the process from the debugger (Shift-F5) or the Task Manager. The reason for it is that we are not currently handling WM_CLOSE message (aside from printing WM_CLOSE to Output whenever we hit it).
To handle WM_CLOSE message properly there're a few things that we can do.
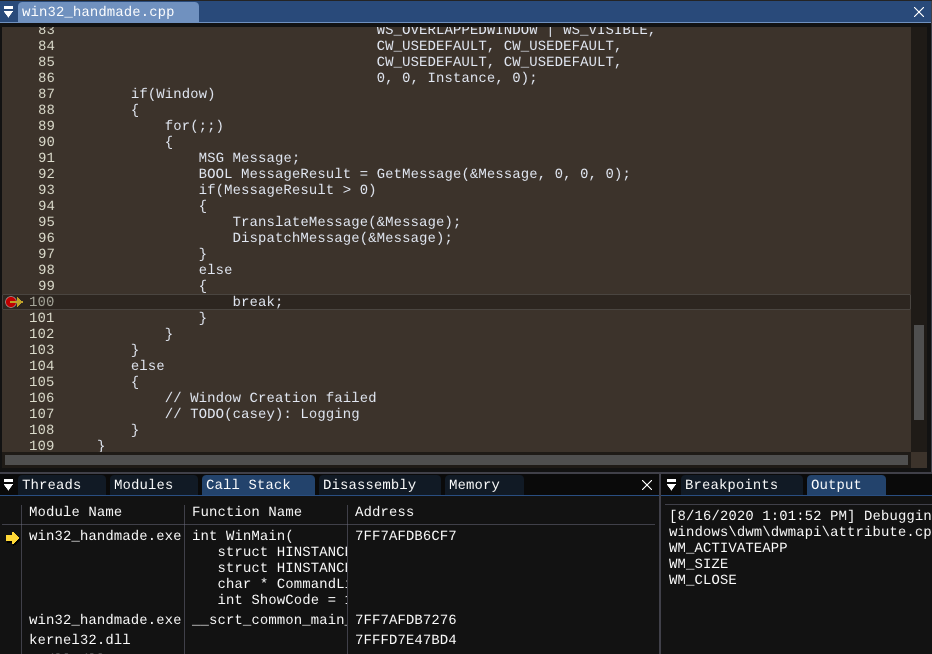
First, let's look at our message loop inside the WinMain. As you might remember from the previous chapter, if GetMessage receives WM_QUIT message, its result is 0 (and if the window handle provided is invalid, the result is -1). That is why we're checking if the message result is greater than 0:
for(;;)
{
    MSG Message;
    BOOL MessageResult = GetMessage(&Message, 0, 0, 0);
    if (MessageResult > 0)
    {
        TranslateMessage(&Message);
        DispatchMessage(&Message);
    }
    else
    {
        break;
    }
}So, at the moment, if we want to exit the application, we simply need to receive a quit messsage! Luckily there's a handy function that does just that:
case WM_CLOSE:
{    PostQuitMessage(0);    OutputDebugStringA("WM_CLOSE\n");
} break;
The 0 that we pass to the PostQuitMessage is our exit code. As in our WinMain, this simply means “all good, program terminated correctly”. In case of some error, you could use some other number so that you're able to analyze why your program might have crashed. We don't really care about this because we won't see much interaction with Windows.
MSDN yourself! While we're providing all the functions and extract the important bits out of them, this course might not have all the calls that you might need for your own programs.
Be sure also to make sure the articles you find are for your target architecture. You can check it in the Requirements section at the bottom of each article where you can see some useful information like “Minimum supported client”. You can also find here other useful information like the library (that we used already a couple of times).
Let's compile and debug our program.
- Set up a breakpoint at the
WM_CLOSEcase in yourMainWindowCallbackand at the message loopbreakpoint (F9). - Start debugging (
F5). - Hit the red
Xbutton in your window. You will notice that your program halts at the breakpoint you've set. - Hit
F10to advance the program untilPostQuitMessage. This function will then trigger and post a newWM_QUITmessage to the queue. - Continue running the program (
F5). - One of the new messages that we receive with our
GetMessagewill beWM_QUITwhich will trigger the breakpoint at ourbreakstatement. F10→breakwill throw us out of the message loop.- If you hit
F10a couple more times, the program will reach its end and exit.
WM_QUIT might not come immediately after WM_CLOSE. Usually there would be a plethora of other messages the queue should go through before it gets to WM_QUIT.
If you're wondering out why aren't we closing our window, check out subsection 8.1.
There's a bit of an oddity in that we are handling the WM_CLOSE message but not the WM_DESTROY. If you want to write a bit cleaner code, you may also add the same PostQuitMessage to WM_DESTROY:
case WM_DESTROY:
{    PostQuitMessage(0);    OutputDebugStringA("WM_DESTROY\n");
} break;If you want to go even one step further to tidy everything up, you could destroy the window (and from there quit):
case WM_CLOSE:
{    DestroyWindow(Window);    OutputDebugStringA("WM_CLOSE\n");
} break;In reality, we aren't going to do any of these things. We will introduce a global variable that, if set to false, will lead us out of the game loop.
This brings to us the following chain of changes:
- Inside
WinMain, what used to be an infiniteforloop becomes awhileloop (from “forever” it will become “while we are running”). - As the criteria for the
whileloop, we will use a global boolean variable calledRunningthat we will create on top of ourwin32_handmade.cppfile.- In the future, this variable might be moved somewhere else, but it will be global for now.
- Inside our
WM_CLOSEcase ofMainWindowCallback, we will set it tofalse. This means that, whenever we receive aWM_CLOSEmessage, user wants to quit → stop running → go out of thewhileloop and exit our application. We can add the same line inWM_DESTROYfor consistency. In a grand scheme of things, this is a temporary measure. In the final game there're a few considerations against such a solution:- We might not want the user to close the application right away, but maybe spawn a confirmation dialogue before switching off the game loop.
- In another case, we might not expect the window to be destroyed; in that case we might treat it as an error of some sort and try to recreate the window.
- Set
Runningto true just before entering thewhileloop.
In total, this will result in the following set of changes:
#include <windows.h>
static bool Running;
LRESULT CALLBACK
MainWindowCallback(...)
{
    switch (Message)
    {
        case WM_CLOSE:
        {            Running = false;        } break;

        case WM_DESTROY:
        {            Running = false;        } break;
        // ...
    }
    // ...
}

int CALLBACK
WinMain(...)
{
    //...
    if (Window) {        Running = true;        while (Running) // Replaces "for" loop        {
            //...
        }
    }
}Different Meanings of static
Let's make a small detour here.
We already encountered the static keyword. We mentioned that static has three meanings in C, depending on where you put it (we used it to identify a “locally persistent” variable inside our WM_PAINT), so let's define it as three different keywords. We'll add them at the top of win32_handmade.cpp:
#include <windows.h>
#define internal static
#define local_persist static
#define global_variable static // the rest of our program
#define in the subsection 8.2.
In our case, we #define three different names to translate as the static keyword. Let's look in which situations to use which.
global_variable
global_variable is a variable that, once declared, is available in the entirety of the file it's in. Any function can access it, read its value and modify it.
Additionally, any global_variable, once declared, is initialized to 0.
Before we move on, let's rename our static bool Running into a global_variable:
#include <windows.h>

#define internal static
#define local_persist static
#define global_variable static
global_variable bool Running;// the rest of our program
You can read some additional consideration about the global variables in the subsection 9.1.
local_persist
Locally persistent static variable stays around similar to a global_variable but it's locally scoped.This is the way we used it last time.
Normally, whenever you enter a scope, area designated by braces ({}), variables declared inside it live until you go out of it. Then that memory is cleared, variable becomes undefined and, if there was already a variable with the same name declared further “above”, the latter's value is returned to the variable.
int x = 0;
{ // enter scope
    int x = 1;
    int y = 2;

    printf(x); // 1
    printf(y); // 2
} // exit scope

printf(x); // 0
printf(y); // compilation error: y is undefined
If you mark a variable with static (or, in our case, local_persist), it will be declared only once for the whole duration of the program. Each time that your program returns to that point (in a loop, or by calling the function multiple times), the application will remember the variable's value from the last time it was at this point in the program.
int GetNextNumber()
{
    int Result = 0;
    int x = -1;

    {
        static int x = 0;
        x = x + 1;
        Result = x;
    }

    return (Result);
}

int main()
{
    printf(GetNextNumber()); // 1
    printf(GetNextNumber()); // 2
    printf(GetNextNumber()); // 3
    printf(GetNextNumber()); // 4
}
In x is initialized to 1 only once. The rest of the times, when we call our GetNextNumber function, it “remembers” its value from the last time, and correctly increments itself by 1.
While we're at it, let's rename our only static variable to local_persist.
case WM_PAINT:
{
    // ...    local_persist DWORD Operation = WHITENESS;    PatBlt(DeviceContext, X, Y, Width, Height, Operation);

    EndPaint(Window, &Paint);
}
local_persist in your final code!There're many reasons to never use static variables in the final code. This is a very bad idea for thread safety and other advanced things.
It was one of the reasons we even split the static keyword into three keywords: so that we can search for local_persist variables and strip them away from the final code.
However, they are a handy tool for development purposes, because they allow to quickly introduce something to the code without having to worry about passing things around, and this is exactly what we are doing right now in WM_PAINT: making sure our PatBlt does exactly what we want to it to do.
internal
If a static keyword is applied to a function, the function is marked as “internal” to that specific file, and no one from outside may access it.
Lay Out the Plan
Backbuffer, Windows, GDI and Us
Now that we've got that out of the way, let's compile and run our program. If you still can see your window, which you can close correctly, you succeeded in this refactoring. We initialize our Running to true which keeps the while loop running, until we hit a WM_CLOSE message. At that point Running becomes false, we fall out the while loop and Windows cleans up the program for us, whether we like it or not.
We fixed the only problem with our application that we had: that we couldn't close it. We can close it now! Very exciting. We could handle now the WM_SIZE and WM_ACTIVATEAPP which we left out as stubs. But the real problem right now is that we can't paint anything meaningful. There a few considerations here:
- When we had to do our paint, we had to use Windows' graphics API called “GDI”. This makes heavy use of a lot of instruments like Device Contexts, Brushes,
PAINTSTRUCTs, etc. - Since we want to do everything from scratch, we want to interface with GDI as little as possible. In practice, we will use it only pass a bitmap to display in our window.
- Think of a bitmap as simply a picture. It's literally a bit map, a sequence of colors: Red, Green, Blue, Red, Green, Blue, etc1.
- The bitmap itself would be created (rendered) using our own code and techniques.
- To create the bitmap, we need to ask Windows to allocate (prepare and assign to us) a memory buffer (a block of memory) that we can write into.
- We need to ask for the memory because we can't simply create a variable with many bits and write into it: for very big memory blocks (like our buffer) you need to allocate memory (or reserve it for our use).
- Also we need to ask for it because Windows (or any other good operating system) is very protective of the memory its applications use.
- We will then arrange it in a format that Windows is comfortable with us handing back to it.
Create / Resize DIB Section
In practice, we are going to introduce the function called ResizeDIBSection. It will serve to resize (or initialize if it doesn't exist) a Device independent Bitmap (DIB). This is the name Windows gives to the bitmaps that we can display using GDI. We will call it every time we get a WM_SIZE message.
global_variable bool Running;
internal void
ResizeDIBSection()
{
}
LRESULT CALLBACK
MainWindowCallback(...)
{
    LRESULT Result;

    switch (Message)
    {
        case WM_SIZE:
        {            ResizeDIBSection();            OutputDebugStringA("WM_SIZE\n");
        } break;

        // ...
    }

    return(Result);
}Calculate Client Area
A key piece of information that we will need to resize our buffer is the size of our window's client area, i.e. the area which we can draw into (it's smaller than the actual window area)2. The Windows API function responsible for it is called simply GetClientRect. Take a moment to find it on MSDN!
As you can see, this function takes a window handle and a pointer to a RECT structure. Windows will write the size of our window to this struct. This will give us the top, left, bottom and right coordinates that we will need to convert to width and height like we did when we were doing our PatBlt.
We will then pass these values to our ResizeDIBSection.
internal voidResizeDIBSection(int Width, int Height){
}

// ...
        case WM_SIZE:
        {            RECT ClientRect;
            GetClientRect(Window, &ClientRect);
            int Width = ClientRect.right - ClientRect.left;
int Height = ClientRect.bottom - ClientRect.top; ResizeDIBSection(Width, Height); OutputDebugStringA("WM_SIZE\n"); } break;Some Refactoring
Before we move on, let's do some cleaning up. Because we're operating on a Windows platform at the moment, you might incur in the naming conflicts. We will simply add a Win32 prefix our functions to indicate the platform we're on.
internal voidWin32ResizeDIBSection(int Width, int Height)
LRESULT CALLBACKWin32MainWindowsCallback(...){
    // ...
    case WM_SIZE:
    {
        // ...        Win32ResizeDIBSection(Width, Height);        // ...
    }
}

int CALLBACK
WinMain (...) // WinMain remains with the old name since Windows _expects_ WinMain function
{
    WNDMCLASS WindowClass = {};    WindowClass.lpfnWndProc = Win32MainWindowCallback;    // ...
}
If you prefer, you could introduce a namespace around the code instead.
Update Window
We now have our buffer. Each frame, we will redraw it using the procedures that we'll write. After that, the buffer will be PAINTed into the window. To do that, we will ask Windows to do a copy of our buffer into a space occupied by our window inside WM_PAINT.
WM_PAINT. But we'll get there later.
Let's introduce a function which we will call Win32UpdateWindow. For this function to work, we can imagine we'll need the device context and the client rect (X, Y, Width and Height we calculated). We then can call it in our WM_PAINT. Let's also remove all the temporary code used for PatBlt:
internal void
Win32ResizeDIBSection(int Width, int Height)
{
}internal void
Win32UpdateWindow(HDC DeviceContext, int X, int Y, int Width, int Height)
{
}
// Win32MainWindowCalback
    // ...
    case WM_PAINT:
    {
        PAINTSTRUCT Paint;
        HDC DeviceContext = BeginPaint(Window, &Paint);

        int X = Paint.rcPaint.left;
        int Y = Paint.rcPaint.top;
        int Width = Paint.rcPaint.right - Paint.rcPaint.left;
        int Height = Paint.rcPaint.bottom - Paint.rcPaint.top;        local_persist DWORD Operation = WHITENESS;
        if (Operation == WHITENESS)
        {
            Operation = BLACKNESS;
        }
        else
        {
            Operation = WHITENESS;
        }
        PatBlt(DeviceContext, X, Y, Width, Height, Operation);        Win32UpdateWindow(DeviceContext, X, Y, Width, Height);

        EndPaint(Window, &Paint);    }break;
// ...Implement Logic
We now have 2 functions: Win32ResizeDIBSection and Win32UpdateWindow. But they don't do anything yet. Let's fix that: we know that one will be necessary to create or resize our DIB section, while the other will be used to output our buffer to window. We also have a rough idea what they should take.
A quick research on MSDN (using words as Create, DIB, etc.) leads us to two functions: CreateDIBSection and StretchDIBits. Let's start from the latter, and make our way to the former.
StretchDIBits Implementation
StretchDIBits is a rectangle-to-rectangle image copy. If the destination rectangle is bigger, the image is increased, if not, shrunk down.
As you can see, the function takes quite a few parameters, but most of them are pretty straightforward.
HDC: handle to our device context. Just pass it in.xDest, yDext, DestWidth, DestHeight: These are the four parameters that we just got from our clientrect. Again, just pass them in.xSrc, ySrc, SrcWidth, SrcHeight: These are the same parameters but for our source rectangle. For today it's the same exact rectangle as the clientrect.*lpBitsand*lpbmi: We can skip these for now.iUsage: specified what kind of buffer is passed (whether it's palettized or RBG). We'll useDIB_RGB_COLORS.rop: raster operation code. This code allows to specify what do we want to do with the destination on bitwise level. We only want to copy fromSrc, so let's useSRCCOPYconstant.
internal void
Win32UpdateWindow(HDC DeviceContext, int X, int Y, int Width, int Height)
{    StretchDIBits(DeviceContext,
                  X, Y, Width, Height,
                  X, Y, Width, Height,
                  const VOID       *lpBits, // TODO!
                  const BITMAPINFO *lpbmi,  // TODO!
DIB_RGB_COLORS, SRCCOPY); }We don't really care about the return of this function. If it succeeds, it returns a non-zero value, so we could in theory capture it to ensure it went smoothly. We leave this as an excercise for the reader.
We assume that you have knowledge of how the RGB values work in computers. If you bring up a color picking utility, you will see that each color (in RGB mode) has a Red, Green and Blue component, each represented by a number from 0 to 255.
This is what's intended under RBG color mode. Each pixel is represented by a Red byte, a Green byte and a Blue byte per each pixel drawn.
A Palette however is when you want to be more indirect (and potentially save buffer memory). For example, if you want to have 16 colors total in your image (from 0 to 15), in your buffer you will write just numbers, from 0 to 15, and have a “palette” passed somewhere together with your buffer, where each index has its corresponding RGB color. This is how, for example, a GIF image works, or “Posterize” effect in Photoshop.
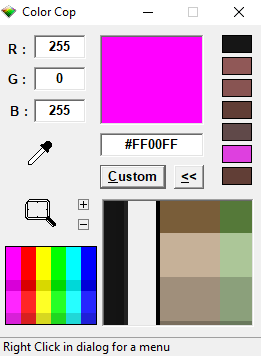
On the topic of color-picking utilities, we highly recommend one called Color Cop. It's a lightweight utility which allows you to pick any color on the screen
To conclude, we now miss the bitmap info and the actual buffer. And to get those, we need to go back to Win32ResizeDIBSection and CreateDIBSection.
CreateDIBSection Implementation
Now, CreateDIBSection, the main call inside Win32ResizeDIBSection, may be even less straightforward than the StretchDIBits we just saw.
From the get-go, we can fill out a few parameters:
hdc: Device Context, we'll get back to it.*pbmi: a pointer to a BITMAPINFO struct that we will need to fill out.usage: same thing asiUsagewe've just seen,DIB_RGB_COLORS.**ppvBits: a pointer to avoidpointer.- It simply means that Windows will need an address of a
void *. - This
void *will contain the address to ourBitmapMemory, the reason for why we actually started this whole enterprise.- To read more about the
void *, check out void Type subsection.
- To read more about the
- It simply means that Windows will need an address of a
hSection: As you can see from its description in MSDN, this is something we need to specify if we want to get fancy with our DIB section. We just need the memory, so0is fine.offset: An offset referencing thehSectionabove. We'll also leave it at0.
We will also make use of the handle that this function returns, so let's capture it, as well.
internal void
Win32ResizeDIBSection(int Width, int Height)
{    BITMAPINFO BitmapInfo;

    void *BitmapMemory;

    HBITMAP BitmapHandle = CreateDIBSection(DeviceContext, // TODO
                                            &BitmapInfo,   // TODO
                                            DIB_RGB_COLORS,
                                            &BitmapMemory,
                                            0, 0);}
Sometimes, you want a function to return more than one value. For instance, CreateDIBSection returns the bitmap handle but also a pointer to the bitmap memory. But, in C, you can only return one thing. How would such a problem solved?
* One way would be to create a “return variable” before calling a function, and pass its address. The function would then overwrite whatever value there was with the return value. This is how most of Windows API is implemented.
* Another way would be packaging all the data in a custom “response” struct. If we were to implement CreateDIBSection, we might have a similar API as a result:
struct create_dib_section_result
{
    HBITMAP Handle;
    void *Memory;
};
create_dib_section_result CreateDIBSection(DeviceContext, BitmapInfo, usage, etc, etc2);
Of course, this might potentially create some issues if you return more than a few values, but then you'd need to re-evaluate if your function doesn't do too much work anyway. Additionally, this is a more recent way; before C was standardized in 1989, you could not return structs, so some older API still linger in the old ways before of legacy compatibility.
Fill Out BITMAPINFO
The next thing that we are going to tackle is the BitmapInfo, a BITMAPINFO structure which we need to pass a pointer to. This is the structure which, at first, will be filled out by us.
If you open the structure on MSDN you will notice that it has only two components. That's not that bad, right? And we can safely ignore the bmiColors array as it's only relevant if we're in the Palette mode (which we are not).
However, if you open documentation for the BITMAPINFOHEADER structure you will be presented a more familiar wall of text.
typedef struct tagBITMAPINFOHEADER {
  DWORD biSize;
  LONG  biWidth;
  LONG  biHeight;
  WORD  biPlanes;
  WORD  biBitCount;
  DWORD biCompression;
  DWORD biSizeImage;
  LONG  biXPelsPerMeter;
  LONG  biYPelsPerMeter;
  DWORD biClrUsed;
  DWORD biClrImportant;
} BITMAPINFOHEADER, *PBITMAPINFOHEADER;BITMAPINFOHEADER structure syntax.
We can fill it out directly by referencing it directly via the BitmapInfo.bmiHeader as follows:
biSize: Size of thebmiHeaderstructure. We can easily calculate it by using a handysizeoffunction.biWidth, biHeight: Width and Height of our DIB sectionbiPlanes: This is an obsolete value which by now should always be1.- In the past, it was used when multiple chunks of memory were combined to get the required color.
biBitCount: How many bits per pixel we will use. We will have 3 bytes of color (1 for Red, Green an Blue channels), so each byte being 8 bits, we'd need 24 of them... but we'll ask for32for the reasons which will become clearer later down the line (spoiler: it has to do with alignment).biCompression: What type of compression we want. Since we don't want our image to be compressed at all (we want the fastest thing possible), we indicateBI_RGB.
We don't care about the remaining parameters, so let's just clear to zero the whole struct upon initialization.
BITMAPINFO BitmapInfo = {};BitmapInfo.bmiHeader.biSize = sizeof(BitmapInfo.bmiHeader);
BitmapInfo.bmiHeader.biWidth = Width;
BitmapInfo.bmiHeader.biHeight = Height;
BitmapInfo.bmiHeader.biPlanes = 1;
BitmapInfo.bmiHeader.biBitCount = 32;
BitmapInfo.bmiHeader.biCompression = BI_RGB;
void *BitmapMemory;

HBITMAP BitmapHandle = CreateDIBSection(DeviceContext,       // TODO                                        &BitmapInfo,                                        DIB_RGB_COLORS,
                                        &BitmapMemory,
0, 0);Decide on Memory Allocation
Now, let's remember that we will allocate a new buffer each time that we resize our window. This can potentially be very bad as our application could explode in memory consumption very quickly if we aren't careful. We need to free the memory that we're getting. Now here comes a dilemma:
- We could try and free a DIB section each time before we create a new DIB section, or
- We can wait and see if we can get a new DIB section first, and if we can't, try to free an already existing one.
Both scenarios are not ideal, but let's go for the first one. We're running a risk to find no BitmapMemory to free to begin with (and we can therefore crash), but it's still better than potentially creating memory leaks. Plus we can “bulletproof” this later.
// TODO(casey): Bulletproof this.
// Maybe don't free first, free after, then free first if that fails.

// TODO(casey): Free our DIBSectionBITMAPINFO BitmapInfo = {};
// ...
void *BitmapMemory;

HBITMAP BitmapHandle = CreateDIBSection(DeviceContext,       // TODO
                                        &BitmapInfo,
                                        DIB_RGB_COLORS,
                                        &BitmapMemory,
0, 0);We'll return to this in a minute.
Extract More Global Variables
Now, we will need some information shared by both of these parties. The simplest solution (that we'll go for now) is to take it out as global_variables. We will pull out BitmapInfo, BitmapMemory and BitmapHandle.
This has also an added benefit that they will be initialized to 0 automatically.
global_variable bool Running;global_variable BITMAPINFO BitmapInfo;
global_variable void *BitmapMemory;
global_variable HBITMAP BitmapHandle;
internal void
Win32ResizeDIBSection(int Width, int Height)
{
    // ...
    // TODO(casey): Free our DIBSection    BITMAPINFO BitmapInfo = {};
    void *BitmapMemory;    // ...
}Free Memory
Now we can also free up our buffer memory if it's already occupied! Simply check if BitmapHandle exists, if not, call DeleteObject on it.
// TODO(casey): Free our DIBSectionif (BitmapHandle)
{
    DeleteObject(BitmapHandle);
}Get the Device Context
The last thing that we have to figure out is where do we get the DeviceContext from. The Device Context that we need to get should be something suitable for drawing bitmaps into.
This can be achieved by asking Windows to create a DC compatible with the device we're trying to use. This is important because, even if we're not drawing with the device context, we still need one to give us a compatible buffer. The call for it is called CreateCompatibleDC.
Since this DC is created for us to use, we might as well store it as a global variable. Moreover, we can only initialize it on the first run, or if we find that this device context was somehow lost. In theory, we won't ever have to release this DC. Let's take a mental (and a physical) note of it however so that we don't lose track of it as we move along:
For consistency, let's also rename it to BitmapDeviceContext:
global_variable BITMAPINFO BitmapInfo;
global_variable void *BitmapMemory;
global_variable HBITMAP BitmapHandle;global_variable HDC BitmapDeviceContext;
internal void
Win32ResizeDIBSection(int Width, int Height)
{
    // ...
    if (BitmapHandle)
    {
        DeleteObject(BitmapHandle);
    }
        if(!BitmapDeviceContext)
    {
        // TODO(casey): Should we recreate these under certain special circumstances?
        BitmapDeviceContext = CreateCompatibleDC(0);
    }            BitmapHandle = CreateDIBSection(BitmapDeviceContext,                                        &BitmapInfo,
                                        DIB_RGB_COLORS,
                                        &BitmapMemory,
                                        0, 0);
!) operator
In C, exclamation mark (!) at the beginning of a boolean value serves to invert it. For example, !true means false, and the contrary.
In this case, we check if we don't have a device context. Only if our BitmapDeviceContext is 0 it gets converted to 1 and thus we step into the if code block to create a new DC.
Finish Win32UpdateWindow
We now have everything in place on one side - let's hook it up to the other side. Fill out the remaining couple parameters in StretchDIBits with the values we put as global. Remember that we need to pass the pointer (address using &) to our BitmapInfo!
internal void
Win32UpdateWindow(HDC DeviceContext, int X, int Y, int Width, int Height)
{
    StretchDIBits(DeviceContext,
                  X, Y, Width, Height,
                  X, Y, Width, Height,                  BitmapMemory,
                  &BitmapInfo,                  DIB_RGB_COLORS, SRCCOPY);
}Inspect Your Work
This should be it, we should be compilable! If you run now, you should see a black square in your ClientRect. Let's step through the code to see if everything behaves as we expect it to:
- Set up your breakpoint at the beginning of the
WM_SIZEcase in yourWin32MainWindowCallback. - Start debugging.
- The program will initialize the window and start receiving the messages.
- At one point it will hit
WM_SIZEcall and stop at your breakpoint.
- Navigate using
F10to step over some functions (likeGetClientRect) andF11to step into them. - In the
Watchwindow, type inWidthandHeightto inspect theWidthandHeightvariables, once you calculate them. Compare them with the data in theClientRect.
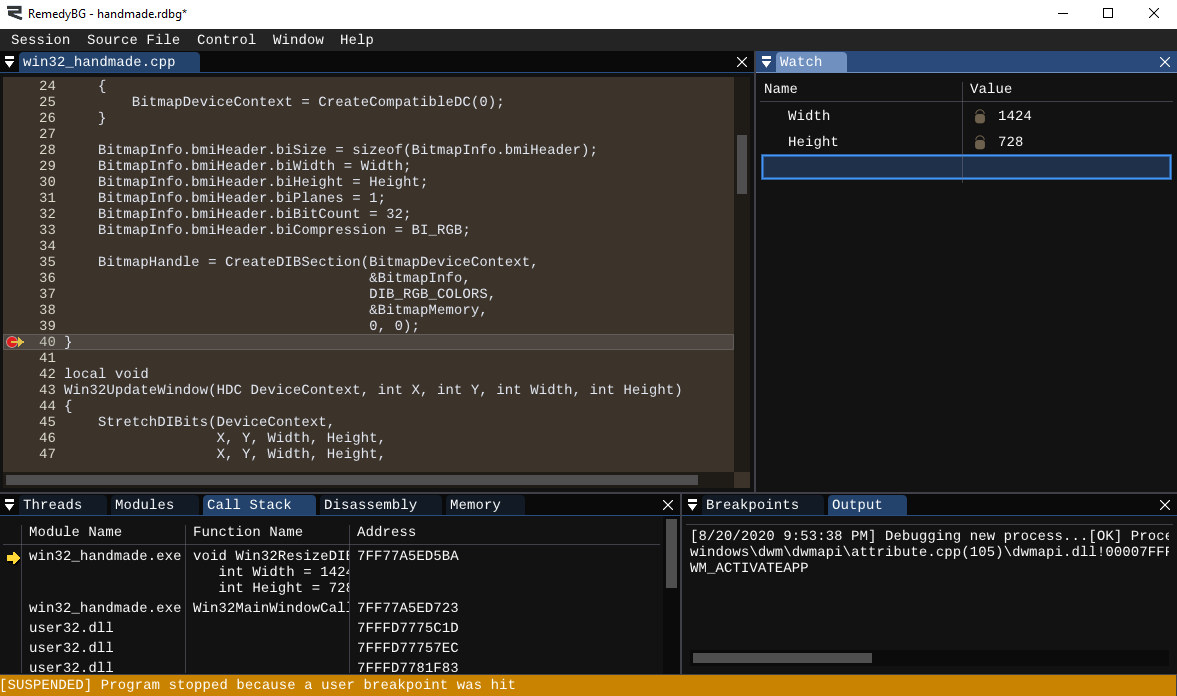
- Once you step into
Win32ResizeDIBSection(F11):- If it's the first time you hit
WM_SIZEyou shouldn't have aBitmapHandleso you skip memory freeing. - You also won't have the
BitmapDeviceContext, so you'll try and get it usingCreateCompatibleDC. InspectBitmapDeviceContextto make sure it's a valid handle (shouldn't be0). - You then fill out the
BitmapInfo. You can inspect it as well to make sure it's filled out as expected. - Last, we call
CreateDIBSection. If you step over it (F10) you should expect getting a) aBitmapHandleand b) aBitmapMemorypointer.
- If it's the first time you hit
- Release all the breakpoints and get the program running. Open the Task Manager (
Ctrl-Shift-Esc) → Details section. Find your process (win32_handmade.exe) and check its memory footprint. Resize your window many times and make sure the memory doesn't explode in size (“leaking memory”).- You can see the memory in the
Working Set (Memory)andCommit Sizecolumns. - If you don't see these columns, you can right click the existing ones and choose the menu option “Select columns”.
- You can see the memory in the
If you got all these steps correct, congratulations! This is a complex road you have embarked upon, and it's fine to make mistakes along the way. This is fine, as during their correction they become happy accidents where you learn something new in a place where you least expected to.
Recap
We covered a lot of ground here. We got a more robust way of closing our window, and learned about different meanings of static keyword. After this, we roughly planned and sketched our next steps and we got them completed! You now have your own buffer to write into. Unfortunately, it's still sad and empty, but we will fix that tomorrow.
In the next chapter, we will start animating our buffer with our own data.
Exercises
Experiment with the Debugger
Start a debug session. Step in your code, inspect different variables into your Watch window. Navigate your program through the Call Stack by double-clicking the previous calls. Check your Output. Try to see how your data looks by inserting various pointers at your disposal in the Memory window.
Peeking into Assembly Language
If you end up in the Disassembly (by stepping into a function you don't have code for) try to see what's going on there. Each line represents machine instructions as converted from the C code, written in the language called assembly, and you can learn more about it here. You can also watch an excellent video on the matter here.
Programming Basics
About Resource Handling
If you have experience programming in an Object-Oriented languages like C++ of Java, you might be asking: what about closing our window?
When programming in Object-Oriented languages, people usually make extreme care in making sure they have completely symmetric construction and destruction (or aquisition and release) of their resources. Some programmers know it as Resource Acquisition Is Initialization (or RAII), others wrap it inside class Constructors and Distructors, but it all boils down to a rather simple concept. This means every time you make something, such as CreateWindowEx or RegisterClass, you want to make sure: if there is some way to clean up, you do so.
As an example we've seen in our program, in WM_PAINT, where there is BeginPaint, there should be a correspondent EndPaint somewhere along the line. However, we registered a window class and opened a window with no intention of cleaning it up, and it would be a no-go for RAII. Why so?
The problem with this pattern is it sounds good on paper or on test dummy projects, but it's less than ideal in real world applications. If you care about performance and many other things, you will quickly discover it's almost always better that resources are acquired and released in aggregate.
Instead of thinking about things individually, you should think about them as a part of a group bundled together. As a result, you will notice that resources are better acquired and released in waves. You don't have to worry about what this means for now: we're going to get into those things much later, when we have more resources to deal with.
Back to the present, we're creating a window which we know will be running for the rest of our game's execution. When we exit the application, Windows will clean up all of our windows, handles, memory, etc. So if we actually ask to close our window before we exit, we're wasting the user's time.
If you ever encountered those applications that you try to close, and it takes a while to close down, you know what we are talking about here. Those programs try to close everything manually, tidy everything up... things that, if they would be thought about in waves, would be gone right away.
(Back to Subsection 1.1)
Define Directive
#define is a so-called “preprocessor directive” (it's in the same family as #include above). It has a syntax of #define NAME value and serves for macro definition. That is, you designate NAME as a macro, and whenever you type NAME in your code the compiler simply reads it as value.
In its simplest form, it works the following way:
#define Pi32 3.1415926535

// later in your code

x = x * Pi32; // Compiler sees it as "x = x * 3.1415926535;"
A more advanced form would be using parameters #define SOMETHING(param), where param is an arbitrary number of parameters you can pass to the macro. Note the absence of space between the name and the parenthesis.
#define Square(number) (number * number)

// later in your code

x = Square(x); // Compiler sees it as "x = (x * x);"
As a preprocessor directive, #define is translated before the rest of the code. This enables us to do various tricks to achieve our goals.
(Back to Section 2)
void Type
A void is a very special type in C.
- If it's a return from a function, it simply means nothing. Moreover, you will receive an error if you try to return from a
voidfunction. - If you don't have any parameters to pass to a function, in C you also used to type
voidas a parameter (in more recent versions of C it's no longer necessary, and it's been deprecated in C++). - Finally, a
void *(“void pointer”) variable is a pointer to raw memory, without any “type” associated with it. Compiler doesn't care what type of data does this pointer points to, any address is fine.- This is useful when you don't know the format of the data you're getting, for example from some opaque API which ends up consuming the same pointer later on.
- Alternatively, if you know what data does it point to, you can cast it to the type of your choice. In our case, we will use the
BitmapMemoryto cast it as several different types, depending on the operation we're doing.
(back to Subsection 4.2)
Side Considerations
About Global Variables
In the programming world, the usage of global variables is generally being frowned upon. And, while we don't agree that their usage should be avoided at all costs, there's a reason while such an adversity exists. Many of the common critisisms of the global variables are totally valid, and here is how we are going to try and go around them:
- Prevent the code from “touching” variables it shouldn't
- Make our code clear about what it can and cannot access
This is where global variables pose a problem. Since everyone can change their value, tracking those changes may become difficult. In this case, the risk is small since the Running variable is totally harmless (it controls the exit from the main loop and nothing else). Additionally, because of how Windows API is constructed our code will always be somewhat “janky”, globals are somewhat inevitable in the Win32 platform layer. Most of our code will not be in that layer, and most of our code will not be touching any Win32 platform globals (or even be aware of its existence). Even then, we will probably move Running somewhere outside at some point.
That said, it's a totally valid strategy of using globals while you are levelling up your code during the development, as long as that usage is cleaned up by the time the codebase is solidified, and we are ready to ship our code.
(Continue to Section 2.2)
Navigation
Previous: Day 2. Opening a Win32 Window
Up Next: Day 4. Animating the Back buffer
- Define
- Memory Allocation
- Memory Leaks
- Translation Unit