Welcome to Day 4 of “Handmade Hero Notes”, the book where we follow the footsteps of Handmade Hero in making the complete game from scratch, with no external libraries. If you'd like to follow along, preorder the game on handmadehero.org, and you will receive access to the GitHub repository, containing complete source code (tagged day-by-day) as well as a variety of other useful resources.
Last time, we started laying out the ground work for our back buffer, a place to which we will render our game. In a few words, we drafted two functions: Win32ResizeDIBSection and Win32UpdateWindow. We use the first one when processing WM_SIZE window message, and the other when processing WM_PAINT.
Now, we shall finish the back buffer setup and do a simple animation to it.
(Top)
1 Review and Simplify Buffer-related Functions
2 Our Custom Bitmap Memory Allocator
2.1 Allocate the Bitmap Memory
2.2 Cleanup
2.3 For Future Reference: Change Memory Protection
2.4 Compile and Test
3 Revisit Win32UpdateWindow
3.1 Update StretchDIBits
3.2 Propagate the Changes Outside
3.2.1 Bitmap Width and Height
3.2.2 Window Width and Height
4 Draw Pixels to the Bitmap
4.1 Understand the Read Order of the StretchDIBits
4.2 Start Pixel Loop
4.3 Set Up Basic Types
4.4 Calculate Row and Pixel positions
4.5 Pixel Component Layout in Memory
4.5.1 Possible Arrangements in Memory
4.5.2 Try to Set Red Channel
4.5.3 Correct the Structured Art
4.6 Draw Colors Based on Pixel Position
5 Rendering a Pattern
5.1 Introduce RenderWeirdGradient
5.2 Prepare the Main Window Loop for Continuous Animation
5.3 Our First Animation
5.4 Recompress Pixel to 32-bit Value
6 Recap
7 Exercises
7.1 Draw Other Weird Gradients
8 Programming Basics
8.1 Virtual Memory vs. Physical Memory
8.2 Type Casting
8.3 Hexadecimal
8.4 Pre-increment and Post-increment operator
9 Side Considerations
9.1 build.bat: Request MSVC to Give Full Paths
9.2 Introduction to Alignment
9.3 RAII
9.4 Bit Blit
10 Navigation
Review and Simplify Buffer-related Functions
Before we get going, let's look back at the two functions we defined last time. We went a bit fast with implementing our plan, so there might be something we missed along the way.
Win32ResizeDIBSectionwould serve to initialize and, if necessary, to resize the buffer.- This function would take a width and a height of our client area rectangle.
- Instead of returning anything, we work with the global variables representing a bitmap device context, a bitmap handle, bitmap info and a pointer to the actual bitmap memory.
- You could also imagine these as some additional pointers passed to our function.
- At its core, we use a couple of Windows calls:
- CreateCompatibleDC to initialize the bitmap device context.
- Bitmap info is filled out by us using some constant values that we won't change unless the size changes.
- CreateDIBSection used to initialize the bitmap memory.
- Inside
Win32UpdateWindow, we would store the device context to copy pixels from the bitmap memory to the window.- This function would take the coordinates of our client area rectangle, and a device context.
- As of now, it would only pass these to the StretchDIBits function from Windows.
There's a bit more to it than meets the eye.
Windows is an old platform. Over years, various tools were created to solve similar problems. One of these problems was outputting a bitmap image to screen or, taken more broadly, from one bitmap to another. Remember that, for the operating system, there's no major difference drawing to your window, a .bmp image file or the whole screen! The process which oversees it is generally called bit blit.
BitBlt, head out to subsection 9.4.
Since we're displaying our bitmap on screen using StretchDIBits, we can make a number of simplifications:
- We don't need a bitmap handle or bitmap DC, these can go away.
- We don't even need a DIB section! Bitmap Memory can be allocated directly by us.
- Yeah, it's actually a simplification. We have all the control that we want over this allocation process.
- As long as it's right size, Windows will accept this memory with no issues.
This results in a following refactoring from the get-go:
//...
global_variable BITMAPINFO BitmapInfo;
global_variable void *BitmapMemory;global_variable HBITMAP BitmapHandle;
global_variable HDC BitmapDeviceContext;
internal void
Win32ResizeDIBSection(int Width, int Height)
{
    // ...
    BitmapInfo.bmiHeader.biCompression = BI_RGB;    if(BitmapHandle)
    {
        DeleteObject(BitmapHandle);
    }

    if(!BitmapDeviceContext)
    {
        BitmapDeviceContext = CreateCompatibleDC(0);
    }
    BitmapHandle = CreateDIBSection(BitmapDeviceContext,
                                    &BitmapInfo,
                                    DIB_RGB_COLORS,
                                    &BitmapMemory,
                                    0, 0);    BitmapMemory = ; // TODO allocation
}Our Custom Bitmap Memory Allocator
In the code above, we left a stub for the BitmapMemory allocation. Let's actually write a custom memory allocator that would give us the memory we need!
Allocate the Bitmap Memory
We now have everything in place to determine the amount of the memory we will need for our buffer.
- Each pixel should be 4 bytes wide.
- Why do we need 4 if we only need 3 bytes to store RGB values? You can find our considerations in subsection 9.2.
- We need
Widthamount of pixels for each row. - We need
Heightamount of rows to form the full picture.
In other words, we are calculating the area of the rectangle \(A = x \cdot\ y\). This gives us the total amount of pixels, and by multiplying by 4 (which is our Bytes per Pixel), we get the final Bitmap Memory Size, i.e. \(A = 4x \cdot\ y\).
int BytesPerPixel = 4;
int BitmapMemorySize = BytesPerPixel * (Width * Height);BitmapMemory = ; // TODO allocation
As you can imagine, in Windows there are several ways of allocating some memory. We have seen CreateDIBSection already but its quite specific in its use. The general-purpose allocators include CRT's malloc, C++ new and several others Windows-specific calls. You can find an overview here.
We could use VirtualAlloc or HeapAlloc:
VirtualAllocis the lowest level function available in Windows API, it allocates pages of memory at a time and clears them to0.HeapAllocis a higher-level function. It allows for sub-allocating smaller amounts of memory from a system page or callsVirtualAllocwhen the amount requested is significant.
Many operating systems, including Windows, subdivide available memory in regions known as “pages”. These are the regions of at least 4KiB (4096 bytes), sometimes they can be 64KiB (a.k.a. LARGE_PAGE)... Page sizes vary. Overall it's a handy way of thinking about the memory since, if transfer between hard disk and the main memory is required, it will happen in these Pages.
For more information about Pages on Windows, check out this article.
We will be doing most of the memory allocation and management ourselves, so for asking memory from the system VirtualAlloc would do perfectly. It's a nice handy function that's pretty simple to use.
LPVOID VirtualAlloc(
  LPVOID lpAddress,
  SIZE_T dwSize,
  DWORD  flAllocationType,
  DWORD  flProtect
);
As you can see, it returns a simple void * (we've seen what void pointers are last time). This pointer represents the base of the newly allocated memory, and its parameters are:
lpAddress: The starting address inside the the Virtual Address Space. We don't care where our buffer memory will reside so we'll leave it at0.dwSize: The size of the region to allocate in bytes. SinceVirtualAlloconly returns full pages, this size will be rounded up to the next page boundary (which is perfect for us). This is where we pass ourBitmapMemorySize.flAllocationType: a bit field telling Windows the action we want to take. You can find the various possible values on MSDN. We're interested in the two top ones, chaining them as usual:MEM_RESERVE | MEM_COMMIT.MEM_COMMITactually requests the memory to become available right now.MEM_RESERVElets the OS know that we will eventually make use of a specific amount of memory. Windows requires us to reserve the memory before using it, so we must specify it as well.
flProtect: another bit field specifying the “access priviliges”. You can find them here. We only want to use the memory as a data bank, soPAGE_READWRITEis sufficient for our purposes.
int BytesPerPixel = 4;
int BitmapMemorySize = BytesPerPixel * (Width * Height);BitmapMemory = VirtualAlloc(0, BitmapMemorySize, MEM_RESERVE | MEM_COMMIT, PAGE_READWRITE);
What does it all mean in practice? If we have a significant Memory returned (non-zero), it means we can access any location within the dwSize we provided, as well as read and write data to it. So we can access the location Memory, Memory + 1, Memory + dwSize... and even a bit more (but you shouldn't count on it!), but we can't access the memory Memory - 1 as it's outside of the “authorized” boundaries.
VirtualAlloc has Virtual in it because we're reserving virtual memory. If you're unfamiliar with the concept of virtual memory, read more in the Virtual Memory vs. Physical Memory subsection.Cleanup
Now, if you remember, we had a cleanup stage at the beginning of our function which prevented us from requesting more and more memory each time we entered Win32ResizeDIBSection. We removed it because we no longer made use of neither BITMAPHANDLE nor the related objects. Now, however, we need a similar device to free our memory each time before reserving some new one. Which function to use?
MSDN comes to the rescue! If you look at the VirtualAlloc page, you will see a “See also” section. In there, you can find a number of useful related articles, including one called VirtualFree:
BOOL VirtualFree(
  LPVOID lpAddress,
  SIZE_T dwSize,
  DWORD  dwFreeType
);
You can also find a reference to this function inside the “Remarks” section. This is exactly what we need. VirtualFree returns a non-zero value if it succeeds. As for its parameters, for our purposes it's even simpler:
lpAddress: The pointer to the “base” of our memory (that we received fromVirtualAlloc).dwSize: Size of memory to be freed. Usually this would require us to keep track of the memory we allocated, but since we want to release that memory in its entirety, we must pass0to it instead.dwFreeType: Operation requested. We want to get rid of the entire “package” of pages provided byVirtualAllocand to make them available for Windows to use. The constant we are after isMEM_RELEASEthat does just that.- The other constant showcased is
MEM_DECOMMIT. While this is not something we are interested in right now, it's a useful operation which removes access from a memory block while retaining its reserved state. In other words, Windows will be aware that we might require this amount of memory in the future.
- The other constant showcased is
We will call VirtualFree at the beginning of Win32ResizeDIBSection, provided that we have a valid (non-zero) BitmapMemory pointer.
if (BitmapMemory) // Same as writing (BitmapMemory != 0) or (BitmapMemory != NULL)
{
    VirtualFree(BitmapMemory, 0, MEM_RELEASE);
    // Optionally, you can check if the result of VirtualFree is not zero.
    // Print out an error message if it is.
}int BytesPerPixel = 4;
int BitmapMemorySize = BytesPerPixel * (Width * Height);
BitmapMemory = VirtualAlloc(0, BitmapMemorySize, MEM_RESERVE | MEM_COMMIT, PAGE_READWRITE); For Future Reference: Change Memory Protection
While we are at the topic of memory, let's cover a case where we need to change a memory block's access priviliges. We won't need it right now, but there might come a situation where we would need to set the memory to read-only, or to allow code execution from it.
VirtualProtect does just that. It allows to change the protection level of the previously allocated memory block.
One use case when we could make use of it is for debugging purposes. If you simply free the memory, a function accessing that memory would sometimes get correct data, sometimes it will get garbage, and sometimes it will get access violation (when the memory gets reserved by another process). Such “use after free” bugs can be super hard to track. If, instead of freeing the memory, you set that memory block to PAGE_NOACCESS (which results in an access violation if someone tries to access that memory), you can then go hunting for a place in your code which tried to access memory after it's been freed.
Compile and Test
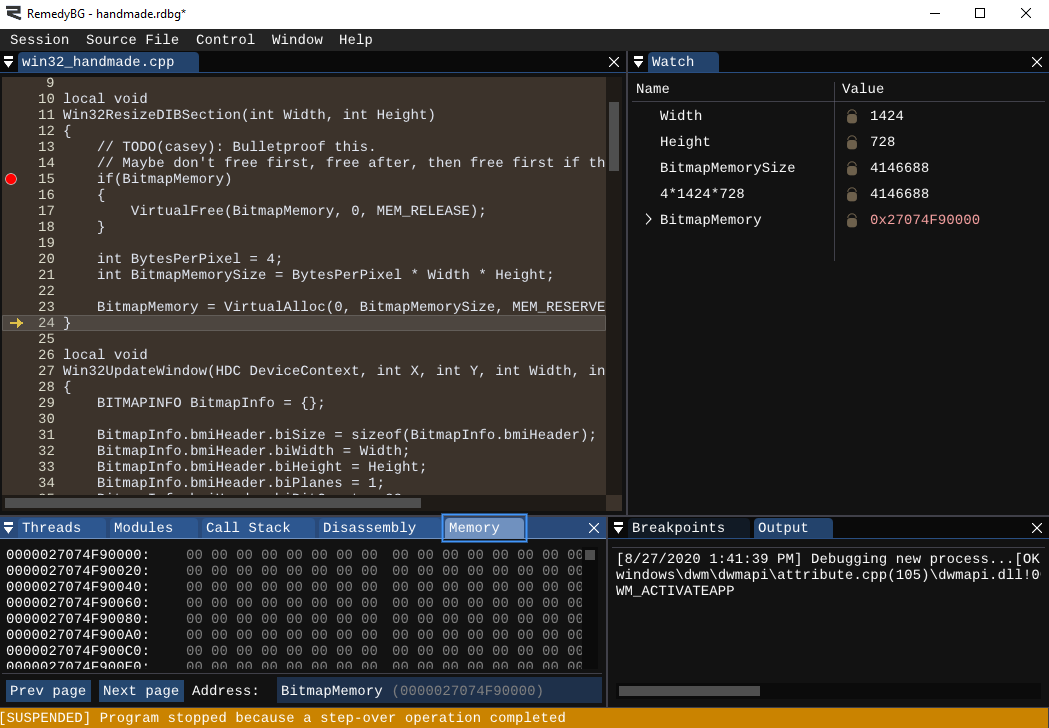
We now should have a compilable program at hand. Try to compile the application, fix eventual compile errors if necessary, and run it through the debugger.
- Create a breakpoint at the start of
Win32ResizeDIBSection(F9). - Start the debugging session (
F5).- Unless you have any other breakpoints before that, the program should halt at the one you've set.
- Continue by stepping over (
F10).- If it's the first time you run through
Win32ResizeDIBSection, you shouldn't have anyBitmapMemory. So theifevaluation should resolve infalse, and theVirtualFreeblock should be skipped.
- If it's the first time you run through
- We set
BytesPerPixelto be 4. - We calculate
BitmapMemorySize. With theWidthof 1424 andHeightof 728, we get to almost 4MiB of memory (4 146 688 bytes)!- You can quickly test if it's correct by typing the math function in the
Watchwindow.
- You can quickly test if it's correct by typing the math function in the
- We finally get to
BitmapMemory. After you step overVirtualAlloc, its value should result in a pointer to memory.- If you type this
BitmapMemoryin theMemorywindow, you will see a page full of zeros. - Notice how you can see the next pages (also zeroed out) but not the previous ones (all question marks).
- If you type this
Revisit Win32UpdateWindow
The essence of this programming method is constantly revisiting the old places we've been to. Each new optimization makes our program (hopefully) better and closer to its final, shipped state.
Now that we're happy with the Win32ResizeDIBSection, let's have a better look at the Win32UpdateWindow:
internal void
Win32UpdateWindow(HDC DeviceContext, int X, int Y, int Width, int Height)
{

    StretchDIBits(DeviceContext,
                  X, Y, Width, Height,
                  X, Y, Width, Height,
                  BitmapMemory,
                  &BitmapInfo,
                  DIB_RGB_COLORS, SRCCOPY);
}
Let's even take one step back, and see where does the X, Y, Width and Height come from:
PAINTSTRUCT Paint;
HDC DeviceContext = BeginPaint(Window, &Paint);
int X = Paint.rcPaint.left;
int Y = Paint.rcPaint.top;
int Width = Paint.rcPaint.right - Paint.rcPaint.left;
int Height = Paint.rcPaint.bottom - Paint.rcPaint.top;
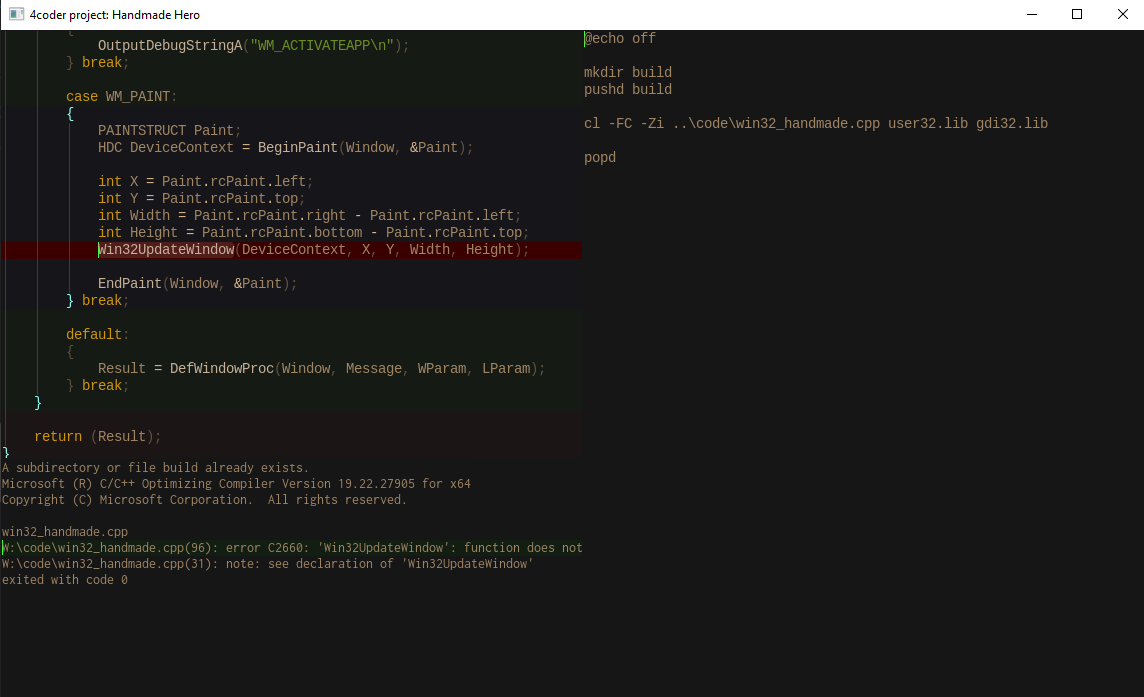
Win32UpdateWindow(DeviceContext, X, Y, Width, Height);
EndPaint(Window, &Paint);It's important to understand that the paint area here is not the whole window. What we are doing here is what's called dirty rectangle update: we only repaint the area that the Operating System considers “dirty” (e.g. a portion of the window previously hidden by another window). In fact, if we look at the “Remarks” section of BeginPaint on MSDN, we find the following:
The update region is set by the InvalidateRect or InvalidateRgn function and by the system after sizing, moving, creating, scrolling, or any other operation that affects the client area. If the update region is marked for erasing,BeginPaintsends aWM_ERASEBKGNDmessage to the window.
BeginPaint is a WM_PAINT-specific call. In fact, further below you can see:
An application should not callThe bottom line for us is that we don't have control over the area of the window we're repainting. As such, we'd need to properly resize our buffer if we want to paint over a smaller area. It's not necessarily a bad thing as it improves the rendering times. However, this can introduce some bugs here and make things harder for us to debug if we are to use this dirty rectangle from the beginning.BeginPaintexcept in response to aWM_PAINTmessage.
Instead, we are going to change our Win32UpdateWindow to repaint the whole window every time, make sure that our buffer-related operations work properly, and then we can worry about only processing the sub-regions that Windows wants us to take care of in WM_PAINT.
This will allow us to start simple, and then get more complicated.
Update StretchDIBits
First, we are going to update StretchDIBits. Let's get a refresher on what its syntax is:
int StretchDIBits(
  HDC              hdc,
  int              xDest,
  int              yDest,
  int              DestWidth,
  int              DestHeight,
  int              xSrc,
  int              ySrc,
  int              SrcWidth,
  int              SrcHeight,
  const VOID       *lpBits,
  const BITMAPINFO *lpbmi,
  UINT             iUsage,
  DWORD            rop
);Ah yes, first we pass the destination coordinates, and then the source. At the moment, these are the same values:
StretchDIBits(DeviceContext,
              X, Y, Width, Height, // destination rectangle (window)
              X, Y, Width, Height, // source rectangle (bitmap buffer)
              BitmapMemory,
              &BitmapInfo,
DIB_RGB_COLORS, SRCCOPY);We're going to make the following changes:
XandYfor both source and destination will be0. We will be starting from the top left corner of our buffer and window.- For the destination, we will go for the full
WindowWidthandWindowHeight - For the source, we will go for the full
BitmapWidthandBitmapHeight
StretchDIBits(DeviceContext,              X, Y, Width, Height,
              X, Y, Width, Height,              0, 0, WindowWidth, WindowHeight, // destination rectangle (window)
              0, 0, BitmapWidth, BitmapHeight, // source rectangle (bitmap buffer)              BitmapMemory,
              &BitmapInfo,
              DIB_RGB_COLORS, SRCCOPY);
We will also use the same BitmapWidth and BitmapHeight inside our BitmapInfo header.
    BITMAPINFO BitmapInfo = {};

    BitmapInfo.bmiHeader.biSize = sizeof(BitmapInfo.bmiHeader);    BitmapInfo.bmiHeader.biWidth = BitmapWidth;
BitmapInfo.bmiHeader.biHeight = BitmapHeight;Propagate the Changes Outside
Bitmap Width and Height
We don't have any of these sizes for now. Let's focus on the bitmap width and height now, we can get it from global scope.
global_variable void *BitmapMemory;global_variable int BitmapWidth;
global_variable int BitmapHeight;
You should always strive to put the global variables only while you're getting things working. Once you know how the things should go, clean it up and make sure that only the things that should be global remain such.
BitmapWidth and BitmapHeight will be initialized inside Win32ResizeDIBSection. We can also start using them right away:
BitmapWidth = Width;
BitmapHeight = Height; int BytesPerPixel = 4;int BitmapMemorySize = BytesPerPixel * (BitmapWidth * BitmapHeight);// ...Window Width and Height
WindowWidth and WindowHeight, on the other hand, can be calculated based on a window rectangle that we will pass into the function. We can also get rid of the now-unused parameters X, Y, Width and Height.
internal voidWin32UpdateWindow(HDC DeviceContext, RECT *WindowRect)
Note that instead of passing the entire RECT structure, we're passing a pointer to it. This allows us to save space on the stack. We'll talk more about it in the next lesson, but the bottom line is that the bigger the structure, the more it makes sense to pass a pointer to it, instead of a 64-bit pointer.
One thing to note however, if we try to access members of a struct passed by pointer, we should dereference them with the -> operator, instead of accessing them via . operator.
Another reason you sometimes want to receive a structure by pointer is the one we've seen before: if you want the changes to the structure propagate outside the function itself.
struct dim
{
    int Width;
    int Height;
};

void CalculateDimension (dim Dim, dim* PointerDim)
{
    PointerDim->Width = Dim.Width;
    PointerDim->Height = Dim.Height;        // If dereferenced values are modified, the edits persist outside this function

    Dim.Height = 0;                         // If values are modified, the edits have no effect outside this function (unless we return it)
}
Once we have our WindowRect (which, as we remember, has left, top, right and bottom components), we can calculate the WindowWidth and WindowHeight:
int WindowWidth = WindowRect->right - WindowRect->left;
int WindowHeight = WindowRect->bottom - WindowRect->top;StretchDIBits(...);
We need to pass our Win32UpdateWindow the WindowRect, and to that we can simply copy and paste related code from WM_SIZE. While we are at it, let's also clean up the rcPaint-related parameters since we won't need them anymore.
switch (Message)
{
    case WM_SIZE:
    {
        RECT ClientRect;                        // Copy this
        GetClientRect(Window, &ClientRect);     // Copy this
        // ...
    } break;

    // ...

    case WM_PAINT:
    {
        PAINTSTRUCT Paint;
        HDC DeviceContext = BeginPaint(Window, &Paint);
        int X = Paint.rcPaint.left;
        int Y = Paint.rcPaint.top;
        int Width = Paint.rcPaint.right - Paint.rcPaint.left;
        int Height = Paint.rcPaint.bottom - Paint.rcPaint.top;        RECT ClientRect;
        GetClientRect(Window, &ClientRect);
        Win32UpdateWindow(DeviceContext, &ClientRect);        EndPaint(Window, &Paint);
    } break;

    // ...
}
Last thing, let's rename our WindowRect inside Win32UpdateWindow to ClientRect, to be consistent with the names. In Windows, WindowRect exists, and it means the whole window area including the borders, so we don't want future us to be confused:
internal voidWin32UpdateWindow(HDC DeviceContext, RECT *ClientRect){
    //...    int WindowWidth = ClientRect->right - ClientRect->left;
    int WindowHeight = ClientRect->bottom - ClientRect->top;    //...
}Draw Pixels to the Bitmap
Now we should be compilable. Let's quickly build and run our program, our window should result nice and black as before. You can also check it for the memory leaks like we did it last time, just to be sure.
We're finally ready to draw some pixels! Let's go ahead and do it.
Understand the Read Order of the StretchDIBits
We have our BitmapMemory pointer, it will be drawn in full to the window, but before we're ready to do so, there's one question: how will it be read by StretchDIBits? How is StretchDIBits going to access this memory?
Memory is just a (giant) series of bytes, one following the other. On the other hand, Bitmap is a 2D grid, each square representing one pixel. We'll therefore need a convention to represent our 2D bitmap in 1D memory.
A single row is simple to do. If you get a pointer to bytes, you start reading them one after the other, considering each consecutive byte (or series of bytes) as the next pixel. But when you get to the end of the row, what happens? Is the next byte the first pixel of the row below? The row above? There's some pointer math happening there?
The passage from one row to another is called pitch or a stride. It's typically a value that you add to the pointer to move the base from one row to another. Keep in mind that sometimes it can be greater then the total length of the pixels.
The most intutive way would be just go in sequence: one row, then the next row, then the next row, and so on (usually from top to bottom). But what would Windows do? Let's check out the on MSDN:
The origin of a bottom-up DIB is the lower-left corner; the origin of a top-down DIB is the upper-left corner. [...]What does it mean? If we want the rows to go sequentially from top-down, we need to update ourStretchDIBitscreates a top-down image if the sign of thebiHeightmember of theBITMAPINFOHEADERstructure for the DIB is negative.
BitmapInfo header height. Let's do it now:
BitmapInfo.bmiHeader.biSize = sizeof(BitmapInfo.bmiHeader);
BitmapInfo.bmiHeader.biWidth = BitmapWidth;BitmapInfo.bmiHeader.biHeight = -BitmapHeight; // negative value: top-down pitchBitmapInfo.bmiHeader.biPlanes = 1;
BitmapInfo.bmiHeader.biBitCount = 32;
BitmapInfo.bmiHeader.biCompression = BI_RGB;
This is partly a matter of preference on our side, but also it's a simpler way of thinking about how code is arranged in memory. It's also in-line with the way Windows thinks about the coordinate system. We have already seen that Windows intends the top-left corner to be the beginning of the coordinates. Last but not least, it's reminiscing of the oldschool frame buffers which started in top-left and went down.
It might not be the most common way of thinking about the newer technologies like OpenGL (which are rendering in bottom-up) but this is ways off, and thinking top-down is a clearer way to begin with.
Start Pixel Loop
Inside the Win32ResizeDIBSection, at the very end, let's create our first rendering.
- We are going to go row by row using a
forloop. - We will then make another
forloop to go pixel by pixel inside each row.
This will give us the X and Y coordinates for each pixel.
BitmapMemory = VirtualAlloc(0, BitmapMemorySize, MEM_RESERVE | MEM_COMMIT, PAGE_READWRITE);for (int Y = 0;
         Y < BitmapHeight;
         ++Y)
{
    for(int X = 0;
            X < BitmapWidth;
            ++X)
    {
        // Write color to pixel
    }
}
We have our BitmapMemory. It's a huge block of memory that Windows gave us specifically for the purpose of drawing pixels into. Unfortunately, it's also a void *, something that C doesn't really know how to work with. So in order to start writing to BitmapMemory, we have to change it to a pointer C does understand.
We want to set up control over the pointer and how it's going to move, so we can cast our void * to unsigned char * to have control over every single byte in our memory (On x86 processors, char is long exactly 1 byte, or 8 bits). For more about type casting, check out subsection 8.2.
BitmapMemory = VirtualAlloc(0, BitmapMemorySize, MEM_RESERVE | MEM_COMMIT, PAGE_READWRITE);unsigned char *Row = (unsigned char *)BitmapMemory;for (int Y = 0;
         Y < BitmapHeight;
         ++Y)
{
    // ...
}Set Up Basic Types
Let's hold on to this thought for a moment and do one important thing. We will throw in a few convenient typedefs to work with the numbers. Typing unsigned char * is tedious, but even more than that, you can't really be sure that it represents exactly an 8-bit block of memory. Unfortunately for us, standard C does not guarantee that types like char, short or int correspond to 8, 16 or 32 bits. The lengths of these are defined by the platform.
So we want to have something that a) is easier to type and b) means what we want to mean. Luckily for us, standard C did provide several types that must correspond to a specific amount of bits. These are defined in the stdint.h header and have names like uint8_t, int32_t, etc. You can use them as is, but we will make them even shorter and typedef the ones we're going to use as follows:
#include <windows.h>#include <stdint.h>

// unsigned integers
typedef uint8_t u8;     // 1-byte long unsigned integer
typedef uint16_t u16;   // 2-byte long unsigned integer
typedef uint32_t u32;   // 4-byte long unsigned integer
typedef uint64_t u64;   // 8-byte long unsigned integer
// signed integers
typedef int8_t s8;      // 1-byte long signed integer
typedef int16_t s16;    // 2-byte long signed integer
typedef int32_t s32;    // 4-byte long signed integer
typedef int64_t s64;    // 8-byte long signed integer
We can now set our Row type appropriately:
BitmapMemory = VirtualAlloc(0, BitmapMemorySize, MEM_RESERVE | MEM_COMMIT, PAGE_READWRITE);u8 *Row = (u8 *)BitmapMemory;for (int Y...)
{
    // ...
}
As everything in this course, giving these exact names is our own preference. In your own code, you're the creator, so you can name your types as you like!
Calculate Row and Pixel positions
This is how we're going to approach it:
- Calculate our
Pitch(BitmapWidth * BytesPerPixel) - Set
Rowto point toBitmapMemory. - Set
Pixelto point to row. - Advance
Pixelby 1 until you reach the end of the row (represented byBitmapWidth). - Move to the next row, by adding
Pitchto theRowvalue. - Repeat steps 2-5 until we reach the end of our bitmap.
Let's implement exactly that. We want to cast our BitmapMemory to a 1-byte value so that we can do pointer arithmetic with it. This is a battle-proven way of approaching pixel operations, it helps preventing unaligned strides issues, or pixel boundaries and other advanced things that we will cover later... It's just a better way of writing these loops, and we hope that in time you will see why.
The key to the outer loop is defining Row outside of the loop, and incrementing it inside the outer loop, right after the inner loop. The positioning is important.
* If you increment the Row inside the inner loop, you will quickly fly out of memory bounds.
* If you increment the Row before the inner loop, you will skip the first row (and will fly out of memory bounds when you reach the last one).
* If you define Row inside the loop, it will never update its position.
int Pitch = Width * BytesPerPixel;u8 *Row = (u8 *)BitmapMemory;
for (int Y...) // Outer loop
{
    for (int X...) // Inner loop
         {
             // Write color to pixel
         }    Row += Pitch;}
If you are familiar with pointer arithmetic, you know that pointer values (the addresses in memory) can be added, multiplied, subtracted and divided just like any other integer.
Please be mindful that C will also silently multiply that movement by the size of the thing it's pointing to.
void *MyPointer = 1000;

u8 *ByteMover =      (u8 *)MyPointer;
u16 *TwoByteMover =  (u16 *)MyPointer;
u32 *FourByteMover = (u32 *)MyPointer; // All three initially point to the same location in memory

printf(ByteMover + 1);      // 1001
printf(TwoByteMover + 1);   // 1002
printf(FourByteMover + 1);  // 1004

printf(ByteMover * 2);      // 2000
printf(TwoByteMover * 2);   // 4000
printf(FourByteMover * 2);  // 8000
As of Pixel pointer, we can make it 32-bit, so that by increasing it by one we can go pixel by pixel. Similar to Row, we initially define it outside of the inner loop and then increase inside.
int Pitch = Width * BytesPerPixel;
u8 *Row = (u8 *)BitmapMemory;
for (int Y...)
{    u32 *Pixel = (u32 *)Row;    for (int X...)
         {
             // Write color to pixel            ++Pixel; // advance to the next pixel (by 4 bytes)         }
    Row += Pitch;
}
You might say: wait a second. Why do we need to remember and increase the Row if by the end of the inner loop Pixel will be at the next row anyway? We could just keep writing!
While this might be inefficient, there's a couple of reasons of doing it this way. First, due to alignment Pitch might not align with the Pixel position. Of course, we might add the eventual padding to it, and you might try doing it that way. We prefer it this way also because it lines up nicely with the notions “Row” and “Pixel”, thus simulating better memory's 2D-ness. Each time we start a new row, we reset our notions of the pixel, even if it was just next to the previous one.
Pixel Component Layout in Memory
We now can write to each pixel (by dereferencing our pointer with the * operator). But what are we going to right to it?
Possible Arrangements in Memory
Each of the pixels contains packed values for Red, Green and Blue channels.
We know that we have to write RGB values to it. We also know that we have one byte per color channel R, G and B, and one unused (XX). But which one do we write where? In the figure 5, numbers above the bytes represent their location in memory, or offset in bytes from the pointer. You can also read it as Pixel + 0, Pixel + 1, Pixel + 2, Pixel + 3, if Pixel was an 8-bit value.
You could try and dig through documentation to find the actual bytes arrangement but let's go the fun way! In the figure below you can see the ways in which it makes sense to pack a color.
Try to Set Red Channel
To better illustrate this, let's actually change our pixel to an 8-bit pointer (for the time being), and write to it a specific scheme. We'll need to advance Pixel 4 times inside a single loop so that it moves by full 32 bits! We'll try to be as explicit as possible so that you can follow along.
u8 *Pixel = (u8 *)Row;for (int X...)
{    *Pixel = ; // write to byte 0
    ++Pixel;   // advance by total of one byte

    *Pixel = ; // write to byte 1
    ++Pixel;   // advance by total of two bytes

    *Pixel = ; // write to byte 2
    ++Pixel;   // advance by total of three bytes

    *Pixel = ; // write to byte 3
    ++Pixel;   // advance by total of four bytes -> full pixel!}
Right now we're tentively testing arrangement RR GG BB XX. To test which value is which we need something called Structured Art which is always a good thing to do when debugging/experimenting. We want to see if we're writing to this thing properly. So we're just going to write to (what we believe to be) the red channel, leave the green and blue channels black for now, and see if it produces the results we expected. This translates in writing the maximum value you can give an unsigned char to red (255), and 0 to the rest.
for (int X...)
{    //
    //Pixel in memory: RR GG BB XX
    //

    // Byte 0, red?
    *Pixel = 255;
    ++Pixel;

    // Byte 1, green?
    *Pixel = 0;
    ++Pixel;

    // Byte 2, blue?
    *Pixel = 0;
    ++Pixel;

    // Byte 3, pad?
    *Pixel = 0;
++Pixel; }Let's compile and run, to see if we get anything on the screen at all.

We do see something on the screen, but it's not red! It is blue.
But why?
There are of course experts out there who know why it is blue. Those are grizzled veterans who spent thousands of hours graphics programming. But if your only knowledge of graphics is limited to what we covered in these notes so far, you might be thoroughly confused. “Why is Blue first, if it's RGB?”

The answer to that has to do with x86 architecture Endianness.
Fun fact, the name takes origin from the Gulliver's Travels, where Lilliputians discute where the egg's “end” is. In computer architecture, the discussion is roughly the same, except each architecture's stance is set in silica inside microprocessors.
Simply put, endianness has to do with in which order are the bytes written in the registry. In big-endian systems, the bytes are written from the most significant to the least significant, while little-endian systems write their bytes from the least significant to the most significant.
x86 systems are little-endian. This means that when, for example, the processor loads a 32-bit value to read a pixel, the first byte is read first, then the second, the third, and the fourth. So if you load 11 22 33 44 it's loaded as 0x______11 → 0x____2211 → 0x__332211 → 0x44332211.
In our case, this means that, when we load RR GG BB XX into memory, it becomes 0xXXBBGGRR. Well, the architects who wrote Windows didn't like that very much, they wanted to read colors in the registers as RR BB GG XX, so they actually swapped the bytes in the memory of the machine to BB GG RR XX (padding byte remained at the end). Thus the output becomes 0xXXRRGGBB. So now all the Windows bitmaps have to have the Blue byte first, Green byte second, Red byte after, and then the padding.
Correct the Structured Art
So this is the correct arrangement of the colors, and if we want to have our screen to be red, we should refactor our program as follows:
for (int X...)
{    //
    //Pixel in memory: BB GG RR XX
    //

    // Byte 0, blue
    *Pixel = 0;
    ++Pixel;

    // Byte 1, green
    *Pixel = 0;
    ++Pixel;

    // Byte 2, red
    *Pixel = 255;
    ++Pixel;

    // Byte 3, pad
    *Pixel = 0;
++Pixel; }If we compile and run it now, we get a nice red bitmap.
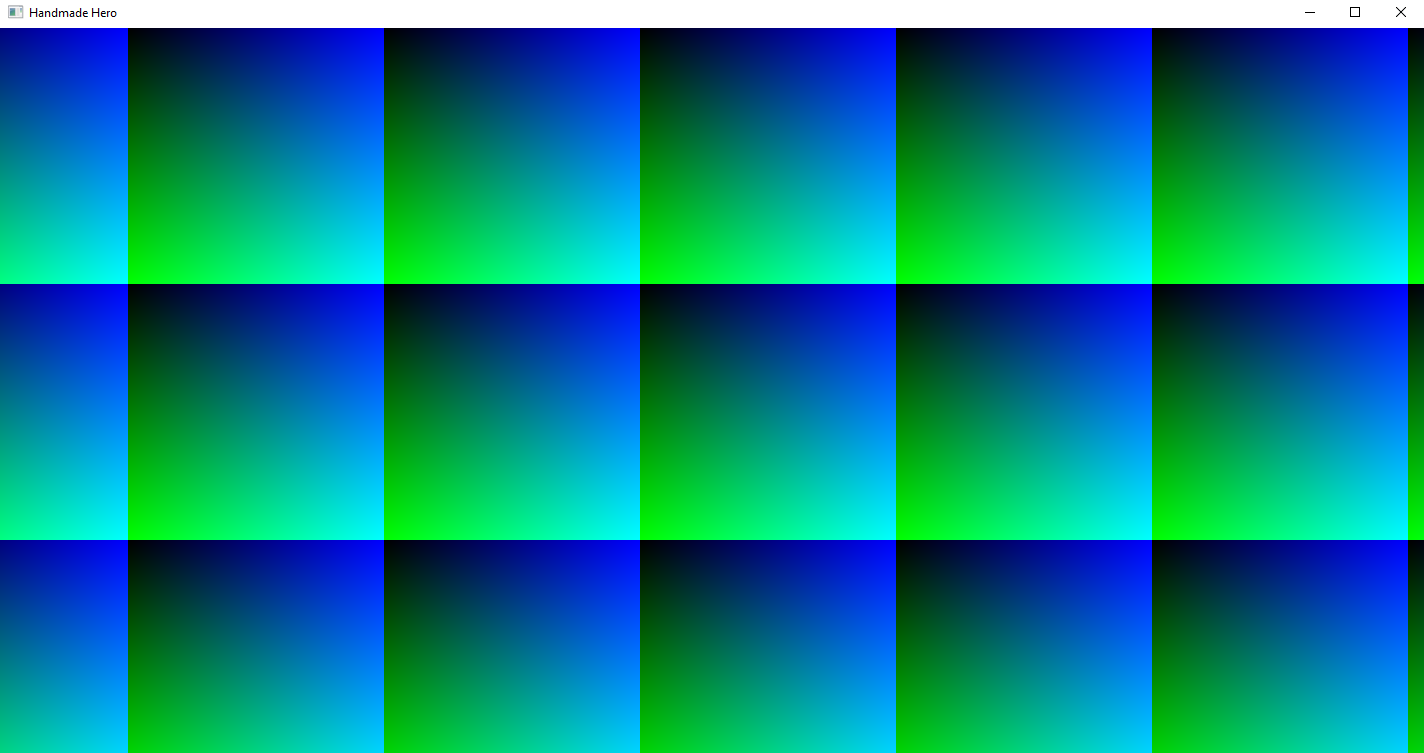
Draw Colors Based on Pixel Position
Let's have some fun! Let's take our X coordinate, cast it down (truncate) to 8-bit and assign the resulting into the Blue channel. We can do the same for Y into the Green channel. Red channel can be left out at zero.

The resulting image definitely has something more going for it. Still not a game, but at least something, and it looks like it's working correctly.
What happens here is a simple color combination. As the rows grow, the green channel becomes more prevalent, same thing for the blue for columns. However both Red and Green can only go until 255, and we simply truncate the higher bits for X and Y, thus restarting from the beginning.
Rendering a Pattern
This is a great achievement right there. You have now enough knowledge to return yourself to 1980! We have just turned this modern and beastly computer running a hugely complicated, difficult to wield operating system into something where we just have a bitmap, that we can draw to, and get back to the Joy of Coding. There is no stopping us now, we can draw any world of our immagination into that.
Introduce RenderWeirdGradient
Let's do something crazy. We can take acout all the pixel drawing code out and into a separate function. Let's call it... RenderWeirdGradient or something. Because honestly, that's what it is doing. And the RenderWeirdGradient call will take a couple of integers that will be called XOffset and YOffset. The only difference in the operation will be that, when we'll be ready to render, we'll add our X and Y for Blue and Green channels, and add them to the offsets before truncating them. Thus, we'll be able to animate our gradient around the screen. And, to replicate the functionality, we will simply call this function from Win32ResizeDIBSection.
What can possibly go wrong?
global_variable int BitmapHeight;
internal void
RenderWeirdGradient(int XOffset, int YOffset)
{
    int Pitch = BitmapWidth * BytesPerPixel;
    u8 *Row = (u8 *)BitmapMemory;
    for (int Y = 0;
         Y < BitmapHeight;
         ++Y)
    {
        u8 *Pixel = (u8 *)Row;
        for(int X = 0;
            X < BitmapWidth;
            ++X)
        {
            *Pixel = (u8)(X + XOffset);
            ++Pixel;

            *Pixel = (u8)(Y + YOffset);
            ++Pixel;

            *Pixel = (u8)Row;
            ++Pixel;

            *Pixel = 0;
            ++Pixel;
        }
        Row += Pitch;
    }
}
//...

internal void
Win32ResizeDIBSection(...)
{
    // ...
    int BytesPerPixel = 4;
    int BitmapMemorySize = BytesPerPixel * (BitmapWidth * BitmapHeight);

    BitmapMemory = VirtualAlloc(0, BitmapMemorySize, MEM_RESERVE | MEM_COMMIT, PAGE_READWRITE);    int Pitch = Width * BytesPerPixel;
    //...
    {
        //...
        Row += Pitch;
    }    RenderWeirdGradient(0, 0);}
Compile, and... W:\handmade\code\win32_handmade.cpp(28): error C2065: 'BytesPerPixel': undeclared identifier
Right, we need to pull out BytesPerPixel as well, that's a constant for now...
global_variable int BitmapHeight;global_variable int BytesPerPixel;
//...

internal void
Win32ResizeDIBSection(...)
{
    // ...    BytesPerPixel = 4;    int BitmapMemorySize = BytesPerPixel * (BitmapWidth * BitmapHeight);

    BitmapMemory = VirtualAlloc(0, BitmapMemorySize, MEM_RESERVE | MEM_COMMIT, PAGE_READWRITE);
    RenderWeirdGradient(0, 0);
}
... And we compile and run again! That's a successful refactoring. Now, where were we? Oh right, we can test if our offset does anything. We can do it by simply supplying it some value. Let's give XOffset of 128, to see if the bitmap moves left halfway.
RenderWeirdGradient(128, 0);Compile, run... looks fine!
Prepare the Main Window Loop for Continuous Animation
One thing that prevents us from running a smooth animation right away is our message loop. You might remember from Day 2 that GetMessage function inside our WinMain will sit and wait for new messages forever if there aren't any. (actually, Windows will simply halt our process and use the CPU power for some other process). We don't want to wait for Windows to give us work, we're a game which is animating even if there're no messages. So we need to change this call to something that keeps running even if we didn't receive any messages.
We need to implement PeekMessageA instead of GetMessage.
BOOL PeekMessageA(
  LPMSG lpMsg,
  HWND  hWnd,
  UINT  wMsgFilterMin,
  UINT  wMsgFilterMax,
  UINT  wRemoveMsg
);PeekMessageA Syntax
As you can see, it has almost the exact same syntax as GetMessage and mostly the same functionality. The only difference is that, as opposed to GetMessage, it only checks the message queue and, if there're no messages, it keeps running.
The new parameter at the end is wRemoveMsg, which tells PeekMessage what to do with the message peeked. We want to remove the message from the queue, so we pass PM_REMOVE.
MSG Message;BOOL MessageResult = PeekMessageA(&Message, 0, 0, 0, PM_REMOVE);if(MessageResult > 0)
{
    TranslateMessage(&Message);
    DispatchMessage(&Message);
}
else
{
    break;
}
Moreover, if you check the return type, you can see that MessageResult doesn't throw negative values in case invalid handles. It simply returns 0 if we don't have any messages to process. This means that we can simplify significantly our code. We can say “While there're messages in the queue, we'll process them, and then we'll get back to our business.” We also don't need to break out of our main Running loop any more, since this is managed by our Win32MainWindowCallback.
while (Running)
{
    MSG Message;    while(PeekMessageA(&Message, 0, 0, 0, PM_REMOVE))    if(MessageResult > 0)    {
        TranslateMessage(&Message);
        DispatchMessage(&Message);
    }    else
    {
        break;
    }    // We dealt with our messages, now do the rest of our game loop here.
}At one point we might want to limit how many messages are processed at a time, so that a flood of messages doesn't slow down or outright block our program, but this will be a problem that future us will have to tackle. We got to process that queue anyway at some point, might as well do it once per game cycle.
One thing that we could do to bullet-proof our Running loop, is to double-check each message. If it's WM_QUIT, we set Running to false and subsequently break out:
MSG Message;
while (PeekMessageA(&Message, 0, 0, 0, PM_REMOVE))
{    if (Message.message == WM_QUIT)
    {
        Running = false;
    }
    TranslateMessage(&Message);
    DispatchMessage(&Message);
}Our First Animation
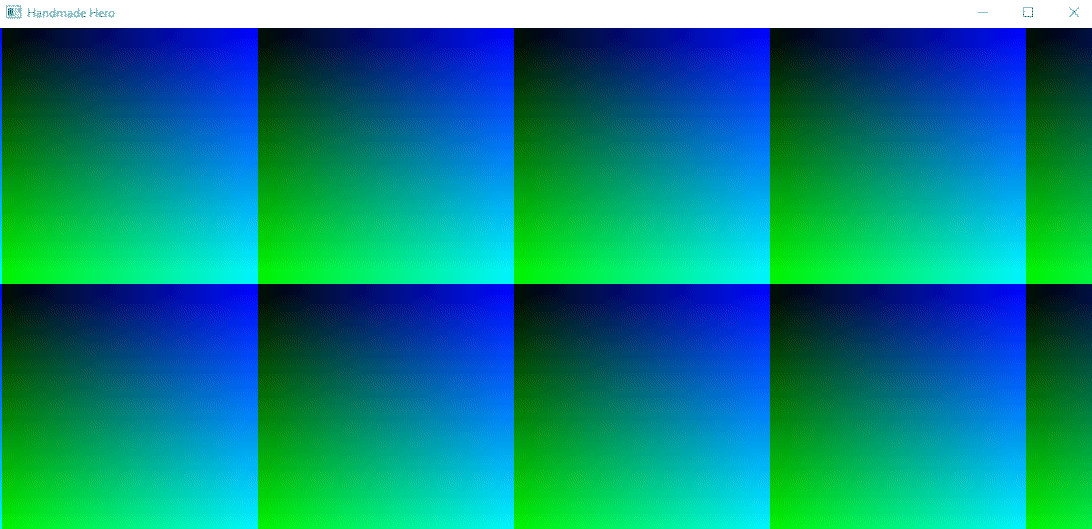
If we compile and run, we'll see that the things are roughly exactly the same as they were before. Let's now get to our animation.
First, let's introduce a couple of variables XOffset and YOffset just outside our main loop. We can then call RenderWeirdGradient after we're done with our message queue and use these variables. Let's say we increment our XOffset at the end of each frame (our main Running loop) so that there's some horizontal movement.
int XOffset = 0;
int YOffset = 0;
Running = true;
while (Running)
{
    MSG Message;
    while (PeekMessageA(...))
    {
        // ...
    }
        RenderWeirdGradient(XOffset, YOffset);
    ++XOffset;}
We also can remove RenderWeirdGradient from Win32ResizeDIBSection:
RenderWeirdGradient(128, 0);Now, to our animation! We compile and run! And... nothing happens. We're greeted with some suprematist art of the early XX Century:

Oh, right. We forgot to blit it to the screen. Sure we render our weird gradient to the bitmap, but the bitmap needs to be translated to the window! We call Win32UpdateWindow when we process our WM_PAINT message, but we also need to call it when WM_PAINT is not being processed, at the end of each frame.
So. We call Win32UpdateWindow which takes a Device Context and a client rect. Now, right now we're too busy making our animation happen so we will simply copy and paste the necessary code as we did id before, but we did cut and paste of the same code enough times to realize that we can optimize getting ClientRect out into a separate function. We'll tackle it some other time, just a mental note for the future us.
As for the DeviceContext, we can use GetDC to get the DC we reserved with our window, and ReleaseDC to return it back to the domain of our window.
while (Running)
{
    MSG Message;
    while (PeekMessageA(...))
    {
        // ...
    }

    RenderWeirdGradient(XOffset, YOffset);
    ++XOffset;
    HDC DeviceContext = GetDC(Window);
    RECT ClientRect;
    GetClientRect(Window, &ClientRect);

    Win32UpdateWindow(DeviceContext, &ClientRect);

ReleaseDC(Window, DeviceContext); }Compile, fix all your errors and run and... we finally have our animation!
Recompress Pixel to 32-bit Value
Last quick refactoring for today. If you remember, in Subsection 4.4 we first set up the Pixel to be a 32-bit value. Now that we know what the color arrangement in memory is, we can return to write 32 bits at a time (this is much faster). We will pack the pixel values on the fly when we'll be writing to the pixel
u8* Row = (u8*)BitmapMemory;
for (int Y...)
{    u32* Pixel = (u32*)Row;    for (int X...)
    {
        //
        // Pixel in memory: BB GG RR XX
        //         // Byte 0, blue
        *Pixel = (u8)(X + XOffset);
        ++Pixel;
    ++Pixel;
        ++Pixel;

        // Byte 1, green
        *Pixel = (u8)(Y + YOffset);
        ++Pixel;
    ++Pixel;
        ++Pixel;

        // Byte 2, red
        *Pixel = 0;
        ++Pixel;
    ++Pixel;
        ++Pixel;

        // Byte 3, pad
        *Pixel = 0;
        ++Pixel;
    ++Pixel;
        ++Pixel;          u8 Red = 0;
        u8 Green = (u8)(Y + YOffset);
        u8 Blue = (u8)(X + XOffset);

        *Pixel++ = ; // TODO    }
}
We will need to do some bit shifting. Using the << or >> operator we can actually move the bits left or right in the memory by the amount of bits specified. Now, we know that our Pixel's bits are arranged in the following manner:
If you look at the memory layout in the figure above, we will know exactly by how many bits must we shift to the left each value to pack our pixel in one go. Let's compute this in, combining the shifted values with the bitwise OR: |
u8 Red = 0;
u8 Green = (u8)(Y + YOffset);
u8 Blue = (u8)(X + XOffset);
*Pixel++ = Red << 16 | Green << 8 | Blue; // << 0Recap
We've came a long way in this course already. From when we've got our environment up and running to get an animated window on the screen using our own code on the Win32, where we can write now anything we want.... People say that it takes a lot of work to get something running on Windows but we proved otherwise. It's a lot of knowledge, yes, but once you've got the knowledge you can run through all the chapters pretty quickly. To recap only today, this is what we did:
- We removed some unnecessary stuff from our buffer functions.
- Allocated some memory for our buffer.
- Updated
StretchDIBitsto take full window width and height instead of just a piece. - Defined the way we would draw our bitmap
- Created our pixel loop
- Made a simple gradient rendering function and
- Animated it!
Next time, we will be do a massive cleanup of the work done so far, so that we can move to new subjects the chapter after.
Exercises
Draw Other Weird Gradients
Get creative! What happens if you change the RenderWeirdGradient formula? For example, if you put XOffset in the red channel? What if you do some other math operation on them? Play around and see which bizarre animations can you get.
Programming Basics
Virtual Memory vs. Physical Memory
Physical memory is a complicated thing. If you think of it, memory constantly moves around the HDD/SSDs, Main Memory, “Cache” memory of the CPU, etc. This is confusing and complicated. So what the operating systems usually do is to abstract it all away for the benefit of the programs into the Virtual Memory.
Virtual Memory is simple. It's a flat array of addresses, and programs (and therefore, programmers such as yourself) don't care where exactly your data currently sits. Each program has a 64-bit address space (in the 64-bit OSes, of course) where all its data, functions, and other good stuff resides. Even stuff belonging to the other running programs! Programs have access only access to some pieces of this address space at a time, and the OS manages allocation of more or less memory for them.
(Continue to Subsection 2.2)
Type Casting
Converting one data type into another is known as casting. It is performed by using the cast operator (()) placed before the value to cast. From there on, C will treat the bits in that value as if they were of the casted type.
int Value = 56523565;       // 32-bit value
char Byte = (char)Value; // Take only in the first 8 bits of our valueA common application of type casting is to perform floating-point math or pointer arithmetic, but there're many others that we will see throughout this course.
(Continue to Subsection 4.3)
Hexadecimal
When reading bytes, it's common to use the so-called “hex format”, where the numbers are represented with 16 distinct symbols, as opposed to the common 10.
The reason for it is that 8 bits of binary translate very nicely to hexadecimal. Any value of a single byte can be represented with a pair of hexadecimal numbers ranging from 00 to FF. In decimal, the same byte would range from 000 to 255, while in binary it obviously ranges from 0000 0000 to 1111 1111.
If you are completely unfamiliar with Hexadecimal, you can simply boot up Windows Calculator and select Programmer Mode. You can type in different values in Decimal and convert them to Hex, and vice versa.

Another common application for hex format that you might be familiar with is RGB color representation in image editors and on the web.
You can quickly distinguish the “Hex code” of a color by a # follow by six hexadecimal characters (0 1 2 3 4 5 6 7 8 9 A B C D E F).
(Back to Subsection ?)
Pre-increment and Post-increment operator
You'll notice that sometimes we put ++ operator before the variable, and sometimes after. This actually has a meaning.
In and of itself, ++ operator increases the value by 1 and reassigns the result to the variable. That is, it's analagous to writing Value = Value + 1;. However, its position before or after the variable can matter if the increment happens during another operation.
Consider two examples:
int ExampleOne = 7;
int ExampleTwo = 7;

printf(++ExampleOne);
printf(ExampleTwo++);
What will be the print output?
In ExampleOne, the result would be 8. This is because the addition happens first, and the rest of the operation after. However, in ExampleTwo the addition will happen after printf, so the result that will be printed will be 7. At the end of the day, both values would be 8, but we used them in a different way in the meantime.
Also, -- operator functions in the similar way but with the decrement.
Side Considerations
build.bat: Request MSVC to Give Full Paths
If you ever encountered compiler errors so far (if you are following along we're fairly confident you did!), you might have noticed that each error is prefixed by its relative path to the code:
..\code\win32_handmade.cpp(##): error C####
Now, if you use 4coder, you have an option to use Alt-N to jump to the next or Alt-Shift-N to jump to the previous error in your build.bat (in vscode, you can jump to the next error by Ctrl-Click on the address inside Terminal). In order to do so however, you need to provide absolute paths to the source files. Luckily, there's an option to do just that: -FC. Let's quickly edit our build.bat before we move on:
@echo off

mkdir build
pushd build
cl -FC -Zi ..\code\win32_handmade.cpp user32.lib gdi32.lib
popd
Introduction to Alignment
Let's review our Bitmap Info Header:
BITMAPINFO BitmapInfo = {};

BitmapInfo.bmiHeader.biSize = sizeof(BitmapInfo.bmiHeader);
BitmapInfo.bmiHeader.biWidth = Width;
BitmapInfo.bmiHeader.biHeight = Height;
BitmapInfo.bmiHeader.biPlanes = 1;
BitmapInfo.bmiHeader.biBitCount = 32;
BitmapInfo.bmiHeader.biCompression = BI_RGB;
One thing to note is that biBitCount. We said that we need 3 bytes to draw an RGB pixel: one for red, one for green, and one for blue channels. \(3 \cdot\ 8 = 24\), so where does the extra byte come from?
It has to do what memory alignment. In general, on the x86 architecture there is often a penalty for doing the so-called unaligned memory access. Whenever you make an operation on a value, its actual position in memory should begin at the multiple of its size (8 bit, 16 bit, 32 bit, etc.). For instance, the 32-bit values (which are 4 bytes long) should start at the bytes 0, 4, 8, 12, etc. They shouldn't begin at, for example, the 2nd byte, or the 5th byte.
In other words, the processor will spend (quite a bit of) time realigning any non-aligned value before processing it.
In our case, whenever we do an operation on a pixel, especially to simplify the things, we want to access it on an 4-byte boundary. So if we want to ask only for the bits we need to insert R, G and B values, i.e. 24 bytes, 3 bytes are in no way aligned to 4, so constant adjustment will be required. So the extra 8 bits will simply be padding. They don't mean anything and they will not be used, and their sole purpose will be to align the rest of the pixel to the 4-byte boundary.
(Back to Subsection 2.1)
RAII
If you would like to try RAII (Resource Acquisition Is Initialization), Subsection 5.3 would be one of the few places where it would be appropriate. You could then have something like:
class DC
{
    public:
        HDC Handle;
        DC(HWND Window) // Constructor, called during object creation
        {
            m_Window = Window;
            Handle = GetDC(m_Window);
        }
        ~DC()           // Destructor, called when exiting scope
        {
            ReleaseDC(m_Window, Handle);
        }
    private:
        HWND m_Window;
};//...

int CALLBACK
WinMain(...)
{
    //...    {
        DC DeviceContext {Window};

        RECT ClientRect;
        GetClientRect(Window, &ClientRect);

        Win32UpdateWindow(DeviceContext.Handle, &ClientRect);
    } // No need to call destructor, it will be called automatically when exiting the block}
Every programming pattern, feature or system has its place; it's the dogma that catches you. Try not to get into the dogma because you don't want to go the same route all the time, you need to know when to use things.
Bit Blit
There's a function which does direct blitting to the screen, called BitBlt. BitBlt was born around Windows 3.x in the early '90s, with an API WinG created to write “directly to display memory” from a bitmap, which resulted in much faster game rendering times. Of course, at this point it largely makes no difference, but it is marginably faster than StretchDIBits, simply because there's no resizing required, it's a straight DC to DC copy.
As our program is written right now, it's a matter of a personal taste which blitting method to use. Our plan is anyway to transition away from GDI and to the hardware-accelerated rendering anyway, so whichever you pick is fine. We will stick to StretchDIBits but, if you'd like to transition to BitBlt, keep in mind the following:
- Bitmap Info doesn't need to be stored globally, we can have it as a local variable inside
Win32ResizeDIBSection. - You need to select your bitmap before drawing it. You can do it by using
SelectObjectfunction (MSDN).
This is how a potential refactoring would look like:
Keep in mind that you will then need to still keep track of Windows-specific DeviceContext, Bitmap Handle! The following section would not necessarily apply to you then, and additional ramifications might appear to your code in the future.
    SelectObject(BitmapDeviceContext, BitmapHandle);
    BitBlt(DeviceContext,
           X, Y, Width, Height,
BitmapDeviceContext, X, Y, SRCCOPY);BitBlt implementation.
It's easy to sit in 2020 and wonder why would someone need multiple blit calls in 1994. But the reality at the time was that BitBlt was objectively faster at the time, and allowed the DOS games to run on Windows almost at the same framerate as on DOS. Since Windows could do the allocation of memory and had the correct device context already selected, it was a faster path than going through StretchDIBits.
For the original discussion on this point, check out this tweet by Chris Hecker, the creator of WinG. For more some more info regarding the bitmap functions, check out this discussion on Handmade.Network.
Navigation
Previous: Day 3. Allocating a Back Buffer
Up Next: Day 5. Windows Graphics Review
- Bit Blit: a data operation commonly used in computer graphics in which several bitmaps are combined into one using a boolean function.
- Dirty Rectangle Update
- Hardware Driver
- Hexadecimal
- Pitch / Stride
- Pointer Arithmetic
- Type Casting
- Unaligned Memory Access
Comparing Memory Allocation Methods
-FC Provides full path of source code file in diagnostics