Welcome to “Handmade Hero Notes”, the book where we follow the footsteps of Handmade Hero in making the complete game from scratch, with no external libraries. If you'd like to follow along, preorder the game on handmadehero.org, and you will receive access to the GitHub repository, containing complete source code (tagged day-by-day) as well as a variety of other useful resources.
We are in the middle of our game architecture phase, where we are starting to think about how we want this game's code to be structured and how we want it to work.
One of the big things we emphasized in the previous two days when talking about architecture and how you should think about it is that you don't want to do a lot of pre-planning. With pre-planning, you usually don't have the information you need to make those good decisions; you'll make mistakes that will cost you a lot of time. Usually, it is better to explore first, learn, and then go back and say, “Okay, now that I've learned what this code should look like structurally, I can say definitively, this is the architecture and move forward.” We're taking this approach precisely and will continue with it today.
We won't go deep into the weeds yet; we're saving the hardcore rendering notions for when we write the renderer. However, if we need to cover something while putting it on the screen, we'll briefly discuss it. We're trying to make a first pass of the initial game code so we can start to look at how it looks and think about how it will develop from there.
Today, we'll start laying out a basic tile map and a character to navigate it.
(Top)
1 Floating Point Color
1.1 Floating-Point vs Integer Colors
1.2 Convert DrawRectangle to Accept Floating-Point Colors
1.3 Introduce RoundReal32ToUInt32
1.4 Noting New Emerging Structures
2 Start the Tile Map
2.1 Define the Grid
2.2 Render rectangles
2.3 Tweaking
3 Getting a Player on the Screen
3.1 Game Physics and Player Position
3.2 Drawing the Player
3.3 Player Movement
3.4 Frame-independent Character Movement
4 Recap
5 Side Considerations
5.1 A Bit of Color Theory
6 Navigation
Floating Point Color
Floating-Point vs Integer Colors
Let's get started! We're right here at the beginning of the game. It's a giant open field in front of us! If you run the game, you will notice that this field is very pink; it's not very exciting. You might even get a temptation to clear the screen to black or white instead, but having an intense magenta as a base background has its uses. When we make a little tile map with its little squares and color the squares in, we'll be able to see anywhere we are not filling: the pink will show through.
We also wrote a little function to draw a rectangle on the screen, ensuring it wouldn't crash our game and passing a simple hexadecimal color to it.
As discussed during Day 4, our bit pattern is 0x AA RR GG BB (with alpha channel unused). If you're from the web programming world, you should be familiar with this layout, which is #RRGGBB. However, you may want to do some operations with these colors. For example, blend one color into another or make it darker or lighter. Because modern processors have much bigger floating-point units than integer units, this sort of math would be faster if done on a floating-point number.
So, even at these early stages, we want to think generally about colors in a floating-point format (one float per Red, Green, and Blue channels) and only “pack” the 32-bit floats into a single 32-bit int for concrete operations: storage, output into the buffer, etc.
You may wonder why we even have Red, Green, and Blue as our basis for colors. In summary, it has to do with how the human eye functions, and we briefly touch on this in the Subsection 5.1.
Now, when outputting red color, we can say that since our monitor has a particular maximum brightness, we can encode the darkest red (where no red is output at all) and the brightest red as a range from 0 to 1. The same applies to green and blue values. Adopting this convention makes our math with colors more manageable and effectively converts whatever underlying real value into a percentage, making it a dimension-free value we can easily convert afterward.
Convert DrawRectangle to Accept Floating-Point Colors
Having said that, we now want to change our DrawRectangle to accept floating-point colors.
internal void
DrawRectangle(game_offscreen_buffer *Buffer,
              f32 RealMinX, f32 RealMinY, f32 RealMaxX, f32 RealMaxY,               u32 Color)              f32 R, f32 G, f32 B)
We must rebuild our Color value inside DrawRectangle. To do that, we need to find a way to pack a 32-bit floating-point color value into an 8-bit unsigned int.
An 8-bit number has 256 possible values, so our 0-1 floating-point number should translate to the 0-255 range. The simplest way would be to write (u8)R * 255.0f, but let's make the same rounding we did last time, to allow our number to round to max value if it's close enough.
if (MaxY > Buffer->Height)
{
    MaxY = Buffer->Height;
}
u32 Color = (u32)(RoundReal32ToInt32(R * 255.0f)
                  RoundReal32ToInt32(G * 255.0f)
                  RoundReal32ToInt32(B * 255.0f));u8 *Row = // ...
Now, we need to think about how we will pack the numbers. Similarly to what we did on Day 4, we need to do some bit shifting (<<) and bitwise OR (|) operations to put three 8-bit values into one 32-bit value.
- The bits 24-32 are unused, so we don't need to do anything with them.
- We shift Red's 8 bits by 16 to occupy bits from 16 to 24.
- We shift Green's 8 bits by 8 to occupy bits 8 to 16.
- We don't shift Blue's 8 bits (or, if you prefer, move them by 0) to occupy bits 0 to 8.
Here is how it looks in the code:
if (MaxY > Buffer->Height)
{
    MaxY = Buffer->Height;
}
u32 Color = (u32)((RoundReal32ToInt32(R * 255.0f) << 16) |
                  (RoundReal32ToInt32(G * 255.0f) << 8)  |
(RoundReal32ToInt32(B * 255.0f) << 0));u8 *Row = // ... This should be it; let's replace the values we're using to call the function:
DrawRectangle(Buffer, 0.0f, 0.0f, (f32)Buffer->Width, (f32)Buffer->Height, 1.0f, 0.0f, 1.0f);
DrawRectangle(Buffer, 10.0f, 10.0f, 30.0f, 30.f, 0.0f, 1.0f, 1.0f);We should see no changes after recompiling, indicating that we refactored everything correctly. So now we can easily modify the red, green, and blue values within the 0-1 range, and our rectangles will change colors accordingly.
Introduce RoundReal32ToUInt32
We could also get more precise with our rounding operation: instead of getting a signed 32-bit value, we can round to an unsigned value instead:
internal s32
RoundReal32ToInt32(f32 Number)
{
    s32 Result = (s32)(Number + 0.5f);
    return (Result);
}
internal u32
RoundReal32ToUInt32(f32 Number)
{
    u32 Result = (u32)(Number + 0.5f);
    return (Result);
}
While we might not necessarily need this distinction right now, it might come in handy in the future. In the meantime, let's use it in our DrawRectangle function:
u32 Color = ((RoundReal32ToUInt32(R * 255.0f) << 16) |
             (RoundReal32ToUInt32(G * 255.0f) << 8)  |
(RoundReal32ToUInt32(B * 255.0f) << 0));Noting New Emerging Structures
You might have noticed already that some structures are starting to emerge here. For instance, we're probably not often going to pass a red value by itself. It's going to always come with a green and a blue.
And so, game architecture-wise, you can start to see what we'll eventually do here: make a struct that will capture the concept of Color so that we don't have to keep passing our Rs, Gs, and Bs around. We won't do it yet because, so far, we have only used it in one function. We don't have enough information on what such a structure should and should not contain.
You should start paying attention to these things, feeling this itch in the back of your head. For example, you might note some operations happening on a color in the future. Maybe someone will try to represent them as u32; others will work with the f32 representation. So we'll be passing a bunch of things together. There are many things to find once you know what to look for.
Similarly, a rectangle might be another structure you might want to pay attention to. These structures are starting to emerge already, and we haven't even done anything yet!
Start the Tile Map
Let's make the most straightforward tile map you can imagine! We'll take a 32-bit value and spread it around a bit.
Define the Grid
We want to start with a grid 16 tiles across and 9 down, the same as the HD aspect ratio.
u32 TileMap[16][9];
DrawRectangle(Buffer, 0.0f, 0.0f, (f32)Buffer->Width, (f32)Buffer->Height, 1.0f, 0.0f, 1.0f);
DrawRectangle(Buffer, 10.0f, 10.0f, 30.0f, 30.f, 0.0f, 1.0f, 1.0f);Maybe it's too big for now, but we can adjust it in the future.
TileMap is an array of arrays of u32s, also known as a 2D array or double array. In fact, similarly to what we did last time, we want to invert X and Y positions because we want the X values to be packed together. 16 will go sequentially, and 9 will be like row offsets.
u32 TileMap[9][16];Now, we want to define the values for our simple map right there:
u32 TileMap[9][16] = {
    {0, 0, 0, 0,  0, 0, 0, 0,  0, 0, 0, 0,  0, 0, 0, 0},
    {0, 0, 0, 0,  0, 0, 0, 0,  0, 0, 0, 0,  0, 0, 0, 0},
    {0, 0, 0, 0,  0, 0, 0, 0,  0, 0, 0, 0,  0, 0, 0, 0},
    {0, 0, 0, 0,  0, 0, 0, 0,  0, 0, 0, 0,  0, 0, 0, 0},

    {0, 0, 0, 0,  0, 0, 0, 0,  0, 0, 0, 0,  0, 0, 0, 0},
    {0, 0, 0, 0,  0, 0, 0, 0,  0, 0, 0, 0,  0, 0, 0, 0},
    {0, 0, 0, 0,  0, 0, 0, 0,  0, 0, 0, 0,  0, 0, 0, 0},
    {0, 0, 0, 0,  0, 0, 0, 0,  0, 0, 0, 0,  0, 0, 0, 0},

    {0, 0, 0, 0,  0, 0, 0, 0,  0, 0, 0, 0,  0, 0, 0, 0}
};Now, let's set some values to the tiles to make sure we're drawing what we want:
u32 TileMap[9][16] = {
    {0, 0, 0, 0,  0, 0, 0, 0,  1, 0, 0, 0,  1, 0, 0, 0},
    {0, 1, 0, 0,  0, 1, 0, 0,  1, 0, 0, 0,  0, 1, 0, 0},
    {0, 1, 0, 0,  0, 0, 0, 0,  1, 0, 0, 0,  0, 0, 1, 0},
    {0, 0, 0, 0,  0, 0, 0, 0,  1, 0, 0, 0,  0, 0, 0, 1},

    {0, 1, 0, 0,  0, 1, 0, 0,  1, 0, 0, 0,  0, 0, 1, 0},
    {0, 1, 0, 0,  0, 1, 0, 0,  1, 0, 0, 0,  0, 1, 0, 0},
    {0, 0, 0, 0,  0, 1, 0, 0,  1, 0, 0, 0,  1, 0, 0, 0},
    {0, 1, 1, 1,  1, 0, 0, 0,  1, 0, 0, 0,  0, 1, 0, 0},

    {0, 0, 0, 0,  0, 0, 0, 0,  1, 0, 0, 0,  0, 0, 1, 0}
};This way, we expect the final result will look something like this:
Render rectangles
Every number here will represent a type of tile. Eventually, it may be land, water, rock, or whatever. For now, though, we will have colored rectangles depending on the tile type. Let's throw a quick for loop after we clear our screen. We can also get rid of our small cyan rectangle.
DrawRectangle(Buffer, 0.0f, 0.0f, (f32)Buffer->Width, (f32)Buffer->Height, 1.0f, 0.0f, 1.0f);
for(int Row = 0;
        Row < 9;
        ++Row)
{
    for(int Column = 0;
            Column < 16;
            ++Column)
    {

    }
}
DrawRectangle(Buffer, 10.0f, 10.0f, 30.0f, 30.f, 0.0f, 1.0f, 1.0f);
Inside the double for loop, we want to access the tile ID. In the future, the ID might access a sprite or a color. We'll assign shades of gray depending on the ID because we don't have any of that yet.
for(int Row = 0; /*...*/)
{
    for(int Column = 0; /*...*/)
    {        u32 TileID = TileMap[Row][Column];
        f32 Gray = 0.5f;
        if (TileID == 1)
        {
            Gray = 1.0f;
        }    }
}Then, when we draw the rectangle, we will need some other info:
MinX: We'll get to it in a second.MinY: Same; let's leave it aside for a moment.MaxX: If we know theMinX,MaxXis the same + tile widthMaxY: If we know theMinY,MaxYis the same + tile height
We can then pass all of this over to our DrawRectangle function. We'll pass our Gray value for Red, Green, and Blue.
for(int Row = 0; /*...*/)
{
    for(int Column = 0; /*...*/)
    {
        u32 TileID = TileMap[Row][Column];
        f32 Gray = 0.5f;
        if (TileID == 1)
        {
            Gray = 1.0f;
        }
                f32 MinX = ;
        f32 MinY = ;
        f32 MaxX = MinX + TileWidth;
        f32 MaxY = MinY + TileHeight;

        DrawRectangle(Buffer, MinX, MinY, MaxX, MaxY, Gray, Gray, Gray);    }
}
Now, how do we calculate MinX and MinY? Well, we've got a row value and a column value, so for each row, we're going down by one tile height each time it increments. Which we already know is going to be some value we'll define in a moment. The same logic will apply to MinX.
That said, Row is an integer, whereas we want a float. So, we need to convert that to a floating point value. Unlike rounding to int, conversion to float is automatic in C, but we still want to be explicit about what's happening in the code. This precaution allows us to avoid weird mistakes and avoid having the compiler not do what we expect it to.
Let's also say we want some base offset that we'll call UpperLeftX and UpperLeftY:
for(int Row = 0; /*...*/)
{
    for(int Column = 0; /*...*/)
    {
        u32 TileID = TileMap[Row][Column];
        f32 Gray = 0.5f;
        if (TileID == 1)
        {
            Gray = 1.0f;
        }
                f32 MinX = UpperLeftX + ((f32)Column) * TileWidth;
        f32 MinY = UpperLeftY + ((f32)Row) * TileHeight;        f32 MaxX = MinX + TileWidth;
        f32 MaxY = MinY + TileHeight;

        DrawRectangle(Buffer, MinX, MinY, MaxX, MaxY, Gray, Gray, Gray);
    }
}
What's left is to define UpperLeftX, UpperLeftY, TileWidth, and TileHeight. We'll do it outside the for loop and give them some random numbers, to begin with:
f32 UpperLeftX = 10;
f32 UpperLeftY = 10;
f32 TileWidth = 100;
f32 TileHeight = 100;
for(int Row = 0;
    Row < 9;
    ++Row)
{
    for(int Column = 0;
        Column < 16;
        ++Column)
    {
        u32 TileID = TileMap[Row][Column];
        f32 Gray = 0.5f;
        if (TileID == 1)
        {
            Gray = 1.0f;
        }

        f32 MinX = UpperLeftX + ((f32)Column) * TileWidth;
        f32 MinY = UpperLeftY + ((f32)Row) * TileHeight;
        f32 MaxX = MinX + TileWidth;
        f32 MaxY = MinY + TileHeight;

        DrawRectangle(Buffer, MinX, MinY, MaxX, MaxY, Gray, Gray, Gray);
    }
}We are ready to compile! Let's see how it looks:
We need to adjust our values if we want the tile map to fit on the screen:
f32 UpperLeftX = 0;
f32 UpperLeftY = 0;
f32 TileWidth = 60;
f32 TileHeight = 60;
Tweaking
There we go! Now, we can modify the tile map values as we want. Let's say we want to create a classic dungeon with walls all around, some obstacles, maybe with the doors in the middle.
u32 TileMap[9][16] =
{    {1, 1, 1, 1,  1, 1, 1, 1,  0, 1, 1, 1,  1, 1, 1, 1},
    {1, 1, 0, 0,  0, 1, 0, 0,  0, 0, 0, 0,  0, 1, 0, 1},
    {1, 1, 0, 0,  0, 0, 0, 0,  1, 0, 0, 0,  0, 0, 1, 1},
    {1, 0, 0, 0,  0, 0, 0, 0,  1, 0, 0, 0,  0, 0, 0, 1},
    {0, 0, 0, 0,  0, 1, 0, 0,  1, 0, 0, 0,  0, 0, 0, 0},
    {1, 1, 0, 0,  0, 1, 0, 0,  1, 0, 0, 0,  0, 1, 0, 1},
    {1, 0, 0, 0,  0, 1, 0, 0,  1, 0, 0, 0,  1, 0, 0, 1},
    {1, 1, 1, 1,  1, 0, 0, 0,  0, 0, 0, 0,  0, 1, 0, 1},
    {1, 1, 1, 1,  1, 1, 1, 1,  0, 1, 1, 1,  1, 1, 1, 1}};
But now we have a big problem! The doors are not centered. Fortunately, it's easy to fix: we will make the grid width odd. It will require us to make some changes though:
u32 TileMap[9][17] =
{
    {1, 1, 1, 1,  1, 1, 1, 1,  0, 1, 1, 1,  1, 1, 1, 1,  1},
    {1, 1, 0, 0,  0, 1, 0, 0,  0, 0, 0, 0,  0, 1, 0, 0,  1},
    {1, 1, 0, 0,  0, 0, 0, 0,  1, 0, 0, 0,  0, 0, 1, 0,  1},
    {1, 0, 0, 0,  0, 0, 0, 0,  1, 0, 0, 0,  0, 0, 0, 0,  1},
    {0, 0, 0, 0,  0, 1, 0, 0,  1, 0, 0, 0,  0, 0, 0, 0,  0},
    {1, 1, 0, 0,  0, 1, 0, 0,  1, 0, 0, 0,  0, 1, 0, 0,  1},
    {1, 0, 0, 0,  0, 1, 0, 0,  1, 0, 0, 0,  1, 0, 0, 0,  1},
    {1, 1, 1, 1,  1, 0, 0, 0,  0, 0, 0, 0,  0, 1, 0, 0,  1},
    {1, 1, 1, 1,  1, 1, 1, 1,  0, 1, 1, 1,  1, 1, 1, 1,  1}
};DrawRectangle(Buffer, 0.0f, 0.0f, (f32)Buffer->Width, (f32)Buffer->Height, 1.0f, 0.0f, 1.0f);
f32 UpperLeftX = -30;f32 UpperLeftY = 0;
f32 TileWidth = 60;
f32 TileHeight = 60;

for(int Row = 0;
    Row < 9;
    ++Row)
{
    for(int Column = 0;        Column < 17;        ++Column)
    {
        // ...
    }
}
You will notice we had to modify UpperLeftX to ensure the right wall is visible again. That said, if we wanted to have this “half wall” effect for our rows as well, we'd have to make the row count even (which would bring the vertical doors off-center) or change the tile height (which would stretch the tiles to become rectangles instead of squares).
These questions are why we do exploration; we want to think about all these things up front before making decisions about our tile map size, etc. To solve them, we might study old games; maybe they did different dimensions because the standard aspect ratio was 4:3 before HD TVs became commonplace. It's a good moment to put on your thinking cap and consider all this.
Getting a Player on the Screen
Given that we have a tile map on the screen, it seems the next logical thing to do is make a little player move around. So, similarly to what we did with our debug code back in the day, we want to add some simple values inside the GameState structure. We usually shouldn't be able to modify structures while we're hot-loading, but in this case, it should work. It's a unique case due to our empty GameState structure; if you recall, we store GameState at the beginning of our memory block, with gigabytes of available memory that follow.
So, for our player, let's say we'll need to capture the player's X and Y positions in the world:
struct game_state
{    f32 PlayerX;
f32 PlayerY;};Game Physics and Player Position
We'll use our DrawRectangle function to draw the player. That said, we'll probably need to do some calculations to properly position our rectangle respectfully to the player's position.
When we say “a player touches a wall” in a 2D world, we usually don't mean the top of their head sprite. Usually, they eclipse the wall a bit, so their actual location is typically more about where their center of gravity projects on the floor.
So, when we want to calculate the position of the player's sprite (rectangle for now), we need to position it so that the player's position is at its bottom center. We achieve that by offsetting our PlayerTop by half the player's width and PlayerLeft by its full height.
It will eventually become second nature to you, but if you've never done anything with graphics before, you want to think it through like this a few times.
Drawing the Player
Let's start typing those values in. We will draw the player after we draw our tilemap on the screen. For MinX and MinY, we'll calculate PlayerLeft and PlayerTop. We'll offset these by player width and height to achieve MaxX and MaxY.
for(int Row = 0; /*...*/)
{
    for(int Column = 0; /*...*/)
    {
        // ...
    }
}
DrawRectangle(Buffer, PlayerLeft, PlayerTop,
              PlayerLeft + PlayerWidth,
              PlayerTop + PlayerHeight,
PlayerR, PlayerG, PlayerB);We will need the red, green, and blue values for our color; let's make it a lovely yellow:
f32 PlayerR = 1.0f;
f32 PlayerG = 1.0f;
f32 PlayerB = 0.0f;
DrawRectangle(Buffer, PlayerLeft, PlayerTop,
              PlayerLeft + PlayerWidth,
              PlayerTop + PlayerHeight,
PlayerR, PlayerG, PlayerB);The tile width and height will determine the player's width and height. Maybe we'll make the width slightly smaller to pass through doors more easily:
f32 PlayerR = 1.0f;
f32 PlayerG = 1.0f;
f32 PlayerB = 0.0f;f32 PlayerWidth = 0.75f * TileWidth;
f32 PlayerHeight = TileHeight;
DrawRectangle(Buffer, PlayerLeft, PlayerTop,
              PlayerLeft + PlayerWidth,
              PlayerTop + PlayerHeight,
              PlayerR, PlayerG, PlayerB);
Finally, to calculate PlayerLeft, we take PlayerX and remove half of PlayerWidth, as we said. Instead of dividing by 2, we'll multiply by 0.5f as it's more efficient. For PlayerTop, we'll take PlayerY and subtract the entire PlayerHeight:
f32 PlayerR = 1.0f;
f32 PlayerG = 1.0f;
f32 PlayerB = 0.0f;
f32 PlayerWidth = 0.75f * TileWidth;
f32 PlayerHeight = TileHeight;f32 PlayerLeft = GameState->PlayerX - (0.5f * PlayerWidth);
f32 PlayerTop = GameState->PlayerY - PlayerHeight;
DrawRectangle(Buffer, PlayerLeft, PlayerTop,
              PlayerLeft + PlayerWidth,
              PlayerTop + PlayerHeight,
PlayerR, PlayerG, PlayerB);Player Movement
We can now compile, but we won't see any changes: since both PlayerX and PlayerY are zero, we draw the whole player rectangle outside the top-left corner of our screen. Let's add some simple code to control player movement (keyboard-only, for the time being).
The logic is straightforward: we define delta values for X and Y and then add them to the player's X and Y.
game_controller_input *Controller = GetController(Input, ControllerIndex);
if (Controller->IsAnalog)
{
    // NOTE(casey): Use analog movement tuning
}
else
{
    // NOTE(casey): Use digital movement tuning    f32 dPlayerX = 0.0f;
    f32 dPlayerY = 0.0f;

    GameState->PlayerX += dPlayerX;
GameState->PlayerY += dPlayerY;}These delta values change if we press the corresponding keys.
    f32 dPlayerX = 0.0f;
    f32 dPlayerY = 0.0f;
    if(Controller->MoveRight.EndedDown)
    {
        dPlayerX = 1.0f;
    }
    if(Controller->MoveLeft.EndedDown)
    {
        dPlayerX = -1.0f;
    }
    if(Controller->MoveDown.EndedDown)
    {
        dPlayerY = 1.0f;
    }
    if(Controller->MoveUp.EndedDown)
    {
        dPlayerY = -1.0f;
    }
        GameState->PlayerX += dPlayerX;
GameState->PlayerY += dPlayerY;We have our dude, and he's moving around now! He moves around pretty slowly, and that's fine; we're not in a rush. Let's see, however, what's causing it and how we can change that.
Frame-independent Character Movement
What we wrote above is quite simple, but what does it mean? Every frame we press a button, say the D key, our player moves by 1 pixel to the right. In other words, we move our player by one pixel for every game frame.
There are many reasons why this is not ideal. If our framerate is faster, the player will move faster; if it's slower, the player will move slower. Some games did it in the past, and on modern hardware, it's almost impossible to experience them as they run dozens, if not hundreds, of frames per second faster than they were designed for.
Instead, let's apply the frame time we got last time, stored in SecondsToAdvanceOverUpdate. In fact, this is a bulky name, let's rename it to something like dtForFrame:
struct game_input
{
    game_button_state MouseButtons[5];
    s32 MouseX, MouseY, MouseZ;
        f32 dtForFrame;    game_controller_input Controllers[5];
};while (GlobalRunning)
{ NewInput->dtForFrame = TargetSecondsPerFrame; // ...
};
We can use dtForFrame by multiplying it with our dPlayerX and dPlayerY:
    if(Controller->MoveUp.EndedDown)
    {
        dPlayerY = -1.0f;
    }
        GameState->PlayerX += Input->dtForFrame * dPlayerX;
GameState->PlayerY += Input->dtForFrame * dPlayerY;This solution works, but you'll notice that the player is now moving at a glacial pace. let's speed things up a bit by adding another multiplier:
    if(Controller->MoveUp.EndedDown)
    {
        dPlayerY = -1.0f;
    }
        dPlayerX *= 64.0f;
    dPlayerY *= 64.0f;
    GameState->PlayerX += Input->dtForFrame * dPlayerX;
    GameState->PlayerY += Input->dtForFrame * dPlayerY;
Recap
All we've written so far is just exploratory code. At this point, anything goes. Ignore the code quality, errors, performance, or anything else! The goal of exploration is to see what you would type in if you just had to do the thing fast, in our case, draw a tile map on the screen. That is the only thing that you should be worrying about. At this point, you should never give even a moment's thought to anything you see in those books, like writing clean code or effective C++. We should shut off all of this because we want to know what the CPU should do to achieve what we want, at least some notion of the final code. The next step will be to review what we wrote and figure out the clean way to make it.
We're going to start having an actual game here. We have so much stuff to discuss, from renderer to coordinate systems (because we don't want to be in pixels as we progress). We have tons of stuff to do, explain, and investigate in detail. The game won't be up and running anytime soon, yet it's so fun to have a little thing moving around on a tile map. Pretty soon, our game will be kind of playable: a little rectangle dude running around between tile maps and fighting little rectangle monsters!
Anyone gets excited about a bunch of beautiful sprites flying around on the screen and doing stuff that's not hard to get excited about. It's when you're excited about the little things it says something about where your inclinations lie.
Side Considerations
A Bit of Color Theory
Light is a type of radiation visible to a human eye. Any electromagnetic radiation consists of waves oscillating at varying speeds, and the cone cells in our eyes can capture three separate ranges that roughly correspond to red, green, and blue light. (The ranges vary by person and age, so providing an exact definition is impossible.) Because these ranges overlap, our eyes can perceive various colors by combining these three “primary” colors.

Similarly, you can take any three colors or properties of a color and create a Color space. You can thus arrive at the color models describing a color in three or four values, such as:
- RGB: describes how much Red, Green, and Blue light needs to be emitted to produce a given color. Adding all three at maximum produces white.
- CMY (or CMYK): used in paint or print to indicate how much Cyan, Magenta, and Yellow produce colors on a white sheet or canvas. Adding all three at maximum produces black.
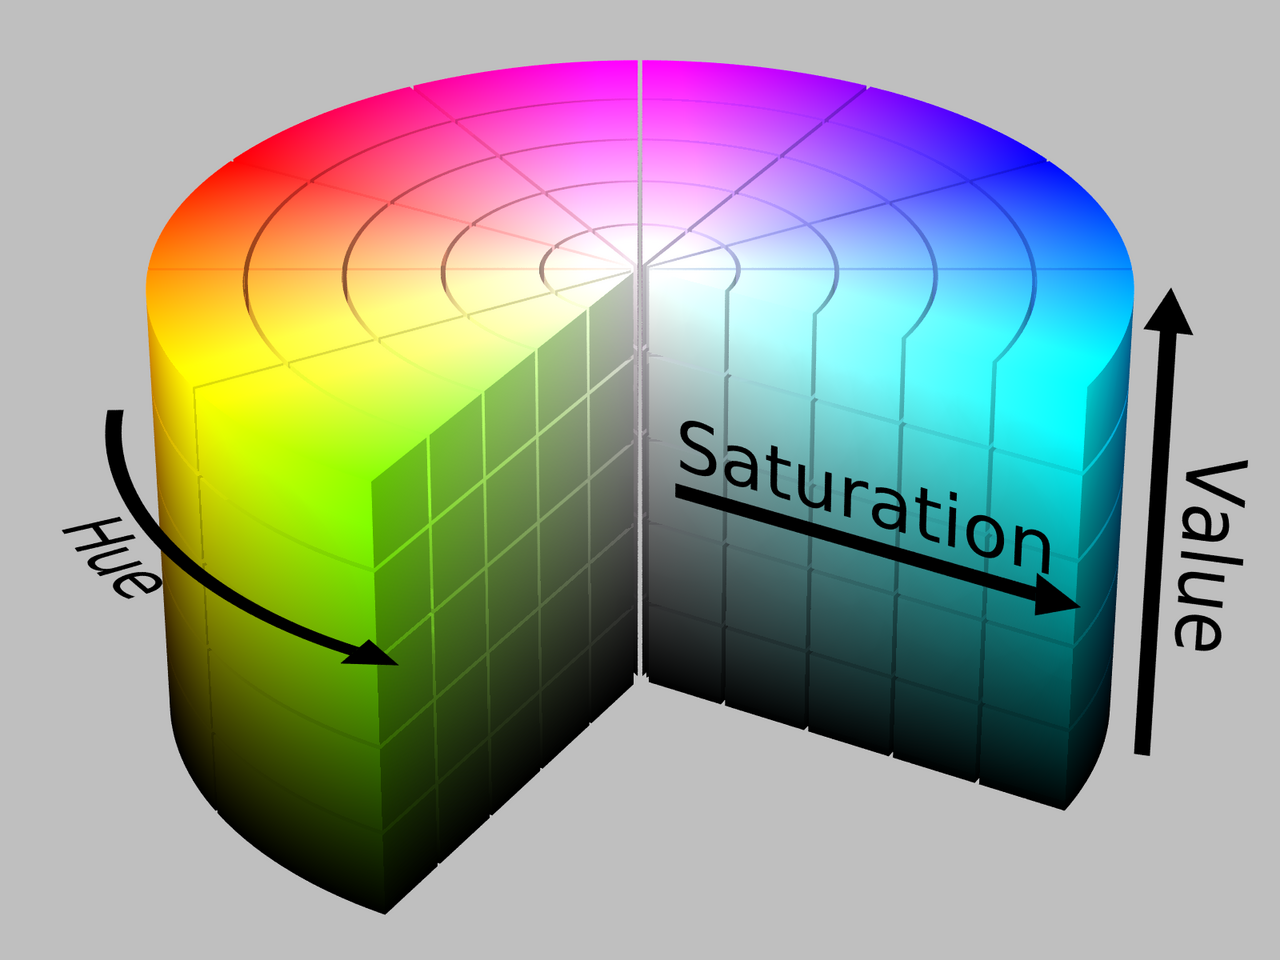
- HSL: Describes the color in terms of Hue, Saturation, and Lightness, where lightness goes from black to white, with base color in the middle.
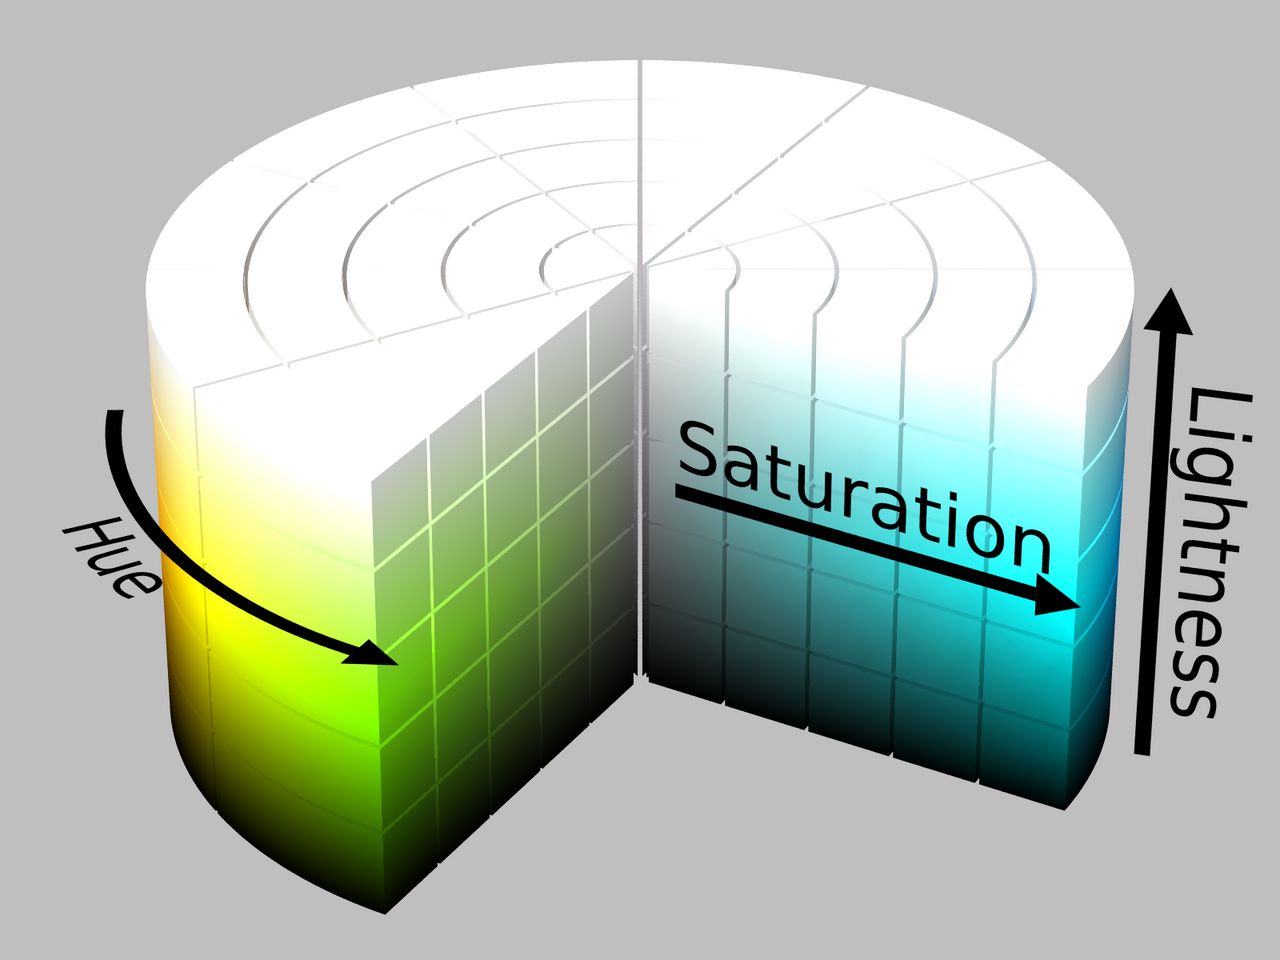
- HSV: Similar to HSL, it describes the color in terms of Hue and Saturation but replaces Lightness with Value (black to maximum chromaticity).
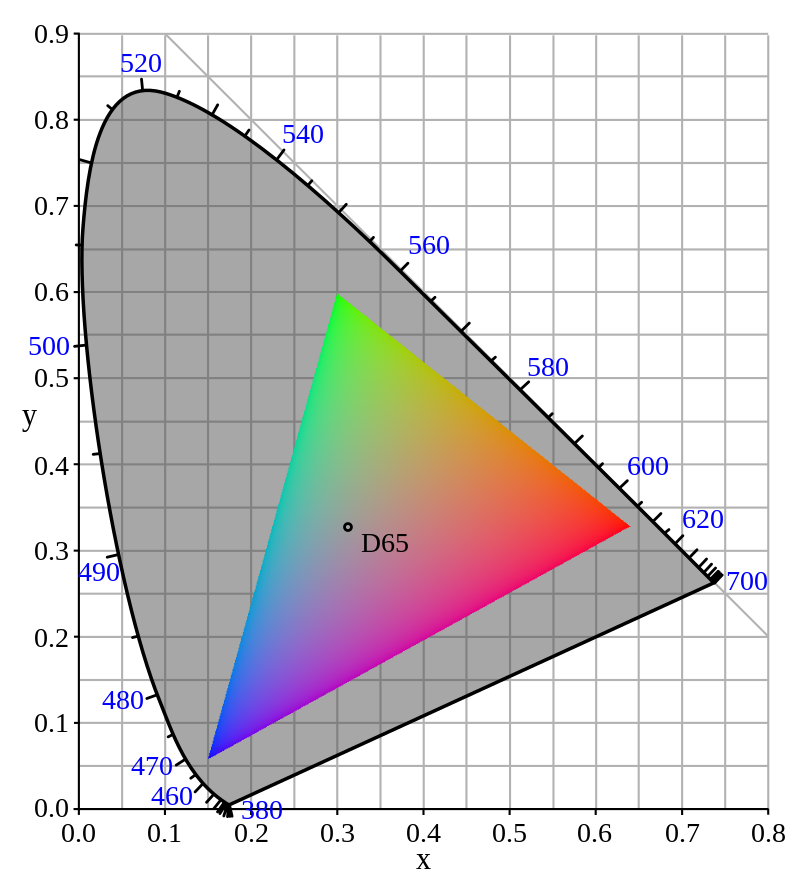
If you go a bit deeper and describe that color space mathematically, you can arrive at specific color gamuts. These are then used as standards for hardware production or general usage. If you pick the colors closer to the primary human eye colors, you get a broader range of the colors that a device can output (printer or display) or perceive (camera or scanner).
Modern consumer screens use arrays of LEDs that emit different strengths of red, green, and blue light to mix the colors. When these arrays are dense enough, we can't tell the difference and accept the mixed colors they produce.

As programmers, we generally don't need to represent the colors in any “better” way than RGB. There are exceptions to this when we do our computations; if we go for high photorealism, it may be necessary to simulate the actual wavelength of the light as opposed to its RGB value. But it's always true regarding the output of the actual pixels on a physical screen, i.e., when we want to render a computed image. We can produce any colors in the respective gamut by adjusting the intensity of red, green, and blue pixel components.
(Back to Subsection 1.1)
Navigation
Previous: Day 27. Exploration-based Architecture
Up Next: Day 29. Basic Tile Map Collision Checking
- Gamut
- Spectrum
Spectra and What They Can Tell Us