Welcome to “Handmade Hero Notes”, the book where we follow the footsteps of Handmade Hero in making the complete game from scratch, with no external libraries. If you'd like to follow along, preorder the game on handmadehero.org, and you will receive access to the GitHub repository, containing complete source code (tagged day-by-day) as well as a variety of other useful resources.
We did quite a bit of theory last time; let's wrap it up and get to practice!
(Top)
1 Project State Space
1.1 Waypoints
1.2 Explore and Lock
2 Our Game Design
2.1 Inspiration
2.2 The Tile Map
2.3 The Game World
2.4 Combinatorics
2.5 Into the Unknown
3 Back to Code
3.1 Get Target Seconds Per Frame
3.2 Remove Test Code
3.2.1 Remove Test Sound
3.2.2 Remove the Weird Gradient
3.2.3 Remove RenderPlayer calls
3.2.4 Remove File Calls
3.2.5 Clean Up the Game State
3.3 Decide on the Game Resolution
4 Draw Rectangle Function
4.1 Repurpose RenderPlayer into DrawRectangle
4.2 Clip Boundaries
4.3 Fill the Pixels
4.4 Write the Rounding Function
4.5 Test Our Changes
4.6 Pass the Color
5 Recap
6 Programming Notions
6.1 Compression-oriented programming
7 Side Considerations
7.1 Floating-point Coordinates
8 Notes
9 Navigation
Project State Space
If we put on our fantasy hats and head into the fantasy land of unicorns, magic, and trolls called Project State Space, we will find a map showing our progress on the project. In our case, we're essentially at Day 0 of the project (if you exclude the excruciating need of having to talk to Windows), and our map looks quite empty:
There's also a point at which we will ship our project. We start somewhere, and that somewhere is the finish:
Of course, if you worked on any project, you know that the path from start to finish is never straight. It's even more the case in the wonderful world of software development. This path to victory is often arduous, full of deviations and even setbacks:
Often, you don't even know how the final product will look! You only have a vague idea, but unless it's anything more complex than a “hello world” project, any additional details will be revealed as the project grows stronger. It's not necessarily a “point” you're trying to reach but more of a nebulous blob of possibilities that slowly condenses into the final product.
Because of this, you might initially set towards a specific point in the “shipping nebula” and even progress there for a while before realizing that the actual thing you're trying to reach is further away. Eventually, the nebula will condense into a point, and you will ship your project.
Waypoints
So how should one approach this voyage, sitting down for the new day and hoping it will bring the project (or even individual pieces of code) closer to the finish?
At any given point in your project journey, be it day 0, day 100, etc., you would set yourself an objective for the day. Maybe it's upgrading the object system because it doesn't handle the number of objects we're trying to draw or optimizing something. Who knows? By doing this, you're effectively picking a new point on your Project State Space and advancing yourself towards that point. Thus, day by day, you'd choose new points from wherever you left the day before. The better you're at dead reckoning, the fewer switchbacks and backtraces there are, the faster you ship your project.
This is where compression-oriented programming comes into play. It allows us to write code, see how it works at the low level, and eventually elevate it into more significant designs as we go without needing a lot of pre-planning.
For more information about compression-oriented programming, see Subsection 6.1 for a broader definition.
The main issue with pre-planning is that it assumes that you know what the final code would look like. If you have to do the pre-plan, you set your final point in advance and create the “waypoints” through which the project should go.
But if you don't know the final point, there's no way to do the waypoints. In reality, the final point is often set way off course.
So when someone tries to follow that plan, things get progressively janky, and by the time you get to a certain point and realize it's a disaster, it's usually way too late to change things. The code is awful; we're fighting the architecture the whole way, and you either ship something sub-optimal or try to course-correct toward the actual goal.
Explore and Lock
Thus, upfront design is about putting some waypoints on this map without knowing your destination. We showed that it doesn't work, and you should avoid looking too far ahead. What we want to encourage instead and how we'll approach everything1 will be focused on unknown (to us) problems. Hopefully, by the end of this course, you'll develop skills to approach these problems. That's the tricky thing, one that makes you a code architect.
We'll take an “Explore and Lock” approach to achieve that. Our approach will be the opposite of these waypoints. We'll explore and see what we find around us at each point we're at. When we find something that we feel is along the path that gets us to shipping the product, we will lock it in and make it our new starting location.
In doing so, you would hopefully develop a feel for a gradient along the path to shipping. This way, you'll also learn when architecture is good or bad, making you more at ease when faced with a new architecture and staying on the right track.
Our Game Design
With this theory out of the way, let's briefly discuss the game we want to make. Specifically, we'll touch upon how our game looks and plays to see what engine we build to support it.
It's important to note that this course doesn't focus on game design, and we're trying to make the most straightforward design possible while maintaining a complex programming challenge.
We'll take significant inspiration from the classic games like The Legend of Zelda, and these are the main points we'd like to focus on:
- Tile-based map
- Things that move on the map
- Fancy renderer/compositor - a complete departure from NES/SNES-era games.
- Separation between the overworld and dungeons
- Consistent space
- Procedurally generated
- No dimension limits
- Combinatorics
All of these should be simple enough so that we can finish them but complex enough so that we can learn advanced programming techniques.
Inspiration
The original Legend _of Zelda was released to NES and other platforms in 1986 and became an instant hit. Even today, decades after its release, it's often considered one of the greatest games of all time and, even less questionably so, one of the most influential.
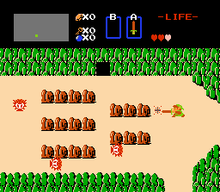
Among the things in which this game was different from its many successors was an extremely open-ended experience. The game would drop you into a rich and exciting world and allow you to explore it. There were no constraints or limitations about what you could do; no fairy told you where to go, etc. In Handmade Hero, we will try to capture this feeling of exploration when you don't know what's coming next. Additionally, Zelda, being a game limited by the technology of its time, would be a good model for us, where we would take its different system and try to modernize them.
The Tile Map
Similarly to the old Zelda games, we want to make a tile-based world grid with tiles like Water, Grass, Land, Shop, and others. Our game would have the same feel as the old classics but not their tile-map graphics. While the latter might have been a necessary tool for its time, and nowadays, we can supersede it, there are real benefits to having a tile-map design. For instance, if a tile is blocked, the player would get a clear message that you can't go through. We want to preserve this to clarify the game rules to the player.
Therefore, what we want to have is a game that has tiles but does not render them as a tile map. This approach would avoid repeating the same asset on a rigid grid if we, for example, want to draw several forest tiles in a row.
We will also allow certain things to float outside the rigid grid structure. For example, the player in The Legend of Zelda_ wasn't bound to a tile grid and could move freely, the same as some enemies.
The Game World
When we talk about the game world, once again, we're thinking about The Legend of Zelda. In it, the player would traverse the overworld, talk to NPCs, and find entrances to the dungeons. The player would discover enemies, traps, and treasures in the dungeons. We want to recreate some of that with one notable sidenote: consistent space.
What do we mean by that? When you enter the dungeon, you will effectively go under the world map, and should you find another exit from it, it will bring you to another point on the map consistent with the space you traversed underground. The only departure from this would be some magical context where it would be clear that it's supposed to be this way: a teleport, a portal, and similar.
Our game would generate every new world from scratch, and nothing we do will be hardcoded, aside from a few selected rooms (start screen, end screen, maybe a few others). That said, we probably won't be able to support a fixed random seed to generate the world around like many other games do; it will have to be more involved.
We want to avoid rigid boundaries on the map. You can quickly learn a 256×256×256 world, and it could get boring. We'd be much happier with an impractical world limit (like 4,000,000,000 × 4,000,000,000 × 4,000,000,000) that would make it infinite for the player.
Combinatorics
Ultimately, our game engine would support an enormous amount of possible combinations. We call these “combinatorics” - any property you can think of can invariably deal with other properties.
For instance, if our game has a monster that can walk around, and we have a property called “fear,” we should be able to hit it with something that could inflict fear on that monster. Additionally, there would be a logical way to transmit these effects: I might have a wand that I could imbue with gems, and if one of these gems happens to be a fear gem, I can cast it to a tile, and if the monster goes through that tile it becomes fearful, and if it combines with another trait the monster might run away...
Combinatorics is not easy to implement, and we will spend a long time dealing with them in the course. That said, it's not something we'll get to anytime soon. We want to create a world where we can move around, which can drive our renderer design first. Once we get that up and running, though, we will dedicate most of our time to this.
Into the Unknown
So, this is where we stand in terms of game design. We start this journey together and don't know where it will lead us. The final code is unknown to us since, until now, we never really attempted a Legend of Zelda clone, let alone a completely new thing that takes it in entirely new directions. So, we have a ton of unknown stuff, and we don't have a plan for how to write it. We don't even know how to approach the tilemap! We could brainstorm and imagine a few ways to implement something like this. Still, we don't have direct experience writing a tilemap in dozens of games or anything that would give us direct knowledge on how to do things specifically.
So here we are, on Day 0 of our project, without knowledge of the road ahead and what it looks like, and we're going to walk this road precisely like we said. Explore our space by looking at what it takes to implement the basic version. How do I get a rectangle moving around on a tile map? How do I make a tile? We'll try an approach, see how the game reacts to it, and let the architecture work itself up from there. If it feels like it's working well, we will say OK and move on.
Back to Code
It's been one and a half days since we last coded. Let's get back to it!
Get Target Seconds Per Frame
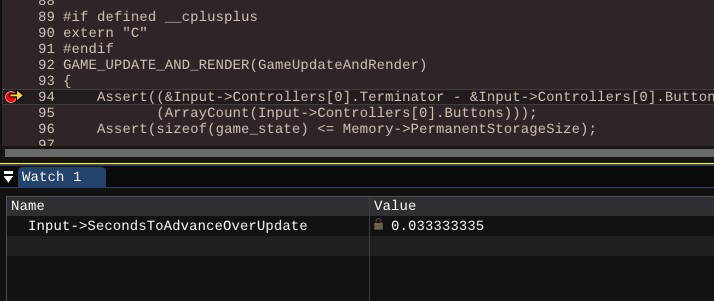
First, we forgot to provide the game with the information on how much time we would have for each frame. In win32_handmade.cpp, we have already defined our TargetSecondsPerFrame, so it's only a matter of passing this value to the game. Of course, it's still a bit early to use that, but let's add it immediately as part of our game_input struct. This value is also known as Delta Time, but let's be more explicit here: SecondsToAdvanceOverUpdate. We will store it as a real32.
struct game_input
{
    game_button_state MouseButtons[5];
    s32 MouseX, MouseY, MouseZ;    r32 SecondsToAdvanceOverUpdate;    game_controller_input Controllers[5];
}
For now, we will not be doing precise calculations and pass the TargetSecondsPerFrame inside the main loop, assuming that we will hit this value:
int MonitorRefreshHz = 60;
// ...
f32 GameUpdateHz = (MonitorRefreshHz / 2.0f)
f32 TargetSecondsPerFrame = 1.0f / (f32)GameUpdateHz;
// ...
while (GlobalRunning)
{    NewInput->SecondsToAdvanceOverUpdate = TargetSecondsPerFrame;// ...
}
If you compile, run the debugger, and inspect your Input somewhere in the handmade.cpp → GameUpdateAndRender function, you should see its value around `0.0333333 to confirm everything is in order.
Remove Test Code
We wrote plenty of test code back in handmade.cpp to ensure our platform layer worked as intended. It's time to go; it's day 0 for us, so we need a blank slate. Since we set up a hot dll reload, we can keep the game running while processing these changes.
Remove Test Sound
If you haven't done it already on Day 23, you can turn off the test sound by simply adding an #if 0 guard and output instead of the sine wave:
#if 0        f32 SineValue = sinf(GameState->tSine);
        s16 SampleValue = (s16)(SineValue * ToneVolume);#else
        s16 SampleValue = 0;
#endifRemove the Weird Gradient
The gradient that we're filling our screen with is being drawn in a separate function, so to turn it off, we can remove the call to it from GameUpdateAndRender:
RenderWeirdGradient(Buffer, GameState->XOffset, GameState->YOffset);RenderPlayer(Buffer, GameState->PlayerX, GameState->PlayerY);However, you will notice that you now cannot compile due to a warning C4505:
W:\handmade\code\handmade.cpp(67): error C2220: the following warning is treated as an error
W:\handmade\code\handmade.cpp(67): warning C4505: 'RenderWeirdGradient': unreferenced local function has been removed
We don't mind having unused functions in our code; they can always return handy later. So let's add another keyword to our build.bat to ignore these warnings:
set compiler=%compiler% -wd4189 &:: Local variable not referencedset compiler=%compiler% -wd4505 &:: Unreferenced local function has been removed
Of course, we could delete the RenderWeirdGradient function or move it to the end of the file.
If your game was running during this time, you will notice that the gradient is still there, although it's getting progressively “dirtier” as you move the mouse cursor around. This effect is due to the gradient performing double duty:
- It was drawing the gradient
- It was clearing whatever was in the buffer in the previous frame (by overwriting its data)
We need to mentally note it and return to clearing our window later.
Remove RenderPlayer calls
We drew small rectangles whenever we pressed mouse buttons; another rectangle represented the mouse position; finally, a rectangle represented the player we moved with our controller input. All of these were using the same function, RenderPlayer, and this code can go, too:
RenderPlayer(Buffer, GameState->PlayerX, GameState->PlayerY);

for (int ButtonIndex = 0;
        ButtonIndex < ArrayCount(Input->MouseButtons);
        ++ButtonIndex)
{
    if (Input->MouseButtons[ButtonIndex].EndedDown)
    {
        RenderPlayer(Buffer, 10 + 20 * ButtonIndex, 10);
    }
}

RenderPlayer(Buffer, Input->MouseX, Input->MouseY);Remove File Calls
To test DEBUGPlatformReadEntireFile, we'd also load and read the outputs of a test file. We don't need it anymore:
if(!Memory->IsInitialized)
{    debug_read_file_result FileData = Memory->DEBUGPlatformReadEntireFile(Thread, __FILE__);
    if (FileData.Contents)
    {
        Memory->DEBUGPlatformWriteEntireFile(Thread, "test.out", FileData.ContentsSize, FileData.Contents);
        Memory->DEBUGPlatformFreeFileMemory(Thread, FileData.Contents);
    }    GameState->XOffset = 0;
    GameState->YOffset = 0;
    GameState->ToneHz = 256;

    GameState->PlayerX = 100;
    GameState->PlayerY = 100;

    Memory->IsInitialized = true;
}

for (int ControllerIndex = 0;
     ControllerIndex < ArrayCount(Input->Controllers);
     ++ControllerIndex)
{

    game_controller_input *Controller = GetController(Input, ControllerIndex);
    if (Controller->IsAnalog)
    {
        // NOTE(casey): Use analog movement tuning        GameState->XOffset += (int)(4.0f * Controller->StickAverageX);
        GameState->ToneHz = 256 + (int)(128.0f * (Controller->StickAverageY));    }
    else
    {
        // NOTE(casey): Use digital movement tuning        if (Controller->MoveLeft.EndedDown)
        {
            GameState->XOffset -= 1;
        }

        if (Controller->MoveRight.EndedDown)
        {
            GameState->XOffset += 1;
        }    }
        GameState->PlayerX += (int)(4.0f * Controller->StickAverageX);
    GameState->PlayerY -= (int)(4.0f * Controller->StickAverageY);
    if (GameState->tJump > 0)
    {
        GameState->PlayerY += (int)(10.0f * sinf(2.0f * Pi32 * GameState->tJump));
    }
    if(Controller->ActionDown.EndedDown)
    {
        GameState->tJump = 1.0f;
    }
GameState->tJump -= 0.033f;}Clean Up the Game State
Our game_state contained a few values we wrote to store some test information. They are no longer necessary, so we can get rid of their initialization code:
if(!Memory->IsInitialized)
{    GameState->XOffset = 0;
    GameState->YOffset = 0;
    GameState->ToneHz = 256;

    GameState->PlayerX = 100;
    GameState->PlayerY = 100;    Memory->IsInitialized = true;
}
Same comes to definition. We can get rid of all the contents of our game_state entirely, leaving the struct empty for the time being:
struct game_state
{    int ToneHz;
    int XOffset;
    int YOffset;

    f32 tSine;

    int PlayerX;
    int PlayerY;
    f32 tJump;};
Trying to compile the game now leads us to #if 0 another piece of GameOutputSound function (you can also delete it if you prefer so):
#if 0
        f32 SineValue = sinf(GameState->tSine);
        s16 SampleValue = (s16)(SineValue * ToneVolume);
#else
        s16 SampleValue = 0;
#endif

        *SampleOut++ = SampleValue;
        *SampleOut++ = SampleValue;#if 0        GameState->tSine += 2.0f * Pi32 * 1.0f / (f32)WavePeriod;

        if (GameState->tSine > 2.0f * Pi32)
        {
            GameState->tSine -= 2.0f * Pi32;
        }#endif
And, instead of passing GameState->ToneHz, we could directly pass a number to GameOutputSound for the time being:
GAME_GET_SOUND_SAMPLES(GameGetSoundSamples)
{
game_state *GameState = (game_state*)Memory->PermanentStorage; GameOutputSound(GameState, SoundBuffer, 400);}And that's it! We're now back to something that does absolutely nothing. We're back at square one.
Decide on the Game Resolution
Let's make a Decision! Those are always fun. This one involves our game resolution. It's an important decision for a 2D game like ours.
In a 3D game, everything is always resampled. You map the polygons to draw and the textures of these polygons. The engine can render the final output to any target resolution, and you don't need to think about it, aside from maybe how dense the textures should be and how closely the players would see them. It's not the case for a 2D game. If the artist wants to be very specific about how things should look, we should be able to draw them in a resolution and aspect ratio, allowing us not to lose any detail or create distortions.
These days, we see an emergence of 4K and 1440p monitors and ultrawide monitors of different sizes. However, the de-facto baseline remains 1920×1080, a “Full HD” resolution.
Another consideration we want to make is that we will write our first version of the renderer (the software renderer) to run on the CPU; we will eventually transition to the much faster hardware renderer running on the GPU.
So let's decide the following:
- Target 1920×1080 at 60Hz for the hardware renderer.
- Halve these values for our software renderer to 960×540 at 30Hz.
If we halve all three values, we will get \(1/2 * 1/2 * 1/2 = 1/8\) lower need of calculations, so hopefully, this will be small enough for us to handle.
In win32_handmade.cpp, we're already defining the size of our DIB section, so let's create two dimensions to switch between. We'll disable one we don't need, of course.
Win32LoadXInput();
Win32ResizeDIBSection(&GlobalBackbuffer, 1280, 720);// Win32ResizeDIBSection(&GlobalBackbuffer, 1920, 1080);
Win32ResizeDIBSection(&GlobalBackbuffer, 960, 540);WNDCLASS WindowClass = {0};We're already using the monitor's refresh rate for the target framerate and then halving it. This gives us 30Hz on 60Hz monitors, which is fine for now.
Draw Rectangle Function
In our test code, there is one function that we can reuse: RenderPlayer. It's a simple function that draws a small 10×10 rectangle at a given position. We can convert this function to draw a rectangle of arbitrary size and, in the future, color (and, who knows, maybe even texture!).
Repurpose RenderPlayer into DrawRectangle
Let's begin by changing the function's name.
internal voidDrawRectangle(game_offscreen_buffer *Buffer, int PlayerX, int PlayerY){
    u8 *EndOfBuffer = (u8 *)Buffer->Memory + Buffer->Pitch * Buffer->Height;
    //...
}We want this function to accept a position marking the beginning of the rectangle (min X and Y) and another marking its end (max X and Y). Remember that we're starting our screen coordinates in the top-left corner.
We probably want to pass these as real numbers, not integers, for future expansions. The reasons might not be immediately apparent, but we will discuss some in the Subsection 7.1.
internal voidDrawRectangle(game_offscreen_buffer *Buffer,             f32 RealMinX, f32 RealMinY, f32 RealMaxX, f32 RealMaxY){
    u8 *EndOfBuffer = (u8 *)Buffer->Memory + Buffer->Pitch * Buffer->Height;
    //...
}Implementation-wise, let's agree on the following convention:
- Whatever real Min/Max positions come in, we will round them to an integer
- We will draw our rectangle from Min(x, y) up to and excluding Max(x, y).
Based on this convention, the first thing we need to do inside the function is to convert the real coordinates into the integer ones.
s32 MinX = RoundReal32ToInt32(RealMinX);
s32 MinY = RoundReal32ToInt32(RealMinY);
s32 MaxX = RoundReal32ToInt32(RealMaxX);
s32 MaxY = RoundReal32ToInt32(RealMaxY);
u8 *EndOfBuffer = (u8 *)Buffer->Memory + Buffer->Pitch * Buffer->Height;We don't have a rounding function yet; we'll think about it in a second.
Clip Boundaries
As discussed during Day 4 (section 4.4, figure 4), our buffer is just a chunk of raw memory we can write into. Each 32-bit value inside it represents a pixel color. So, now that we have the minimum and maximum points, we want to clip them to these boundaries.
(Because of how we laid out the buffer memory, going over the sides would bleed the pixels to the opposite side of the screen, while going above or below would flat-out crash the program for trying to access unauthorized memory).
Actual clipping is trivial:
s32 MinX = RoundReal32ToInt32(RealMinX);
s32 MinY = RoundReal32ToInt32(RealMinY);
s32 MaxX = RoundReal32ToInt32(RealMaxX);
s32 MaxY = RoundReal32ToInt32(RealMaxY);
if (MinX < 0)
{
    MinX = 0;
}

if (MinY < 0)
{
    MinY = 0;
}

if (MaxX > Buffer->Width)
{
    MaxX = Buffer->Width;
}

if (MaxY > Buffer->Height)
{
    MaxY = Buffer->Height;
}u8 *EndOfBuffer = (u8 *)Buffer->Memory + Buffer->Pitch * Buffer->Height;You might think that we should clip Max x/y if the value is greater or equal to the buffer width/height, but because we're filling the rectangles excluding Max values, we're fine.
Fill the Pixels
We want to change the sequence in which we fill our pixels. We're getting a pixel and then shifting it by every row. It's inefficient since you usually want to send contiguous memory blocks to the processor. So, let's invert the loops we have:
u8 *EndOfBuffer = (u8 *)Buffer->Memory + Buffer->Pitch * Buffer->Height;u32 Color = 0xFFFFFFFF;   int Left = PlayerX;
int Right = PlayerX + 10;

int Top = PlayerY;
int Bottom = PlayerY + 10;for (int Y = MinY;
     Y < MaxY;
     ++Y){    u8 *Pixel = ((u8 *)Buffer->Memory +
                    X * Buffer->BytesPerPixel +
                    Top * Buffer->Pitch);    for (int X = MinX;
         X < MaxX;
         ++X)    {        if ((Pixel >= Buffer->Memory) &&
            (Pixel < EndOfBuffer))
        {            *(u32 *)Pixel = Color;            Pixel += Buffer->Pitch;
        }    }
}We want to position ourselves at (MinX, MinY) before we enter the loop as follows:
- Since we want to offset one byte at a time for correct positioning, we define the row pointer as an 8-bit value
- We start at the start of the buffer memory.
- We then move “horizontally” by
MinXamount of pixels, multiplied by the size of our pixels. We have saved this size asBytesPerPixel. - Finally, we move “vertically” by
MinYpixels, multiplied by the stride orPitchof our row. - We then advance our row by pitch until we fill the rectangle we need.
u32 Color = 0xFFFFFFFF;   u8 *Row = ((u8 *)Buffer->Memory +
           MinX * Buffer->BytesPerPixel +
           MinY * Buffer->Pitch);for (int Y = MinY;
     Y < MaxY;
     ++Y)
     {
        for (int X = MinX;
             X < MaxX;
             ++X)
        {
            // ...
} Row += Buffer->Pitch; }Similarly to the row pointer, we can define the pixel pointer, except it can be a 32-bit value. Finally, within the loop, we can write our color and advance the pixel pointer:
u32 *Pixel = (u32 *)Row;for (int X = MinX;
        X < MaxX;
        ++X)
{ *Pixel++ = Color;}We will approach this problem differently in the final renderer, but a simple fill to get things going is enough for now.
Write the Rounding Function
Our rounding function will be super simple.
Rounding is an operation that brings a real number to its nearest integer. You could truncate (cut off) decimal numbers in C by casting a f32 to (u32)Number.
internal s32
RoundReal32ToInt32(f32 Number)
{
    s32 Result = (s32)Number;
    return (Result);
}internal void
DrawRectangle //...This, however, would always bring you to the lower value, even if the decimal value is above 0.5. A quick fix would be to bias the incoming value by 0.5 and then truncate it:
By adding 0.5, any number with a decimal above 0.5 would get a +1 integer value. Thus the truncation will return the correct result.
internal s32
RoundReal32ToInt32(f32 Number)
{    s32 Result = (s32)(Number + 0.5f);    return (Result);
}There's much more to rounding than this, but the naive solution will suffice for now.
Test Our Changes
Let's test if things work as we intend. At the end of GameUpdateAndRender, we'll add a call to DrawRectangle function:
DrawRectangle(Buffer, 10.0f, 10.0f, 30.0f, 30.f);If we recompile and run our program, we should see our happy rectangle in the top-right corner:
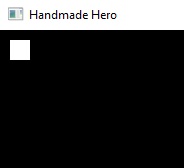
Feel free to play around with it!
Pass the Color
We will see how to pass and pack the RGB color next time. For now, let's pass directly to a 32-bit color. If you're familiar with HEX colors, we will pass something similar.
internal void
DrawRectangle(game_offscreen_buffer *Buffer,              f32 RealMinX, f32 RealMinY, f32 RealMaxX, f32 RealMaxY,               u32 Color){
    // ...u32 Color = 0xFFFFFFFF;       u8 *Row = ((u8 *)Buffer->Memory +
               MinX * Buffer->BytesPerPixel +
               MinY * Buffer->Pitch);
    // ...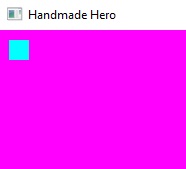
}This allows us to set up a background to clear our screen every frame, and a rectangle on top of it:
DrawRectangle(Buffer, 0.0f, 0.0f, (f32)Buffer->Width, (f32)Buffer->Height, 0x00FF00FF);DrawRectangle(Buffer, 10.0f, 10.0f, 30.0f, 30.f, 0x0000FFFF);Recompiling now will give you a cyan square on a pink background:
Recap
Today, we concluded our first introduction to game architecture theory and started looking ahead to the actual game development. Our game will be inspired by classic games like The Legend of Zelda, with a game world about exploring and making your path. We then cleaned up the old test code and laying down the first bricks for our game's core features, and we're ready to start bringing our big ideas to life!
Programming Notions
Compression-oriented programming
We briefly mentioned Semantic Compression at the end of Day 22. The approach that we can coin as “Compression-oriented programming”, and we define it as follows:
Like a good compressor, I don’t reuse anything until I have at least two instances of it occurring. Many programmers don’t understand how important this is, and try to write “reusable” code right off the bat, but that is probably one of the biggest mistakes you can make. My mantra is, “make your code usable before you try to make it reusable”.Now, you can look at this definition at the surface and say - this is what DRY (Don't Repeat Yourself) principle does! But there's a fine line between making code that uses itself, making the maximally overlapping set of functions that DRY recommends, and setting things up to allow quick “blast style” optimization. In the latter approach, the programmer breaks out core operations and optimizes them individually.I always begin by just typing out exactly what I want to happen in each specific case, without any regard to “correctness” or “abstraction” or any other buzzword, and I get that working. Then, when I find myself doing the same thing a second time somewhere else, that is when I pull out the reusable portion and share it, effectively “compressing” the code. I like “compress” better as an analogy, because it means something useful, as opposed to the often-used “abstracting”, which doesn’t really imply anything useful. Who cares if code is abstract?
Waiting until there are (at least) two examples of a piece of code means I not only save time thinking about how to reuse it until I know I really need to, but it also means I always have at least two different real examples of what the code has to do before I try to make it reusable. This is crucial for efficiency, because if you only have one example, or worse, no examples (in the case of code written preemptively), then you are very likely to make mistakes in the way you write it and end up with code that isn’t conveniently reusable. This leads to even more wasted time once you go to use it, because either it will be cumbersome, or you will have to redo it to make it work the way you need it to. So I try very hard to never make code “prematurely reusable”, to evoke Knuth.
Similarly, like a magical globally optimizing compressor [...], when you are presented with new places where a previously reused piece of code could be reused again, you make a decision: if the reusable code is already suitable, you just use it, but if it’s not, you decide whether or not you should modify how it works, or whether you should introduce a new layer on top of or underneath it. [...]
Finally, the underlying assumption in all of this is, if you compress your code to a nice compact form, it is easy to read, because there’s a minimal amount of it, and the semantics tend to mirror the real “language” of the problem, because like a real language, those things that are expressed most often are given their own names and are used consistently. Well-compressed code is also easy to maintain, because all the places in the code that are doing identical things all go through the same paths, but code that is unique is not needlessly complicated or separated from its use. Finally, well-compressed code is easy to extend, because producing more code that does similar operations is simple, as all the necessary code is there in a nicely recomposable way.
With the compression-oriented programming approach, individual operations that are super simple (4-5 lines of code maximum) but not entirely homogenous are usually not collapsed. They are left as is to leave room for eventual rewriting of individual functions more efficiently. Instead, we leave the patterns to emerge from the code we're writing explicitly and with the understanding we get from it.
This is but the first glimpse into what compression-oriented programming means. It will be the backbone of how we approach code, and you will have ample opportunity to see it in action.
Side Considerations
Floating-point Coordinates
Each pixel coordinate, fixed on a physical screen, is a non-divisible integer number. Yet most renderers work with them using decimal numbers. Generally, it allows for a more fluid movement of the sprites on screen.
When you work with concrete systems, like renderers, the precise definition of what you want matters.
Let's imagine a pixel grid:
Filling a single pixel is simple; you assign a color at given coordinates (let's say, (2, 1)):
But things might get complicated when you fill an area of pixels. For example, do you want your coordinates to be inclusive or exclusive? Let's say we want to fill an area from (1, 1) to (3, 3):
Does this mean that I'm excluding the outer bounds?
Or am I including them?
We can't just take whatever approach and agree on it. There are specific reasons to go for one or the other approach, and we'll see more of them in the future when we get deep into the renderer implementation.
Things get even more confusing when you allow things to move around sub-pixel on the grid. Let's say we have a 3×3 sprite. It's obvious how we draw it's lined up exactly to a grid:
But what if the sprite moves off-center slightly? For example, an enemy moves towards the player.
We can't just draw it as is; each pixel only accepts one color. It would help if you had a strong convention for how this sprite influences border pixels with its colors. If we wanted to fill from (2, 1) to (5, 4), we'd only draw a portion of those colors for a smooth transition.
We adopt the excluding bounds precisely because of this. This way, we will get all the bounds for potential rounding without cropping potential overlaps.
Notes
Navigation
Previous: Day 26. Introduction to Game Architecture
Up Next: Day 28. Drawing a Tile Map
- Semantic compression
- Compression-oriented programming
- Delta Time