Welcome to “Handmade Hero Notes”, the book where we follow the footsteps of Handmade Hero in making the complete game from scratch, with no external libraries. If you'd like to follow along, preorder the game on handmadehero.org, and you will receive access to the GitHub repository, containing complete source code (tagged day-by-day) as well as a variety of other useful resources.
In the past four chapters, a tremendous amount of work was done. If you have followed along, you will have you very own animated graphics on the screen in Windows that you wrote entirely yourself. So today we'll be focusing on cleaning up, explaining some things we've left behind, and going to some related tangents. Also we'll walk through our whole program, reviewing what's going on, and fixing and commenting where necessary.
If you review your code file, win32_handmade.cpp, you will notice that there's not a lot of code here, and what's in there is already pretty straightforward. You might have been intimidated by the prospect of writing everything from scratch, that it would be a huge, huge huge amount of work. But it's not, there's very little code here.
One thing that really needs to be addressed today are all those global variables that are sitting on top of our code. But we'll get to there in due time.
(Top)
1 Revisit WNDCLASS style
1.1 CS_OWNDC
1.2 CS_HRDERAW / CS_VREDRAW
2 Revisit Win32UpdateWindow Parameters
3 Revisit the Global Variables
3.1 Bundle Bitmap Globals Together
3.2 Update Buffer Function Definitions
3.3 Update Buffer Function Calls
4 Stack
4.1 Deep Dive Into the Stack
4.2 Overflowing the Stack
5 Extract ClientRect Calculations
5.1 Create Window Dimension
5.2 Make Use of Win32GetWindowDimension
6 Setting a Fixed Size for Backbuffer
7 Full Program Step-through
8 Recap
9 Exercises
9.1 Learn More About Refactoring
9.2 Rewrite your Program
10 Programming Basics
10.1 Pointer Aliasing
10.2 Access Violations
11 Side Considerations
11.1 Variable Initialization
11.2 Passing Parameters to the Functions
11.3 About Conventions
11.4 About const Keyword
12 Navigation
Revisit WNDCLASS style
The first thing we're going to look at is the style of our Window Class. If you remember, from Day 2, we have set three flags as our style: CS_HREDRAW, CS_VREDRAW and CS_OWNDC. You can find the description of all of the window class flags available in the Window Class Styles guide.
CS_OWNDC
CS_OWNDC allocates a device contest for every window. As of right now, we make use of a device context at every frame update, and a of a special one when WM_PAINT message is processed. However, as we use it now, we can simply grab and use any available DC Windows would give us. We don't really need it to keep track of the various handles, brushes, etc.
So we have two options: either to remove this flag completely or to get a handle exclusively for our usage. The second option would allow only asking for it once, once we get our window, which in turn would allow us to stop asking and releasing a device context every loop.
Getting and releasing dc every frame will work fine in both cases, so you don't need this flag. The difference is that, without CS_OWNDC, the device context will be created/initialized on every GetDC call. With the flag it will be kept around after ReleaseDC for next GetDC call, in a kind of pool reserved for our window. As a result, you will actually get the exact same HDC value on every GetDC call.
Let's go with the second option and leave CS_OWNDC; we can always change in case. We'll also leave a comment for posterity.
if (Window)
{    // NOTE(casey): Since we specified CS_OWNDC, we can just
    // get one device context and use it forever because we
    // are not sharing it with anyone.
    HDC DeviceContext = GetDC(Window);    // ...
    while (Running)
    {        HDC DeviceContext = GetDC(Window);        // ...         ReleaseDC(Window, DeviceContext);    }
}
CS_HREDRAW / CS_VREDRAW
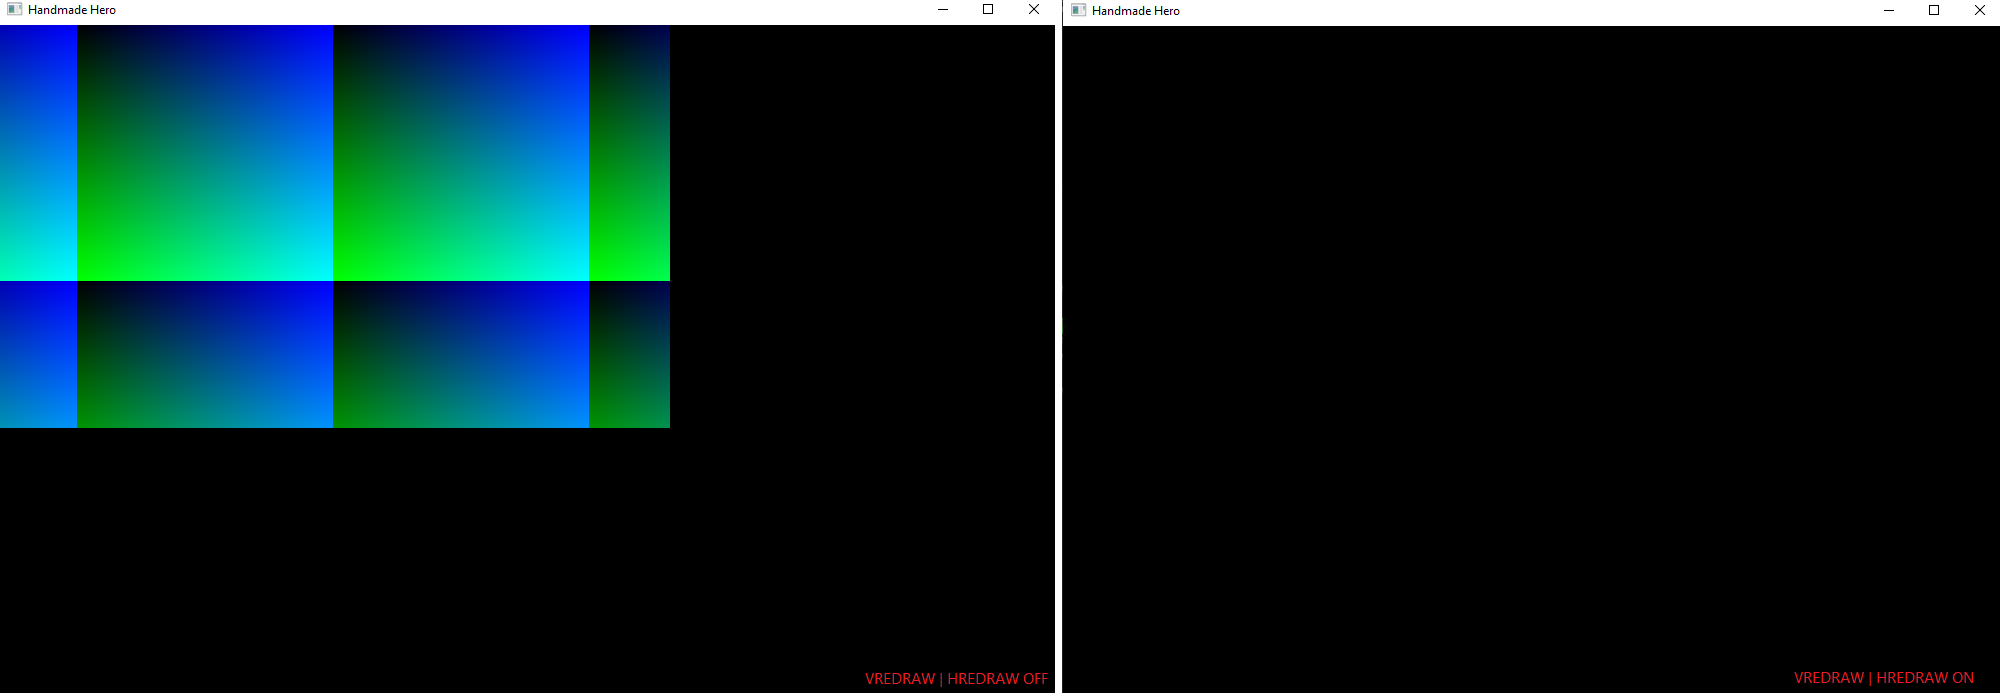
For what it might concern CS_HREDRAW and CS_VREDRAW, we can confirm their usefulness. These options come into play when resizing the window (Horizontally or Vertically), and force the whole window to be repainted right away, and not just the chunks we resize. You can easily test it if you disable it (comment out or delete the line altogether), recompile, run, and try to resize the window. If you re-enable these style options you'll notice that the whole window is being blacked out as soon as you start resizing it.
Revisit Win32UpdateWindow Parameters
Win32UpdateWindow in a minute to completely rethink how we approach the parameters to it. Feel free to skim through this section as none of this code will matter in a short while.
Let's fast forward a bit to day 4 where we decided to pass our ClientRect as a pointer. Now, it's true that RECT is a structure, but it's a rather small one, and stack savings are minimal. But what's more, typically nowadays you want to avoid passing pointers to functions.
internal void
Win32UpdateWindow(HDC DeviceContext, RECT *ClientRect)
If you pass the structure to a function by value (i.e. RECT ClientRect instead of RECT *ClientRect), compiler can make several assumptions:
- No one else is going to touch (modify) it outside of the function.
- It's a private copy for the use of the function.
- There's no possibility for aliasing.
There are many ways of preventing pointer aliasing but the easiest way is to just not use any pointers. One of the things you notice about Win32UpdateWindow is that it is small. It's a classic candidate to be inlined (literally copied its code in the place from which it was called, instead of defining the function in a separate place), and if the compiler will know that the ClientRect stays the same it will have an easier time deciding to inline the function.
Now why isn't the compiler “smart enough” to figure out that the ClientRect stays the same is a different story. Compiling process is complicated, and the compiler might not see the same thing we see. The code that goes through multiple transformations comes out from the other side quite different from when it came in.
Of course, in this case it's not a performance-critical thing to do in this case, but let's go ahead and change the signature for Win32UpdateWindow to take ClientRect by value:
internal voidWin32UpdateWindow(HDC DeviceContext, RECT ClientRect)Now, if you try to compile now you can use the compiler errors to guide you through the changes to do:
- Inside
Win32UpdateWindowReplace the->operator accessing theClientRectmembers with the.operator:
int WindowWidth = ClientRect.right - ClientRect.left;
int WindowHeight = ClientRect.bottom - ClientRect.top;
- Remove the
&operator in theWinMainandWin32MainWindowCallback.
Win32UpdateWindow(DeviceContext, ClientRect);Revisit the Global Variables
Now, back to our global variables.
global_variable bool Running;
global_variable BITMAPINFO BitmapInfo;
global_variable void *BitmapMemory;
global_variable int BitmapWidth;
global_variable int BitmapHeight;
global_variable int BytesPerPixel;As you can see, by now we have quite a few of them. As the globals grow, it might become confusing who can access each variable. A neat way to check would be to simply add a character at the end of the name and try to compile: you will quickly see the errors where these variables are used.
An edit
global_variable int BytesPerPixel_;results in
win32_handmade.cpp
W:handmade\code\win32_handmade.cpp(29): error C2065: 'BytesPerPixel': undeclared identifier
W:handmade\code\win32_handmade.cpp(73): error C2065: 'BytesPerPixel': undeclared identifier
W:handmade\code\win32_handmade.cpp(74): error C2065: 'BytesPerPixel': undeclared identifierBytesPerPixel is used.However, our program is small enough that we can go ahead directly and bundle most of these variables up into something that a bit more concise. It's not for performance: this way the things are organized in a cleaner and a more manageable way. This one anyone who is looking at the code can see exactly what has to happen for these bitmaps to be created.
Bundle Bitmap Globals Together
Now, Running aside all our globals refer to our bitmap. It's almost as if they were begging to be bundled together. So let's create a struct and do just that. Thus we'll be able to pass this structure to anyone who needs to do something with our offscreen buffer.
struct win32_offscreen_buffer
{    BITMAPINFO BitmapInfo;
    void *BitmapMemory;
    int BitmapWidth;
    int BitmapHeight;
int BytesPerPixel;};global_variable bool Running;This way we know that we need:
- A
BITMAPINFOto describe our bitmap - A pointer to the bits of the bitmap
- We need a width and a height, as well as those bytes per pixel.
We can go ahead and shorten these variables' names since we know they will all belong to a bitmap:
struct win32_offscreen_buffer
{    BITMAPINFO Info;
    void *Memory;
    int Width;
    int Height;    int BytesPerPixel;
};
Now we don't need most of the globals any more. Instead, we can introduce a single one called, let's say, GlobalBackbuffer:
global_variable bool Running;global_variable BITMAPINFO BitmapInfo;
global_variable void *BitmapMemory;
global_variable int BitmapWidth;
global_variable int BitmapHeight;
global_variable int BytesPerPixel;global_variable win32_offscreen_buffer GlobalBackbuffer;Last thing that we can do is to comment on the convention we're using for our buffer. This might come handy if you ever forget it:
struct win32_offscreen_buffer
{    // NOTE(casey): Pixels are always 32-bits wide,
    // Memory Order  0x BB GG RR xx
    // Little Endian 0x xx RR GG BB    BITMAPINFO Info;
    void *Memory;
    int Width;
    int Height;
    int BytesPerPixel;
};
Update Buffer Function Definitions
If we try to compile now, we will be greeted with with a couple dozen errors. We'll go through each error one by one and implement the changes.
We will put the “main” thing that the function has to take account of (in this case, the buffer) at the very beginning of the parameter list.
RenderWeirdGradient: needs the structure to read Width and Height, as well as to read the Memory pointer (to write to the pixels).Win32ResizeDIBSection: needs the structure to actually fill it out. Now here we have two options:- We pass the structure to be filled out.
- We can initialize the structure inside the function and return it.
- Both methods have their advantages and disadvantages. Let's go with the first one because we still need the
win32_offscreen_bufferto be passed by value for an eventual memory release. This results in the function being a bit error-prone, and it's not a performance-sensitive place of our code.
Win32UpdateWindow: While we're at it, let's rename the function to something more concrete, i.e.Win32DisplayBufferInWindow.
With this chage, we're levelling up our capabilities, as well! Before we could only read/write from the globals, but now the functions can use whichever buffer they receive. So there you have another advantage to pull values from the globals: not only it makes things more clear but also more flexible.
internal voidRenderWeirdGradient(win32_offscreen_buffer *Buffer, int XOffset, int YOffset){    int Pitch = Buffer->Width * Buffer->BytesPerPixel;
    u8 *Row = (u8 *)Buffer->Memory;    for (int Y = 0;         Y < Buffer->Height;         ++Y)
    {
        u8 *Pixel = (u8 *)Row;
        for(int X = 0;            X < Buffer->Width;            ++X)        {
            //...
        }
        Row += Pitch;
    }
}

internal voidWin32ResizeDIBSection(win32_offscreen_buffer *Buffer, int Width, int Height){    if(Buffer->Memory)    {        VirtualFree(Buffer->Memory, 0, MEM_RELEASE);    }    Buffer->Width = Width;
    Buffer->Height = Height;
    Buffer->BytesPerPixel = 4;

    Buffer->Info.bmiHeader.biSize = sizeof(Buffer->Info.bmiHeader);
    Buffer->Info.bmiHeader.biWidth = Buffer->Width;
    Buffer->Info.bmiHeader.biHeight = -Buffer->Height; // negative value: top-down
    Buffer->Info.bmiHeader.biPlanes = 1;
    Buffer->Info.bmiHeader.biBitCount = 32;
    Buffer->Info.bmiHeader.biCompression = BI_RGB;

    int BitmapMemorySize = Buffer->BytesPerPixel * (Buffer->Width * Buffer->Height);

    Buffer->Memory = VirtualAlloc(0, BitmapMemorySize, MEM_RESERVE | MEM_COMMIT, PAGE_READWRITE);}

internal voidWin32DisplayBufferInWindow(win32_offscreen_buffer *Buffer,
                           HDC DeviceContext, RECT ClientRect){
    int WindowWidth = ClientRect.right - ClientRect.left;
    int WindowHeight = ClientRect.bottom - ClientRect.top;

    StretchDIBits(DeviceContext,
                  0, 0, WindowWidth, WindowHeight,                  0, 0, Buffer->Width, Buffer->Height,
                  Buffer->Memory,
                  &Buffer->Info,                  DIB_RGB_COLORS, SRCCOPY);
}
Now, you'll notice that we use the Pitch every frame, so we might want to decide to also make it part of the buffer and initialize the pitch with everything else. Make sure to place the Pitch intialization after the Width, Height and BytesPerPixel since it uses these!
struct win32_offscreen_buffer
{
    BITMAPINFO Info;
    void *Memory;
    int Width;
    int Height;    int Pitch;    int BytesPerPixel;
};

internal void
RenderWeirdGradient(win32_offscreen_buffer *Buffer, int XOffset, int YOffset)
{    int Pitch = Buffer->Width * Buffer->BytesPerPixel;    u8 *Row = (u8 *)Buffer->Memory;
    for (int Y = 0;
         Y < Buffer->Height;
         ++Y)
    {        Row += Buffer->Pitch;    }
}

internal void
Win32ResizeDIBSection(win32_offscreen_buffer *Buffer, int Width, int Height)
{
    //...
    Buffer->Width = Width;
    Buffer->Height = Height;
    Buffer->BytesPerPixel = 4;
    Buffer->Pitch = Buffer->Width * Buffer->BytesPerPixel;
    //...
}Update Buffer Function Calls
Now let's also look at the calls to these functions. We call them from our Win32MainWindowCallback and WinMain.
Now, because these functions are called by Windows independently, the simplest thing for now would be to return one global variable holding our back buffer. We will then use it to pass it where it's currently required:
Win32MainWindowCallback: inside the casesWM_SIZEandWM_PAINT.WinMain: inside our loop.
LRESULT CALLBACK
Win32MainWindowCallback(...)
{
    //...
    case WM_SIZE:
    {
        RECT ClientRect;
        GetClientRect(Window, &ClientRect);
        int Width = ClientRect.right - ClientRect.left;
        int Height = ClientRect.bottom - ClientRect.top;        Win32ResizeDIBSection(&GlobalBackbuffer, Width, Height);    } break;
    //...
    case WM_PAINT:
    {
        PAINTSTRUCT Paint;
        HDC DeviceContext = BeginPaint(Window, &Paint);

        RECT ClientRect;
        GetClientRect(Window, &ClientRect);
                Win32DisplayBufferInWindow(&GlobalBackbuffer, DeviceContext, ClientRect);
        EndPaint(Window, &Paint);
    } break;
}

int CALLBACK
WinMain(...)
{
    //...     RenderWeirdGradient(&GlobalBackbuffer, XOffset, YOffset);    ++XOffset;

    RECT ClientRect;
    GetClientRect(Window, &ClientRect);
        Win32DisplayBufferInWindow(&GlobalBackbuffer, DeviceContext, ClientRect);    //...
}We now should be compilable. If you build and run, you'll notice that no changes have been made on the output of the program. The refactorings serve other purposes: to make the code more efficient, cleaner and overall better.
At this point we could as well remove our last global buffer-variable, GlobalBackbuffer but it would be a bit of overkill. You don't want to be doing things that you don't need to do, for the sake of doing them. You risk falling into dogma and making busywork.
Stack
The stack is a block of memory that is allocated by the system for our program to run. It's different from the heap in that it's used directly by the application as the local memory bank for local variables inside functions. The stack grows and shrinks from the “top” every time we call a new function:
- We call into a function.
- The function puts on the stack the values that are passed to it, as well as it reserves the space necessary for its local variables.
- Once you're out of the function, this space is marked unused and the stack returns to its precedent value.
In other words, when we declare a local variable, like for example WindowClass, offset integers and the Message in WinMain, we're actually growing the stack to make room to store that. So instead of doing an allocation which will sit around for a while (like using VirtualAlloc to get a block of memory), the stack grows and shrinks allowing the memory to be reused.
Think of it as a watermark: we have an empty pool when the program starts, then the water rises and falls depending on the functions called. In the same way, when you call into a function, it uses space on the stack, stores parameters and local variables. Then, after the function is done, the next functions reuse that space (the stack remains occupied if you call a function from the other).
One thing that makes a stack different from a swimming pool (except, you know, water and bytes) is that direction this stack is growing from. On the x86 architecture, the stack grows downward, meaning that it starts on a bigger address, and the new allocations receive progressively smaller addresses.
Deep Dive Into the Stack
To really drive the message home, let's start a debug session at the beginning of WinMain and open the Memory window of our debugger. As the address, you can type &WindowClass or get the address of WindowClass in the watch window and type it directly.
Memory window is divided in three sections: The left column shows the address (in hexadecimal) of the first byte in the row, the middle one shows the bytes (in hexadecimal, each pair of numbers represents one byte), and the right one converts the bytes to ASCII characters.
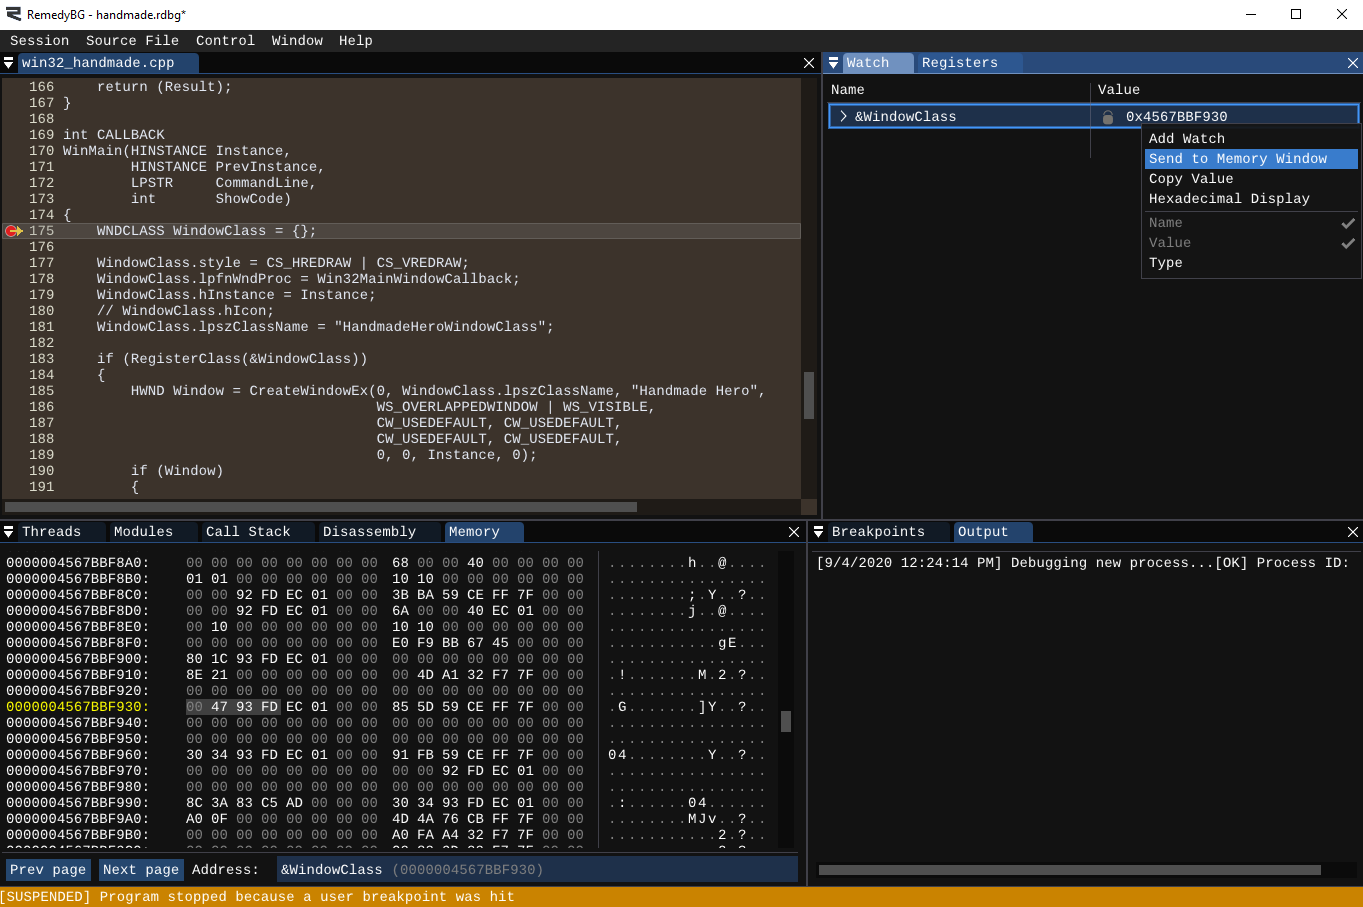
You will notice that, even if we didn't allocate any memory for our WindowClass, it's still has an address and memory pages associated with it. These pages are exactly the same as when you call VirtualAlloc, with the sole exception of being reserved for the stack.
At the same way, you can inspect &Instance, &PrevInstance, &CommandLine and &ShowCode and see that these are also located close to the WindowClass bytes and to each other.
Overflowing the Stack
By default on MSVC, you get 1MB of memory for your stack (you can request more or less by providing the appropriate compiler option). Some of it is taken by your globals and the CRT right away, so you get actually even less. You can test it by allocating directly on the stack a huge structure at the beginning of your WinMain:
u8 HugeBuffer[1024*1024] = {};
If you compile it and run, you'll quickly see the error message Stack Overflow. We asked to put too much stuff to it, and our program crashed.
Stack Overflow we don't mean a website where programmers exchange questions and answers (that might sometimes be correct).The bottom line is: memory does not come for free from thin air. Even the stack which is managed by the compiler (and Windows) is limited. Of course, you might not simply allocate such a huge structure on stack, but you might still reach Stack Overflow if you allocate a lot of things on your stack or if you go very deep in your recursive functions. We will touch the latter much later, so you don't need to worry about it just yet.
(Read more: Variable Initialization subsection)
Extract ClientRect Calculations
You'll find by now several places in your code where we calculate the ClientRect, and even further, the ClientRect's width and height. Let's make a small helper function that would do all these calculations for us so that we don't need to copy-paste the same chunk of code over and over again.
Create Window Dimension
First, we'll need to create a struct that we'll be returning from this function. We'll call this struct win32_window_dimension and it will have only a pair of Width and Height:
struct win32_window_dimension
{
    int Width;
    int Height;
};
global_variable bool Running;
global_variable win32_offscreen_buffer GlobalBackbuffer;The code we're optimizing is the following:
RECT ClientRect;
GetClientRect(Window, &ClientRect);
int Width = ClientRect.right - ClientRect.left;
int Height = ClientRect.bottom - ClientRect.top;
So we can use this code to get our window dimension. We only need a window handle for it:
global_variable bool Running;
global_variable win32_offscreen_buffer GlobalBackbuffer;
internal win32_window_dimension
Win32GetWindowDimension(HWND Window)
{
    win32_window_dimension Result;

    RECT ClientRect;
    GetClientRect(Window, &ClientRect);
    Result.Width = ClientRect.right - ClientRect.left;
    Result.Height = ClientRect.bottom - ClientRect.top;

    return(Result);
}Make Use of Win32GetWindowDimension
We can now go to the places where we asked for ClientRect and replace that code. It's straightforward where we call Win32ResizeDIBSection:
RECT ClientRect;
GetClientRect(Window, &ClientRect);
int Width = ClientRect.right - ClientRect.left;
int Height = ClientRect.bottom - ClientRect.top;win32_window_dimension Dimension = Win32GetWindowDimension(Window);Win32ResizeDIBSection(&GlobalBackbuffer, Dimension.Width, Dimension.Height);
However, our call to recently renamed Win32DisplayBufferInWindow is a bit different. We take the Window RECT and then calculate the WindowWidth and WindowHeight. That's... really not what we need to do inside this function. We need to pass exactly what a function needs, no more and no less. You can read more about it in Subsection 11.2.
With this in mind, let's make our changes:
internal void
Win32DisplayBufferInWindow(win32_offscreen_buffer *Buffer,                            HDC DeviceContext, int WindowWidth, int WindowHeight){    int WindowWidth = ClientRect.right - ClientRect.left;
    int WindowHeight = ClientRect.bottom - ClientRect.top;StretchDIBits(DeviceContext,
                  0, 0, WindowWidth, WindowHeight,
                  0, 0, Buffer->Width, Buffer->Height,
                  Buffer->Memory,
                  &Buffer->Info,
                  DIB_RGB_COLORS, SRCCOPY);
}RECT ClientRect;
GetClientRect(Window, &ClientRect);win32_window_dimension Dimension = Win32GetWindowDimension(Window);Win32DisplayBufferInWindow(&GlobalBackbuffer, DeviceContext, Dimension.Width, Dimension.Height);RECT ClientRect;
GetClientRect(Window, &ClientRect);win32_window_dimension Dimension = Win32GetWindowDimension(Window);Win32DisplayBufferInWindow(&GlobalBackbuffer, DeviceContext, Dimension.Width, Dimension.Height);This looks a bit messy but it has great benefits. This update makes the code go through exactly the same path as the previous code. It's always good to have the fewest code paths as possible if you can avoid having them. It just means that our life will be easier if we need to change this code later (and more likely to find bugs).
Setting a Fixed Size for Backbuffer
Right now, our bitmap depends on the size of the window. But, since StretchDIBits allows for stretching, let's test it out! We will cut everything out from WM_SIZE and paste it into our WinMain.
case WM_SIZE:
{    win32_window_dimension Dimension = Win32GetWindowDimension(Window);
Win32ResizeDIBSection(&GlobalBackbuffer, Dimension.Width, Dimension.Height);}if (Window)
{ win32_window_dimension Dimension = Win32GetWindowDimension(Window);
Win32ResizeDIBSection(&GlobalBackbuffer, Dimension.Width, Dimension.Height); //...
}
The concept of “handling a message” is a bit fuzzy. Sometimes by leaving a message blank ourselves we prevent Windows from doing anything in response to this message.
In our case, the WM_SIZE message can be left there or removed altogether: there is no default action that Windows takes in DefWindowProc. On the other hand, WM_CLOSE and WM_DESTROY do have a default behaviour that we don't want to invoke (we're also doing our own stuff in there). Same thing with WM_ACTIVATEAPP.
In other cases again, like WM_PAINT, you might want to have your own code to do some compulsory work or at least invoke DefWindowProc. In case of WM_PAINT, unless you do BeginPaint-EndPaint the “dirty” region of the window will never be validated. Windows will continue to think the region is dirty and will continue sending WM_PAINT messages. Thus having an empty case WM_PAINT: {} break; would be bad. If you don't want to handle this message, rather delete the case entirely. Windows will clear the client area to zero and consider the region validated.
If in doubt, check documentation! All the messages have detailed documentation on MSDN.
Furthermore, we can now say that we want a fixed buffer size, for instance 1280×720. We won't even need Dimension after that!
if (Window) {
    win32_window_dimension Dimension = Win32GetWindowDimension(Window);    Win32ResizeDIBSection(&GlobalBackbuffer, 1280, 720);    //...
}
It's not perfect and, if you resize it significantly, it produces some weird artifacts, but it works. Our WeirdGradient proportionally now always occupies the same amount of space inside the window.
StretchDIBits!
StretchDIBits(DeviceContext,
              0, 0, WindowWidth, WindowHeight,    // Destination (where the bitmap will be copied)
              0, 0, Buffer->Width, Buffer->Height,  // Source (from where the bitmap will be copied)
              Buffer->Memory,
              &Buffer->Info,
              DIB_RGB_COLORS, SRCCOPY);
Of course, you'll notice that now that we have a fixed buffer size, you'll realize that the aspect ratio of our image changes depending on its size: The squares of our gradient may be squashed vertically or horizontally, and it would represent any image we'd want to display on screen. This is something that we'll leave for another time. Let's leave a TODO in our Win32DisplayBufferInWindow to remind us of it for another time:
Win32DisplayBufferInWindow(win32_offscreen_buffer *Buffer,
                           HDC DeviceContext, int WindowWidth, int WindowHeight)
{
    // TODO(casey): Aspect ratio correction
    // ...
}Full Program Step-through
Today specifically we've made a lot of refactoring. Let's go through the code and make sure we understand deeply what it does and how every little thing works.
Open your debugger, hit F11 (or set your breakpoint at the beginning of your WinMain) and prepare for the ride. Each numbered step below assumes that you hit F11 to move forward one or more times.
- The first thing that happens in our program happens inside the C Runtime Library. The code that compiler added before ours makes some preparations and calls
WinMain.- We receive
Instance,PrevInstance,CommandLineandShowCodewhich are allocated on stack for us.
- We receive
- We pass a pointer to our
GlobalBackbuffer(located in our Data memory) and the desired buffer width and height (as constants) toWin32ResizeDIBSection.- We allow this function to be called as many times as we want to, so the first thing we do is to check if we allocated any memory already. If we did, we'd clear that memory first.
- If you want, you might as well remove this section for now. We're only ever planning to call this function once, and we can always return it later. Leave yourself a reminder!
// NOTE(yakvi): Remember to VirtualFree the memory if we ever
// call this function more than once on the same buffer!if(Buffer->Memory)
{
    VirtualFree(Buffer->Memory, 0, MEM_RELEASE);
}
- If you want, you might as well remove this section for now. We're only ever planning to call this function once, and we can always return it later. Leave yourself a reminder!
- Then we fill out various fields that we will need to remember: width, height, bytes per pixel, pitch.
- Our
Pitchis the width of the bytes times the number of bytes per pixel, since this is how much we should move to advance to the next row of pixels.
- Our
- After this, we fill out the
BITMAPINFOstructure. This one will be used by Windows at a later stage to blit the buffer.- This is a description for Windows of how it's supposed to interpret the memory that we pass to it.
- If you fill particularly inclined so, you can change
biBitCountto beBuffer->BytesPerPixel * 8instead of a constant32. - As for
biHeight, it might become confusing to the future you why there's a-there, so let's add a comment to it:// NOTE(casey): When the biHeight field is negative, this is the clue // to Windows to treat this bitmap as top-down, not bottom-up, meaning // that the first bytes of the image are the color for the top left // pixel in the bitmap, not the bottom left!Buffer->Info.bmiHeader.bisize = sizeof(Buffer->Info.bmiHeader);
- We then compute the size and request our chunk of memory.
- We do so by calling Windows function
VirtualAllocthat reserves the pages for us to hold the size we calculated. - You may ask: why won't we just declare that chunk up there? We could have done that, it's totally valid, but we want to have flexibility to change the size of our bitmap. On the other hand, if we would have put the bitmap as a global, its size should've been known at compile time.
- We do so by calling Windows function
- We allow this function to be called as many times as we want to, so the first thing we do is to check if we allocated any memory already. If we did, we'd clear that memory first.
- We initialize and fill out our
WindowClass, which is allocated on the stack.- The
{}symbol initially clears the structure to zero - We fill out the fields allowing the window class to inform Windows of our program.
- The instance handle so Windows knows which virtual address space (or which process) to call.
- A pointer to our callback function so Windows knows which function within that address space to call.
- This is all important because a pointer does not uniquely identify memory in the system, only inside one process.
- We also give a random name to our class because we'll then need to pass it to
CreateWindowExcall.
- The window class is then registered with
RegisterClassWindows call.- We don't really care about
WindowClassstructure at that point. Windows will register our class in its own registries and will keep track of it that way. - This is different from other times when you do care about conserving a handle that you passed to Windows, in case other things might use it.
- We don't really care about
- The
- Once we ensure that
WindowClassregistration completed successfully, we go ahead and create our window callingCreateWindowEx.- We pass our window the class name so that it can intercept messages directed to our class.
- We make sure that the window has all the standard properties (
WS_OVERLAPPEDWINDOWis a composite set of flags), as well as it's immediately visible. - We also pass our
Instancehandle to make sure Windows knows who called it.
- If the
Windowhandle returns valid, we assume that we're ready to run. - We next request a device context that would allow us to issue draw calls. It's a purely artificial construct by Windows because the device contexts save state of the brushes you might have used. We don't really need all this, but all the drawing should happen through this path. Usually you're supposed to release a DC once you're done with it. However, since we have specified
CS_OWNDCwe can keep one for the whole duration of our window. - We enter the main loop by initializing our
Runningglobal variable totrueand entering thewhileloop. This loop will remain infinite untilRunningset tofalse.- Since it's a global, let's actually prefix it as such. Find each reference to
Runningin your code and rename it toGlobalRunning.global_variable bool GlobalRunning; // we leave search and rename of the variable as the exercise for the reader - It's a good habit to keep track of our globals by their name so that we don't lose them from our view. Some use the prefix
g_, as usual we leave the naming convention to you!
- Since it's a global, let's actually prefix it as such. Find each reference to
- We reserve some space on stack for our
Messageand use it to peek if there're any messages (usingPeekMessageA). If we find any:- We remove the message from the queue (
PM_REMOVE). - We quickly check if the message is
WM_QUIT, if so, we setGlobalRunningtofalse. - We then call
TranslateMessageto translate a keycode into characters. - We then dispatch the message so that it's intercepted by our
Win32MainWindowCallbackfunction.- Remember that Windows doesn't call the callback function only through this pass!
- We then check for the new messages until we clear the whole queue.
- We remove the message from the queue (
- After we finish processing all the messages, we call
RenderWeirdGradient!- We pass it the pointer to our
GlobalBackbuffer, and theOffsetXandOffsetYthat we initialized earlier. RenderWeirdGradientpoints at the beginning of our buffer memory.- It steps through every row of this buffer. We advance each row by the buffer's
Pitch.Pitchis in single bytes, so theRowshould be a pointer to single bytes as well, otherwise C will do the silent multiplication throwing us way out of our memory boundaries.
- Inside each step, the function grabs a pointer to the beginning of the row as individual pixels.
- We step through each 32 bits in a row. These are our pixels.
- We set
Blue,GreenandRedpixelsBlueandGreenreceive the values ofXandY, respectively, with whatever value the offset is. The offset is what creates our animation.- Red we set to
0. - Since they are all byte-long, they will overflow at 255 and return to
0. This is what creates those 256×256 block pattern that you see in our gradient: it's those 8 bits wrapping and overflowing every time.
- We set our
Pixelin a very concise manner.*Pixel++ = Red << 16 | Green << 8 | Blue;*Pixeldereferences thePixel(writes to whatever valuePixelis pointing to)++is the post-increment operator. It says: "After this statement, this value should be incremented by 1. This results in the pointer moving by its size, i.e. 4 bytes (i.e.1 * sizeof(u32)).- As the value, we pack
Red,GreenandBluecomponents into a single 32-bit value. Since in memory the layoutxx RR GG BBlooks likeBB GG RR xx, we need to shiftRedby 2 bytes andGreenby 1. There is no need to move theBlue. The shifting is done by the<<operator, and it shifts by bits.
- We pass it the pointer to our
- We then use helper function
Win32GetWindowDimensionto get the width and height of our window (or client area, to be precise).- We ask Windows to get us the
ClientRectwhich is the writable region of a window in window's space. This means thatLeftandTopwill always be0. - We make
GetClientRectto get just that. RightandBottomshould always return width and height, but we're being extra diligent and making the calculations to get the width and the height.
- We ask Windows to get us the
- After we're out, we go straight in
Win32DisplayBufferInWindowand ask Windows to display our buffer in our client area, by callingStretchDIBits.StretchDIBitsalso stretches the buffer (increasing or decreasing its size as relevant) so that it fits in client area.- We pass it the various parameters including the bitmap info that we filled out earlier, the memory, and a few flags so that the function knows what we want to do with all this.
- We increment our gradient offset(s).
This is the end of our main loop! This program will run forever until we cancel it. Occasionally it will also hop into our Win32MainWindowCallback to check if there's a message that we want to process.
- By now we only really process the
WM_CLOSEandWM_DESTROYmessages which setGlobalRunningtofalse. - We also have our
WM_PAINTmessage. It still displays our buffer in window but remember: by now we're forcing the program to display the buffer each time aGlobalRunningloop runs. We're like a chihuahua on speed trying to blit as fast as possible. But if we, for example, try to resize the window, our update loop stops but we still repaint the window. This is what happens inside theWM_PAINT: we continuosly blit our buffer into newly-sized window.- You will notice
BeginPaintandEndPaintcalls. These happen only insideWM_PAINTmessage. You need to callBeginPaintandEndPaint. If you don't, Windows will flood your message queue withWM_PAINTmessages.
- You will notice
- Any time we get a message that we don't handle, we fall into our
defaultcase and let Windows to do whatever it thinks the way of treating that message.
And... this is the end of our program (as of today)!
You cannot recompile while the program is running! If you try to recompile, you'll get the following message:
LINK : fatal error LNK1168: cannot open win32_handmade.exe for writingIf you get this message, simply stop debugging and try again. This is a downside of Windows. UNIX-based systems uses a different system which allows the program to be recompiled on the fly.
Recap
A long road lies ahead of us, but where we got so far gives us already a lot of freedom. This is where the joy of programming is coming from: by simply diving into the code and tinkering with various values to see where they bring you.
As this program becomes more and more complicated, we will not be offering many guided walkthroughs of the whole program. But it's a good habit to get into, of doing similar walkthroughs after you implement a new code path: go into the debugger, step into each thing, inspect it through Watch window and try to understand if it does what you think it does, commenting in the confusing places, and correcting things that aren't clear.
Exercises
Learn More About Refactoring
“Refactoring” is a relatively new term, but it's definitely not a new concept. Learn more about how it works and see if you can refactor something else in your program!
For instance, since we aren't using BytesPerPixel anywhere but in Win32ResizeDIBSection, you can also remove this variable from the win32_offscreen_buffer.
Rewrite your Program
We've said it at the beginning of this chapter: it's not a lot of code in this program!
To prove it, and to make sure you understood everything so far, rename your win32_handmade.cpp file and create a new win32_handmade.cpp. Rewrite your program from scratch. If necessary, peek at this book and, if in dire need, at your renamed file's code.
If you want an extra challenge, you can also redo the whole project setup from scratch.
Programming Basics
Pointer Aliasing
There're many things that are called aliasing. You might be familiar with the aliasing (or even better yet, anti-aliasing) in computer graphics, here though we're talking about something specific to C and C++ languages.
Pointer aliasing happens when two pointers COULD point to the same memory. The compiler doesn't know if a write to one of those pointers might affect a read from the other pointer, so really it doesn't know whether or not to optimize that read.
To give you an example, Let's imagine you have two pointers: a *A and a *B which are pointing to somewhere in memory. These addresses might or might not be the same.
int *A = somewhere_in_memory;
int *B = somewhere_in_memory;
Let's say that we want to write something to *A. Similarly, you want to read something from B:
int X = *B;
*A = 5;
int Y = *B;Now, if you take a look at this code it looks pretty obvious what's going on:
- We take whatever value
*Bwas pointing to and give it toX. - We assign
5as the new value to whichever address*Awas pointing to. - We then read the value of
*Bagain and give it toY.
So at the end of this, we're looking at it, and saying: “Obviously, X and Y are the same! So of course the compiler should load it once. Compiler should just convert to int Y = X and assign whichever value X was holding.”
Well... unfortunately the compiler cannot do that because we have not given enough information to the compiler to know that *A doesn't point to the same location as *B. So it could be that that assignment to *A overwrote whichever value *B held, and in reality Y == 5 (while X == whatever_value_there_was_before_5). There might as well be an A = B somewhere in between the *A and *B initialization and our code snippet.
That said, there optimization modes you can put the compilers in that make it assume specific things about aliasing. Using them is generally not a good idea: it's bugs waiting to happen. Nowadays, compilers assume more and more things about aliasing that might not be true or intended by the programmer. Generally assuming that there is no aliasing is not bad, rather there should be a way for the programmer to mark the pointers that don't result in the aliasing. This way is partially provided by the restrict and assume keywords.
For more information about how a modern compiler approaches optimization, watch this talk by Chandler Carruth.
(back to Section 2)
Access Violations
Let's say you failed to initalize the memory properly. For instance, we can modify our program in the following way:
internal void
Win32ResizeDIBSection(win32_offscreen_buffer *Buffer, int Width, int Height)
{
    //...
    Buffer->Width = Width;
    Buffer->Height = Height;    // Buffer->BytesPerPixel = 4;}
4coder by pressing Alt-Up or Alt-Down.If we build and run our program now, our debugger suddenly halts the execution with the following message:
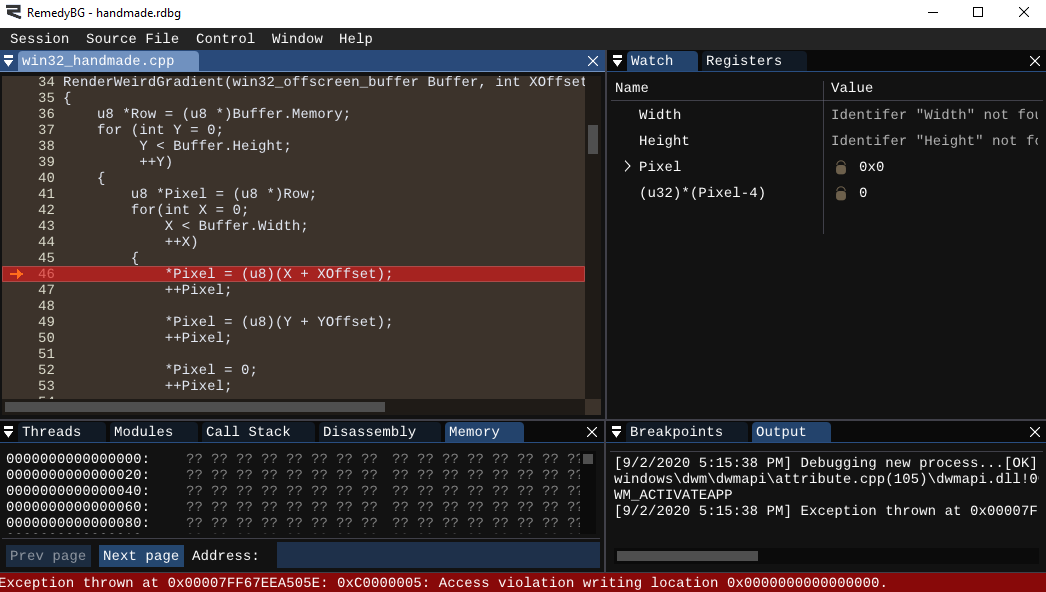
What happened?
When we talked about virtual address space, you'll remember that by default we get no memory pages reserved or committed. So if we try to write to a pointer which point to an invalid page/address, the CPU will raise an exception and halt the program's execution. The operating system will be then notified and let the program know that it's touching invalid memory.
Note that it could well be that the program is touching the memory it's allowed to. For instance, an allocated memory chunk could need to have its memory reserved somewhere else. But it's not that happened in this case: we tried to an invalid pointer and got what's known an access violation or segmentation fault. Now, if you notice, this pointer is awfully suspicious: it's all zeroes. And what this means is that we tried to write to a pointer that we never initialized.
We know what happened in this case, but let's see how we arrived to it. If we inspect our Pixel pointer, we'll see that it's invalid, and that probably means that the Buffer.Memory pointer is invalid (0). Halt the program's execution (Ctrl-F5), put a breakpoint at the start of the Win32ResizeDIBSection and run again.
ResizeDIBSectiongets a pointer to theGlobalBackbufferwhich, at the start of the program should be completely initialized.- We initialize the various values.
- We try to calculate our memory size and... we get
0.
Bug found! BytesPerPixel is not initialized, so what happens during the memory size calculation is the multiplication for 0. You don't need any memory for something that requires 0 bytes to store.
This was a very simple mistake. It can happen when quickly typing and often intercepted as quickly. Unfortunately often the effects of such mistakes are not as clearly visible, and this is where assertions would save the day.
We will return to assertions later down the line but for now keep in mind that there're errors which you want to safeguard against at all times. The ones might be insidious and hard to find, they do not manifest themselves that often. The errors that appear every time you run our problem will always be there, but they're not as important to guard against. We'll always be able to fix those. What you need to worry about are the errors which might not appear until after you ship.
internal void
Win32ResizeDIBSection(win32_offscreen_buffer *Buffer, int Width, int Height)
{
    //...
    Buffer->Width = Width;
Buffer->Height = Height; Buffer->BytesPerPixel = 4;}(Continue to Section 5)
Side Considerations
Variable Initialization
You might wonder: what is the performance difference between defining a variable within the loop vs. outside the loop? For example, see two code snippets below:
while (Running)
{    MSG Message;    PeekMessageA(&Message, ...)
    {
        // ...
    }
}
versus
MSG Message;while (Running)
{
    PeekMessageA(&Message, ...)
    {
        // ...
    }
}
Is there a difference? What difference does it make for the code that gets generated?
The difference is... nothing. Nowadays most compilers are pretty smart about how they lay out things on the stack. And where you declare your local variables is largely your convenience.
There's one practical difference: when you put something inside a while loop, the variable's scope is only bound within that loop. If you put the variable outside, other code that you wouldn't intend to might interact with that variable. In our case, Message is only serving for our message loop so it's bound inside it.
So this lexical scoping allows to prevent referrals to things that shouldn't be referred. While it seems like an odd thing to protect against, it's useful because often code gets moved around, cut and pasted in different ways inside a function, and you may accidentally leave something that moves to some place it shouldn't... and you've got a bug. Putting a variable inside helps compiler to catch a few mistakes for you. It's not really a big deal. Old-school C programmers put all their declarations on top (because you used to not be able to declare them inside the code)... but it's something to consider.
There's another thing to watch out for if you go overboard with some C++ features: class and struct constructors and destructors. Constructors and destructors get called when a class or a struct come into existance and go out of existance, respectively. They are function calls triggered on those boundaries.
So if, for example, your MSG structure had a constructor or a destructor, the compiler has to call them each time a this variable goes in and out of the scope (created and eliminated). At that point there would be a potential performance hit: putting it inside the while loop means that MSG constructor and destructor are called at each while cycle. That is compiler's responsibility, and it does not have flexibility to do anything else unless it can determine that it can safely defer that destruction in some way.
(Continue to Section 5)
Passing Parameters to the Functions
You may ask: why would you not pass the structure itself? The reason is that you don't want to go overboard with your type wrapping.
We created win32_window_dimension in first place for the sole reason that you cannot return two values from a C function. So when we want to return more than one value, you bundle those together. There're languages that support return of two integers, and if you're using a language using one of those, this is exactly what you should do.
However, if we pass this structure as is to our Win32ResizeDIBSection and Win32DisplayBufferInWindow we will force everyone who will ever call these functions to bundle that width and height together, even if you had that width and height from something else. That is not what we want to do.
When making a function you want to make it available as much as possible, in the most number of circumstances. This is what gives us leverage and allows us to reuse the code more often. The only time when you really want to bundle things together is when these types interdepend on each other. Take win32_offscreen_buffer: the pitch, width, height, bytes per pixel... all these value influence how the final memory would look. They go together and they cannot be used separately. But win32_window_dimension is some arbitrary dimension. You could have gotten it from anywhere, not necessarily from Win32GetWindowDimension call.
(Back to Subsection 5.2)
About Conventions
You will note that that many of the things you've encountered so are prefaced with “this is our convention”, “this is how we would do”. This is because, in programming, there's no right or wrong, even if someone tries to tell you otherwise. There're clearly inefficient practices that can make your program super slow and your life super hard, but it doesn't mean that those aren't valid if, at the end of the day, your code does what you set it up to do.
We could keep in mind what we said before and pass by value if we don't need to edit the structure. However, here we're falling into the realm of the premature optimization, and we won't really do it. This sort of optimizations should be profiled only at the very latest stages of development, so we'll just stick to our conventions and pass by pointer if the struct size is of any consideration (like win32_offscreen_buffer actually shapes out to be).
As everything in this program, the names are really up to you! This is your world, and you are the master of your code.
However a word is in place: while we don't teach “good ways” of programming, when in Rome, do as Romans do! Whenever you're working on a collective project, be sure to take your time to get used to the programming conventions and style guides your team is using, even if it's not necessarily how you'd do the things!
About const Keyword
In this course, we won't be using const keyword. const is a language-specific keyword (i.e. it doesn't have any impact on the code generated) which prevents the programmer from modifying a value that normally would be read-only. As we said above, it's strictly about our own habit.
int const BytesPerPixel = 4;

BytesPerPixel = 8; // error C3892: 'BytesPerPixel: you cannot assign to a variable that is const
As everything in this course, not using const is our own convention. If you find yourself doing many const-related mistakes in your code, feel free to use it!
Navigation
Previous: Day 4. Animating the Back buffer
Up Next: Day 6. Gamepad and Keyboard Input
- Access Violation/Segmentation Fault
- Inlining a function
- Pointer Aliasing
- Stack
Understanding Compiler Optimization by Chandler Carruth